Fall Front Porch Decor Guide

Ok, we made it to September, which means Fall decor is in full swing!

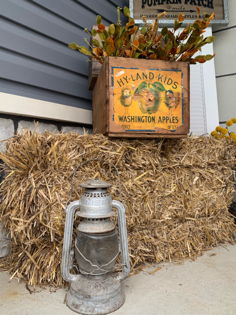
I have the pumpkin bread in the oven, harvest candles burning, and a huge bale of straw on the front porch. It’s just not officially Fall until a bale of straw is on the front porch!

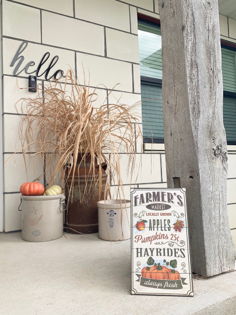
Our porch is west-facing, and has quite a bit of afternoon sun & heat throughout September. For this reason, I have initially decorated with only faux items as any live flowers or pumpkins would be scorched by the elements. I imagine around the beginning of October I will be able to add some Fall mums and pumpkins to the mix. For now, I will share what I have done so far so you can hopefully find some inspiration for your own porch!

As I mentioned above, a bale of straw is a must! I picked up one at a local farm and fleet store for $5. If you wanted a super simple front porch setup, and didn’t have time to round up other decor, a simple stack of three bales of straw would work perfectly!

10e92e66358603552256d087b322b80f.jpeg

Here I have my bale of straw sitting on end, matched up with some other items I shopped from my garage!

Next up, I grabbed some trimmed dead grasses and stuck them in a rusted metal milk jug that usually resides on my porch year round. I also had a few faux pumpkins and put them in a crock along with a fold out sign. The vertical barn beam is the front pillar to our house (neat, right?!).

895b8c9b5448ed2aa1f9ff0bf04a42d8.jpeg

If you have been following along for a bit, you might remember the thrift-ed set of white shutter-style closet doors that I picked up this spring, and how I used them on the porch to hang buckets of succulents. Well, that set of closet doors remains in place, only this time with a few Fall items….as pictured below!

37dd5432f190a903cc32fbd12a4ec9b7.jpeg

We are still in the process of getting a black door, but for now I have to work with what I have! I found the door hanger in the holiday section of a local craft store, and I am extra excited about the fact that it doesn’t make any noise when it blows in the wind!

My last important piece of porch decor is this metal sunflower, which is one of my all time favorite outdoor items. Around November I will have to retire this guy until next Summer, but for now he stay’s put!

847e348cdc44357c989d5930e0ce0393.jpeg

Well friends, that’s all I have going on for the front porch this time around! As I mentioned above, I will be adding some live flowers and pumpkins as the days get cooler, and I will be sure to post an update. Until then, happy decorating for Fall and thank you for stopping by the blog today!

-Rachael

The Final Summer Porch Refresh!

If you have been following along you might be aware that sweet corn season officially started this week here in Iowa, and I might be just a teeny bit excited about that! In fact, I had to incorporate the first delivery of corn into my final Summer porch refresh of the year. That’s correct, the next time I redo this space it will be with pumpkins!

But for now, I had to take down the 4th of July decor and I wanted to incorporate a few farming pieces to set up for the future harvest season. As a collector of all things random and old, I happened to have everything I needed stored in the garage (which has kind of unintentionally become my decor locker, just don’t tell Adam). This John Deere seed planter from an old tractor is a great example…

74906d4031a1b99e1e184eb495f70cb0.jpeg

The fresh ears of corn in this photo are from our local CSA/farm share program that is delivered weekly throughout the spring and summer. For more information about farm shares, you can see my full post here.

Here are a couple more photos of this newly refreshed space!

3a82275f7f885595fa0b0334e6447638.jpeg

For the other side of the door I snagged some of the decorative grass from my front landscaping that is currently out of control, and stuffed it into an old rusty milk can that i picked up at a garage sale a couple years back. The black metal ‘hello’ sign will stay for now, but I might take it down for the winter months, as it gets pretty cold here and I don’t want it damaged or warped in any way.

8c410791a4ce8682d44f2dfbf638e95a.jpeg

Here’s a front shot of the whole front porch, which is one of my more favorite area’s to decorate at my home. Now, if only I can light a fire under Adam and have him replace the construction door that’s been there for 4 years next month! It’s the little things….

8f61029b17d664610d873b31d0628ba2.jpeg

That’s all I have for you today, thank you for stopping by the blog and I hope I have been able to inspire you on your own decorating adventure! As always, feel free to share your projects and questions either here or over on Instagram.

Happy Summer!

Rachael

DIY - Bug Repellent Mason Jar Lanterns

Hi friends! Today I have a really easy DIY for the outdoors! Gnats and mosquitoes can really put a damper on outside activities, and bug spray works great for an individual person but I wanted to find a solution for a larger area such as driveway/garage.

I did a bit of research and trial and error, and the results are these cute little mason jar lanterns. They are super easy to make, and extremely budget friendly. I have tested them out myself and can personally say they do actually work, and last quite a long time.

Step by step instructions are below, or feel free to click on any picture to pin this post for later!

First, gather your materials!

39d5c6caec345345caf76207bd316d60.jpeg

You will need:

-A mason jar of any size, complete with lid

-Rope wick

-Liquid bug repellent

I grabbed a few different jars that I had laying around, and then went to Target for the rest of the materials. They are currently having a decent sale on their patio/outdoor items so I was able to pick up the rope wick (came in a package of two) and the liquid bug repellent for under $10 total. I chose the ‘clean burn’ version of the liquid repellent, which has less smoke/flame but maintains the same effectiveness of the standard version. You could use any bug repellent/torch fuel that is designed to be burned in this manner.

Next, its time for assembly!

I had Adam use a drill bit to puncture a hole in the mason jar lid, and fed the rope wick through the opening. You could probably use a hole punch too, but I just didn’t have one on hand. Then I filled the jar about 1/4 of the way and trimmed the wick so it was just a couple inches tall. It took a few minutes for the wick to soak up enough of the liquid to ignite, but once it did I snapped this picture…

09614116a003b8b8a9975b5c181ee841.jpeg

I really like that there is no smoke/soot coming from this ‘clean burning’ torch fuel, as that was one of my biggest hesitations to ever investing in the traditional ‘tiki torches’.

Last step…Enjoy!

I made a few different lanterns with a few different sizes and colors of mason jars, and set them out on the front porch when we were out there the other night. Not only did they look cute, but they served a great purpose too!

774b681c09ec47a67ba71e2907d36c80.jpeg

Quick safety note, these jars do get warm after being lit for a long period of time, so be sure to let them cool before handling them. Also, I like to put them in a metal tray or on concrete (or anything non-flammable) just in case they were to be tipped over.

That’s all I have for you today! I hope you are enjoying those long summer evenings and if you are having a biting insect problem like we were, you might give these lanterns a whirl! As always, thanks for stopping by the blog today!

Signoff.jpg