

Simple Spring Dining Room
It’s beginning to warm up here, and that means it’s time to bust out the spring decor! I am trying to follow a more simple style this year (less to dust!) and I am really enjoying it.
Speaking of things I am really enjoying, I found a small tray with little glass bottles on Target’s website lately, for a very affordable price (around $23) and I see it is still available online. I decided to add it to my dining room table, here is how I styled it….
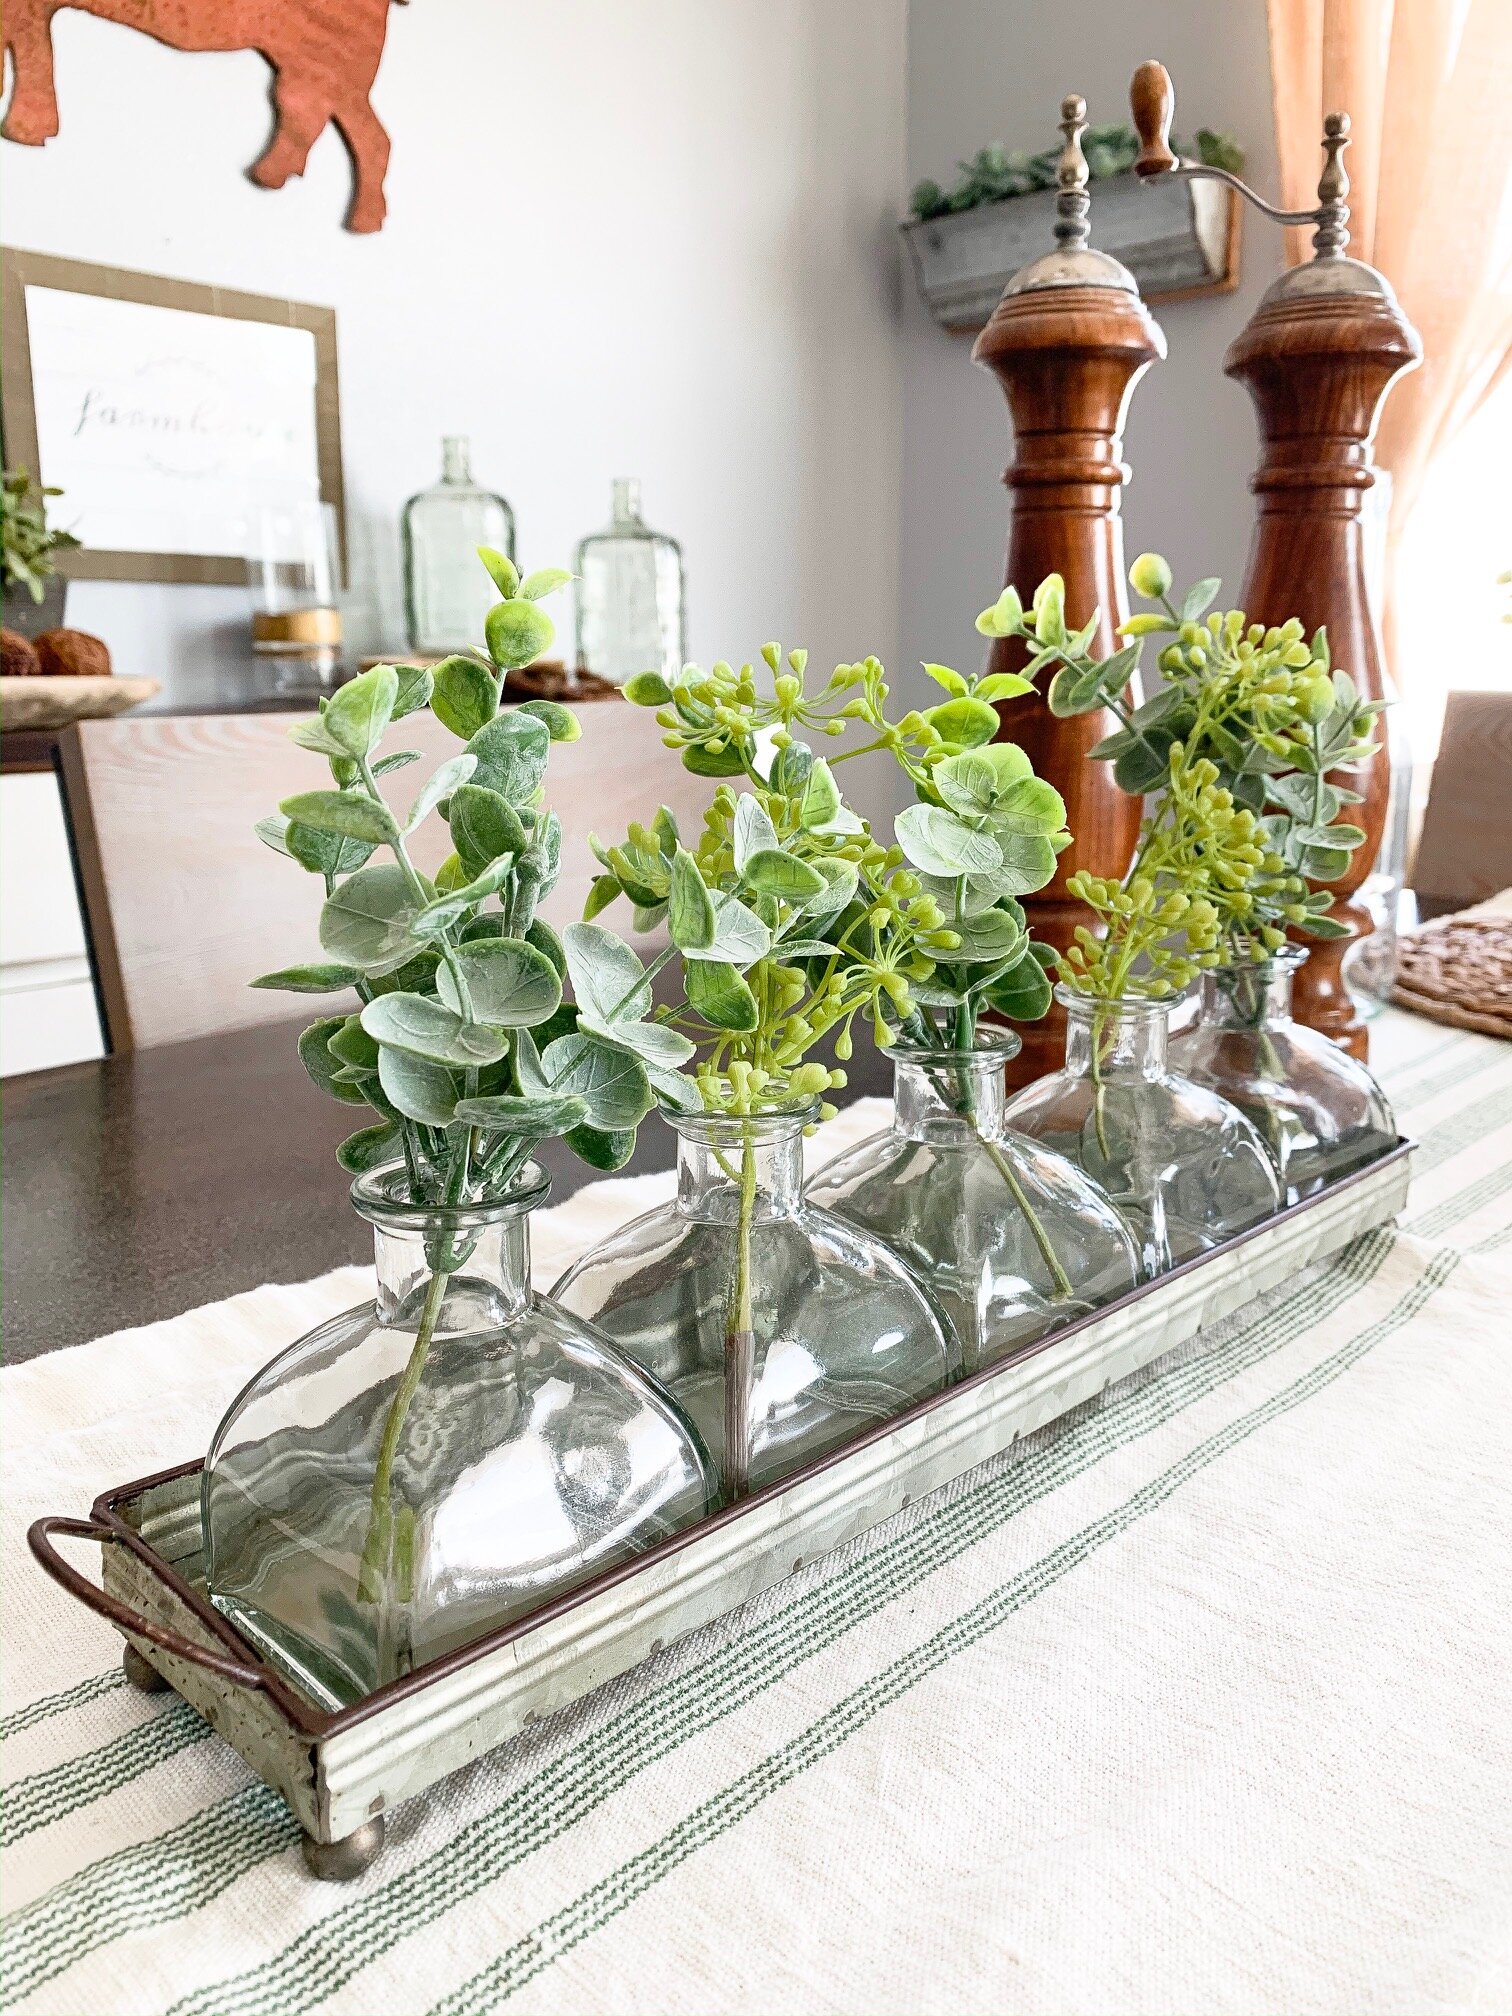
As for the greenery that I used, I have a bin of random floral that I have collected over the years and I just cut some of that up and put it into the glass bottles. I tend to like the looks of faux greenery that isn’t ‘shiny’ or plastic looking, and of course that is always the type that costs the most, so buying off season/clearance and keeping them in a tub is a way to offset the price.
Another really good deal that I found at Target in their spring floral area, are their small faux eucalyptus plants. They are surprisingly ‘dense’ and nice looking for the amazing low price of $5. My target still has them available, and I will be snatching up a few more and putting them all over my house!
Here is a photo of how I used these plants on my table (they come in a nice white planter, and I just set them inside a larger white pot that I already had).

Now for a shot of the whole table, so you can see it all together…

And there you have it, my simple and festive dining room! I hope this post brought you some inspiration for your own home, and as always thank you for stopping by the blog today! We really appreciate it! We will chat again soon!
Cheers!
-Rachael
Sawhorse Table Refresh
Well hello friends!
It’s been a little while since I posted a decor refresh, and there’s no time like the present! February is when I normally dig out some of the faux greenery, mostly just to remind myself that spring is almost here. The temperatures have been steady in the 30’s lately, which might not sound warm depending on where you are located but trust me it’s pretty darn good for winter in Iowa!
The table I am sharing today is in my entryway, it’s a sawhorse table that my husband Adam built several years ago. Here’s a few photos of what I did with it recently.

These magnolia stems were considered holiday decor at Target, so I snagged them at the end of December for 70% off (y’all know I love a bargain!).

Recently, a friend generously gave me this stack of old books and I stacked them in an old birdcage with some wooden beads. Simple! I also wanted to mention that little green plant in the background, they are currently at target for $5! They are quite nice quality for the price!
Here are a couple photos of the whole table put together…

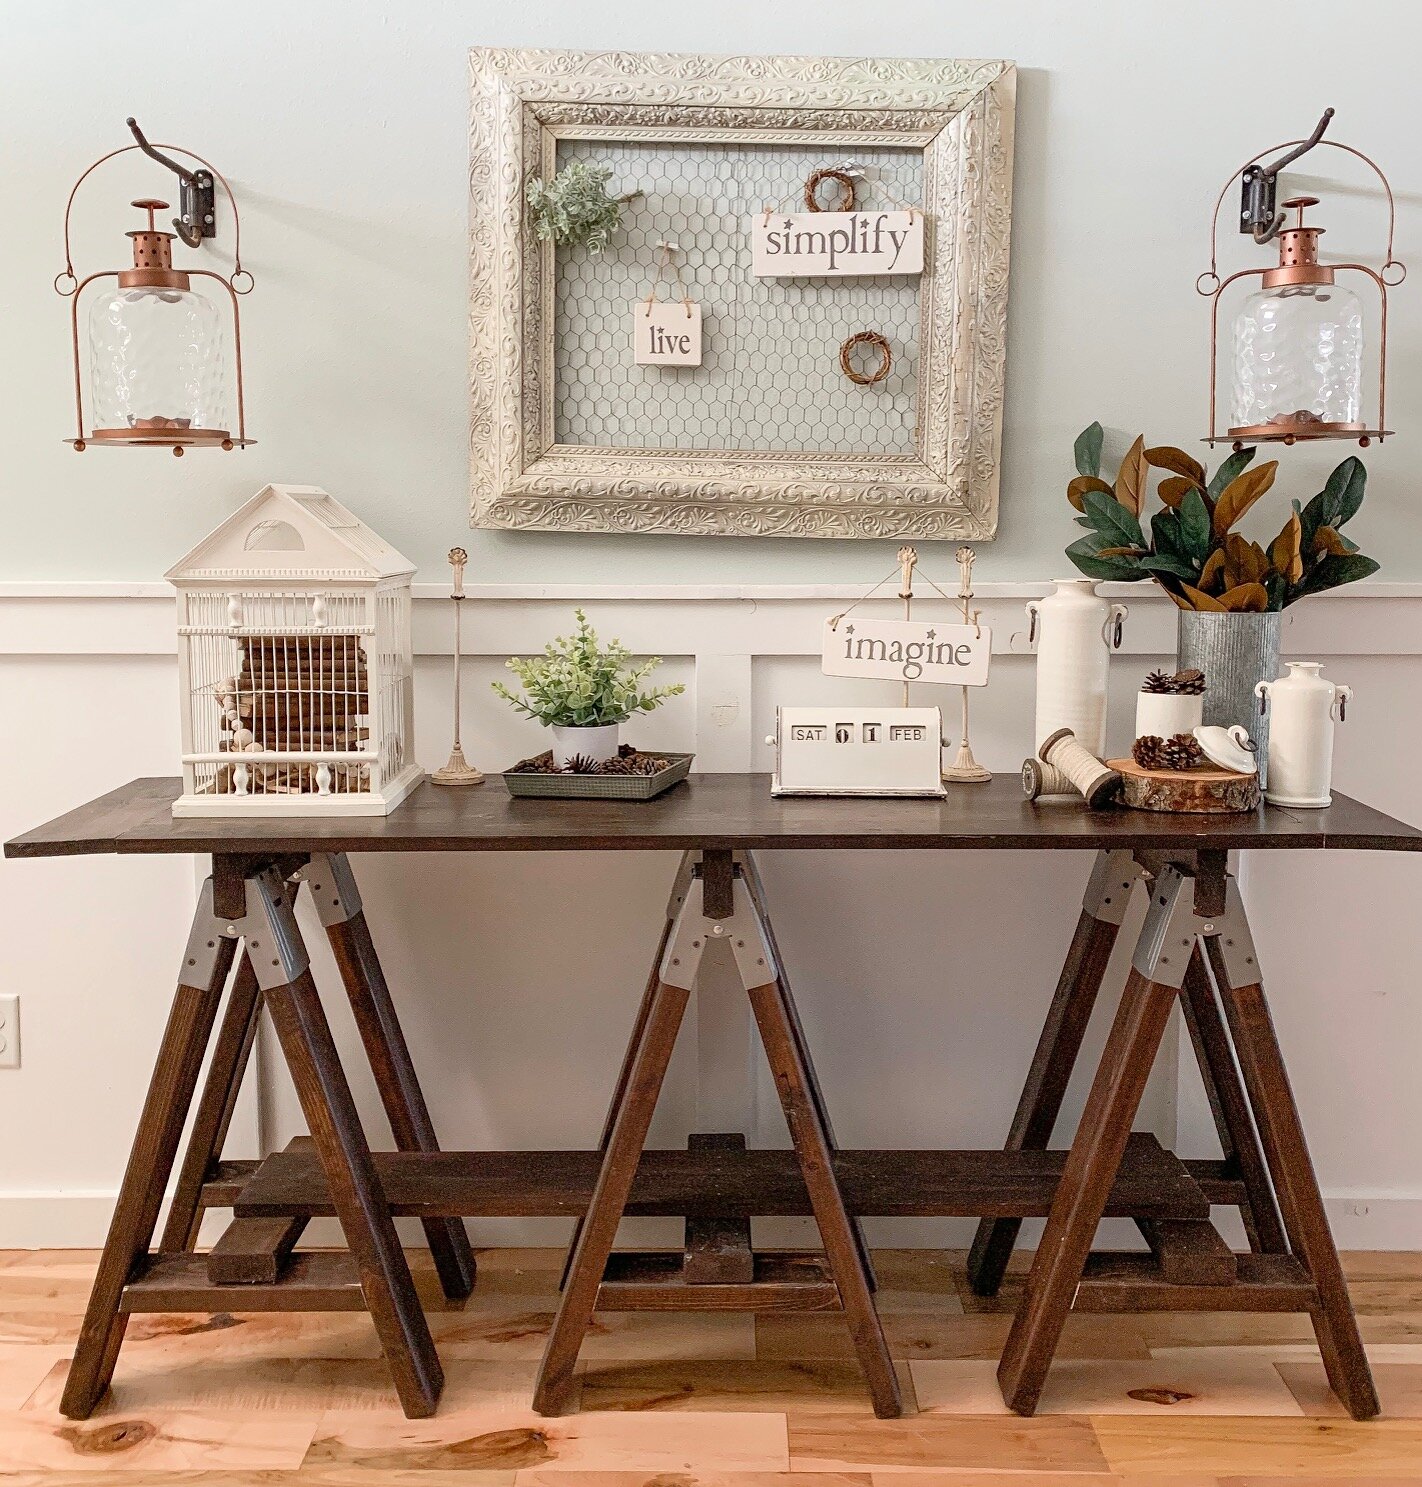
This table came together nicely, minus the crooked frame on the wall but hey, we can’t have it all together ALL the time :)
That’s all I have for you today, thank you for stopping by the blog today and be sure to check back soon for my dining room refresh that I have in the works!
Stay warm out there!
-Rachael
Repurposing : The #1 Budget Friendly Decorating Hack
I often get asked about decorating in general, and the cost associated with it. It’s no secret I am an epic bargain hunter, and I think that’s why repurposing old items is my favorite budget friendly decorating hack. The possibilities are only limited by your search terms on Pinterest!
Don’t like an old cabinet or buffet taking up space in your garage? Add some new paint and hardware and turn it into a decor display cabinet or changing table in a nursery. Looking for inexpensive ‘new to you’ furniture? Check out your local thrift store or salvage yard, and then spruce it up a bit.
Today I have a few examples of repurposed items currently on display in my home, and I will share the cost of the items and the updates that I did to them. Feel free to pin any images for later reference!
First up, my medicine cabinet turned decor cabinet! I found this beauty at a local thrift store, and I believe the price was only $10 (it was even on sale!). I completely updated it for only $5, and it now sits as a permanent fixture on my entryway wall, and I simply change out the decor for different seasons. For details on how I updated the cabinet, click here.
Total cost: $15

Medicine Cabinet, original condition


Next, I have an old shutter style hinge door on my front porch that I simply use hooks to hang different decor on depending on the season. This item was FREE, on a local facebook marketplace group. All I did was clean it up and bit and do a small amount of sanding. Here are a couple examples of how I have used it so far, and the photo on the left is how it looks currently.
Total cost: $0

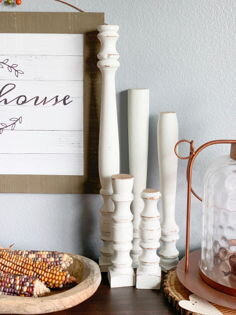
I’m not afraid to get a little dirty and bust out the chalk paint when necessary, and this comes in handy when an item needs a fresh look. A perfect example is a set of 3 spindles I picked up at a salvage store, and I was determined to make them look like candlesticks. I had Adam cut them at different heights, for a total of 5 candlesticks made from the 3 spindles. At $2 a piece, my cost was $6 total. A little chalk paint and sanding later, I have 5 pretty versatile pieces of decor and you will see them in my home during every season. For the full tutorial, click here.
Total cost: $6

Lastly, I have a deep love for decorating with old farm items. These might look like junk to the untrained eye, but the history in each piece is what calls my heart to them. For example, this chicken feeder from a local flea market sits on my dining room table almost year round, filled with various seasonal decor. I sometimes find myself wondering how many chickens ate from this trough over the years and what other stories this item holds, not to mention it makes a great centerpiece because it doesn’t obstruct views of people sitting at the table!
Total Cost $10

I hope today I could show you that having a vast assortment of decor and/or decorating your home for each season doesn’t have to be expensive. In fact, I get such enjoyment searching for that bargain and then bringing new life to old items. How do you decorate with repurposed items in your home? I would love to hear all about it!
I hope October is treating you well, wherever you are!

Laundry Room Makeover
I am always looking for inexpensive ways to update and/or decorate our home, and my laundry room was recently at the top of my list of spaces that needed serious help. I had seen several designers recently posting about using wallpaper to update a space, and my first reaction was not a positive one. I mean, wallpaper?!? Who has time for that??
Well as it turns out, I had time for it, and so do you! Wallpaper has come SUCH a long way from the days where I remembered my grandparents mixing paste and matching patterns, only to have it dry and shrink just enough that it no longer lined up perfectly. I was curious how this “new” version worked, so I ordered a roll from Target’s website, which has dozens of options.
Today’s version of wallpaper has no mess, simply peel and stick. Make a mistake and need to remove it? Just peel it off the wall, no damage to the paint/wall, and you can re-use the piece! This feature in particular makes a wallpaper project budget friendly, I did this entire laundry room makeover with only one roll, which was $30. Don’t worry about matching patterns either, the print I chose has a tiny pattern line on it so you can easily tell where the next piece should line up.
So I went for it and ordered the wallpaper….
Before I show you how it turned out, let’s take a look at some ‘before’ photos!


This laundry room functioned just fine how it originally was, but I wanted a space that was more inviting and had a ‘fresh’ look. I first shopped the garage for some shelving materials, then picked up a vintage window for the space above the sink, and finally picked out the wallpaper that would tie it all together Somehow, I roped Adam into helping me.
Neither one of us had ever worked with wallpaper, and thus we had no idea how to install it. I envisioned unrolling it and sticking it to the wall (why make it more difficult than it needs to be, am i right?), however Adam had other ideas.
He approached the situation as thought it were flooring, and found the center of the wall and the center of the wallpaper pattern and started there. As a result, the first piece took about 45 min to place, but the rest of it went much faster.
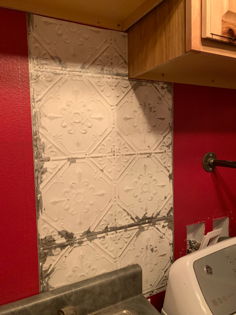
After the wallpaper was applied, we placed a small white trim around the top edges to give it more of a polished look. Then all that was left was to mount the shelf and hang the window, and suddenly the laundry room had been transformed! Here are a couple photos…

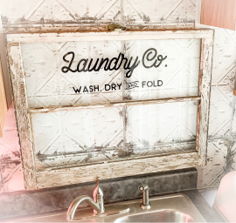

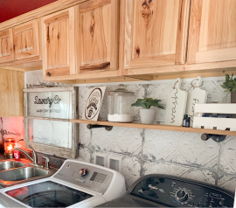

This budget friendly update has made quite a difference, and I am really happy how it turned out. This was a learning experience, but it really was quite easy, so if you are looking to freshen up a space consider using wallpaper!
That’s all I have for today, I am headed back outside to enjoy this second Summer that Iowa has given us this week! I will be back soon with our latest outdoor client project, as soon as I load and edit the photos :)
As always, thank you for stopping by the blog today! We really appreciate it!
-Rachael
Fall Front Porch Decor Guide
Ok, we made it to September, which means Fall decor is in full swing!
I have the pumpkin bread in the oven, harvest candles burning, and a huge bale of straw on the front porch. It’s just not officially Fall until a bale of straw is on the front porch!
Our porch is west-facing, and has quite a bit of afternoon sun & heat throughout September. For this reason, I have initially decorated with only faux items as any live flowers or pumpkins would be scorched by the elements. I imagine around the beginning of October I will be able to add some Fall mums and pumpkins to the mix. For now, I will share what I have done so far so you can hopefully find some inspiration for your own porch!
As I mentioned above, a bale of straw is a must! I picked up one at a local farm and fleet store for $5. If you wanted a super simple front porch setup, and didn’t have time to round up other decor, a simple stack of three bales of straw would work perfectly!
Here I have my bale of straw sitting on end, matched up with some other items I shopped from my garage!
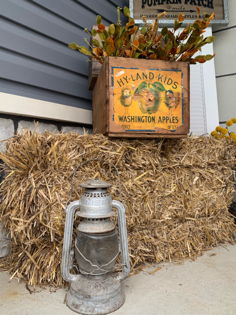
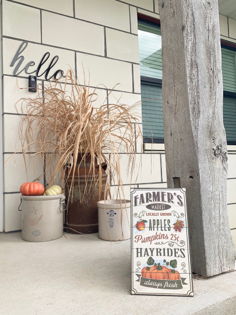
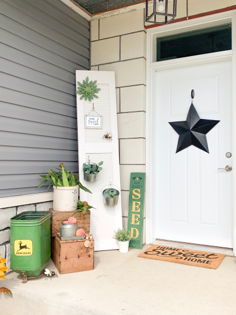
Next up, I grabbed some trimmed dead grasses and stuck them in a rusted metal milk jug that usually resides on my porch year round. I also had a few faux pumpkins and put them in a crock along with a fold out sign. The vertical barn beam is the front pillar to our house (neat, right?!).
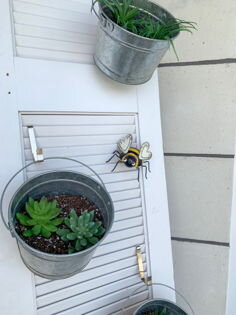
If you have been following along for a bit, you might remember the thrift-ed set of white shutter-style closet doors that I picked up this spring, and how I used them on the porch to hang buckets of succulents. Well, that set of closet doors remains in place, only this time with a few Fall items….as pictured below!

We are still in the process of getting a black door, but for now I have to work with what I have! I found the door hanger in the holiday section of a local craft store, and I am extra excited about the fact that it doesn’t make any noise when it blows in the wind!
My last important piece of porch decor is this metal sunflower, which is one of my all time favorite outdoor items. Around November I will have to retire this guy until next Summer, but for now he stay’s put!

Well friends, that’s all I have going on for the front porch this time around! As I mentioned above, I will be adding some live flowers and pumpkins as the days get cooler, and I will be sure to post an update. Until then, happy decorating for Fall and thank you for stopping by the blog today!
-Rachael
The Final Summer Porch Refresh!
If you have been following along you might be aware that sweet corn season officially started this week here in Iowa, and I might be just a teeny bit excited about that! In fact, I had to incorporate the first delivery of corn into my final Summer porch refresh of the year. That’s correct, the next time I redo this space it will be with pumpkins!
But for now, I had to take down the 4th of July decor and I wanted to incorporate a few farming pieces to set up for the future harvest season. As a collector of all things random and old, I happened to have everything I needed stored in the garage (which has kind of unintentionally become my decor locker, just don’t tell Adam). This John Deere seed planter from an old tractor is a great example…

The fresh ears of corn in this photo are from our local CSA/farm share program that is delivered weekly throughout the spring and summer. For more information about farm shares, you can see my full post here.
Here are a couple more photos of this newly refreshed space!
For the other side of the door I snagged some of the decorative grass from my front landscaping that is currently out of control, and stuffed it into an old rusty milk can that i picked up at a garage sale a couple years back. The black metal ‘hello’ sign will stay for now, but I might take it down for the winter months, as it gets pretty cold here and I don’t want it damaged or warped in any way.
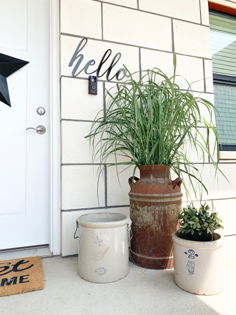
Here’s a front shot of the whole front porch, which is one of my more favorite area’s to decorate at my home. Now, if only I can light a fire under Adam and have him replace the construction door that’s been there for 4 years next month! It’s the little things….

That’s all I have for you today, thank you for stopping by the blog and I hope I have been able to inspire you on your own decorating adventure! As always, feel free to share your projects and questions either here or over on Instagram.
Happy Summer!
Rachael
The Easiest Decor DIY Ever!
Hi there! I’m writing to you from sunny Iowa, and while 40 degrees might not be warm where you are from, it’s certainly a welcomed sight in this region! Today I have a super easy and quick DIY ready for you, perfect for filling in those small spaces in your home.
You will need:
Twine
Clothespins
Scissors
That’s it!
Let’s get to it!

I picked up these clothespins and twine from Lowes