My Budget Friendly Fall Front Porch

Since it’s now October, I thought it was time to take down the Spring décor from the front porch. Somewhere in there I completely skipped over Summer, which is not like me, but hey it’s the year of ‘anything goes’!

I made it to the storage unit and hauled all the Fall bins home, and found quite a few items I had previously forgotten about (my favorite part about decorating for a new season). It’s still randomly hot here in Iowa, so I am holding off on any real pumpkins as my porch faces the west and they just bake in the afternoon sun.

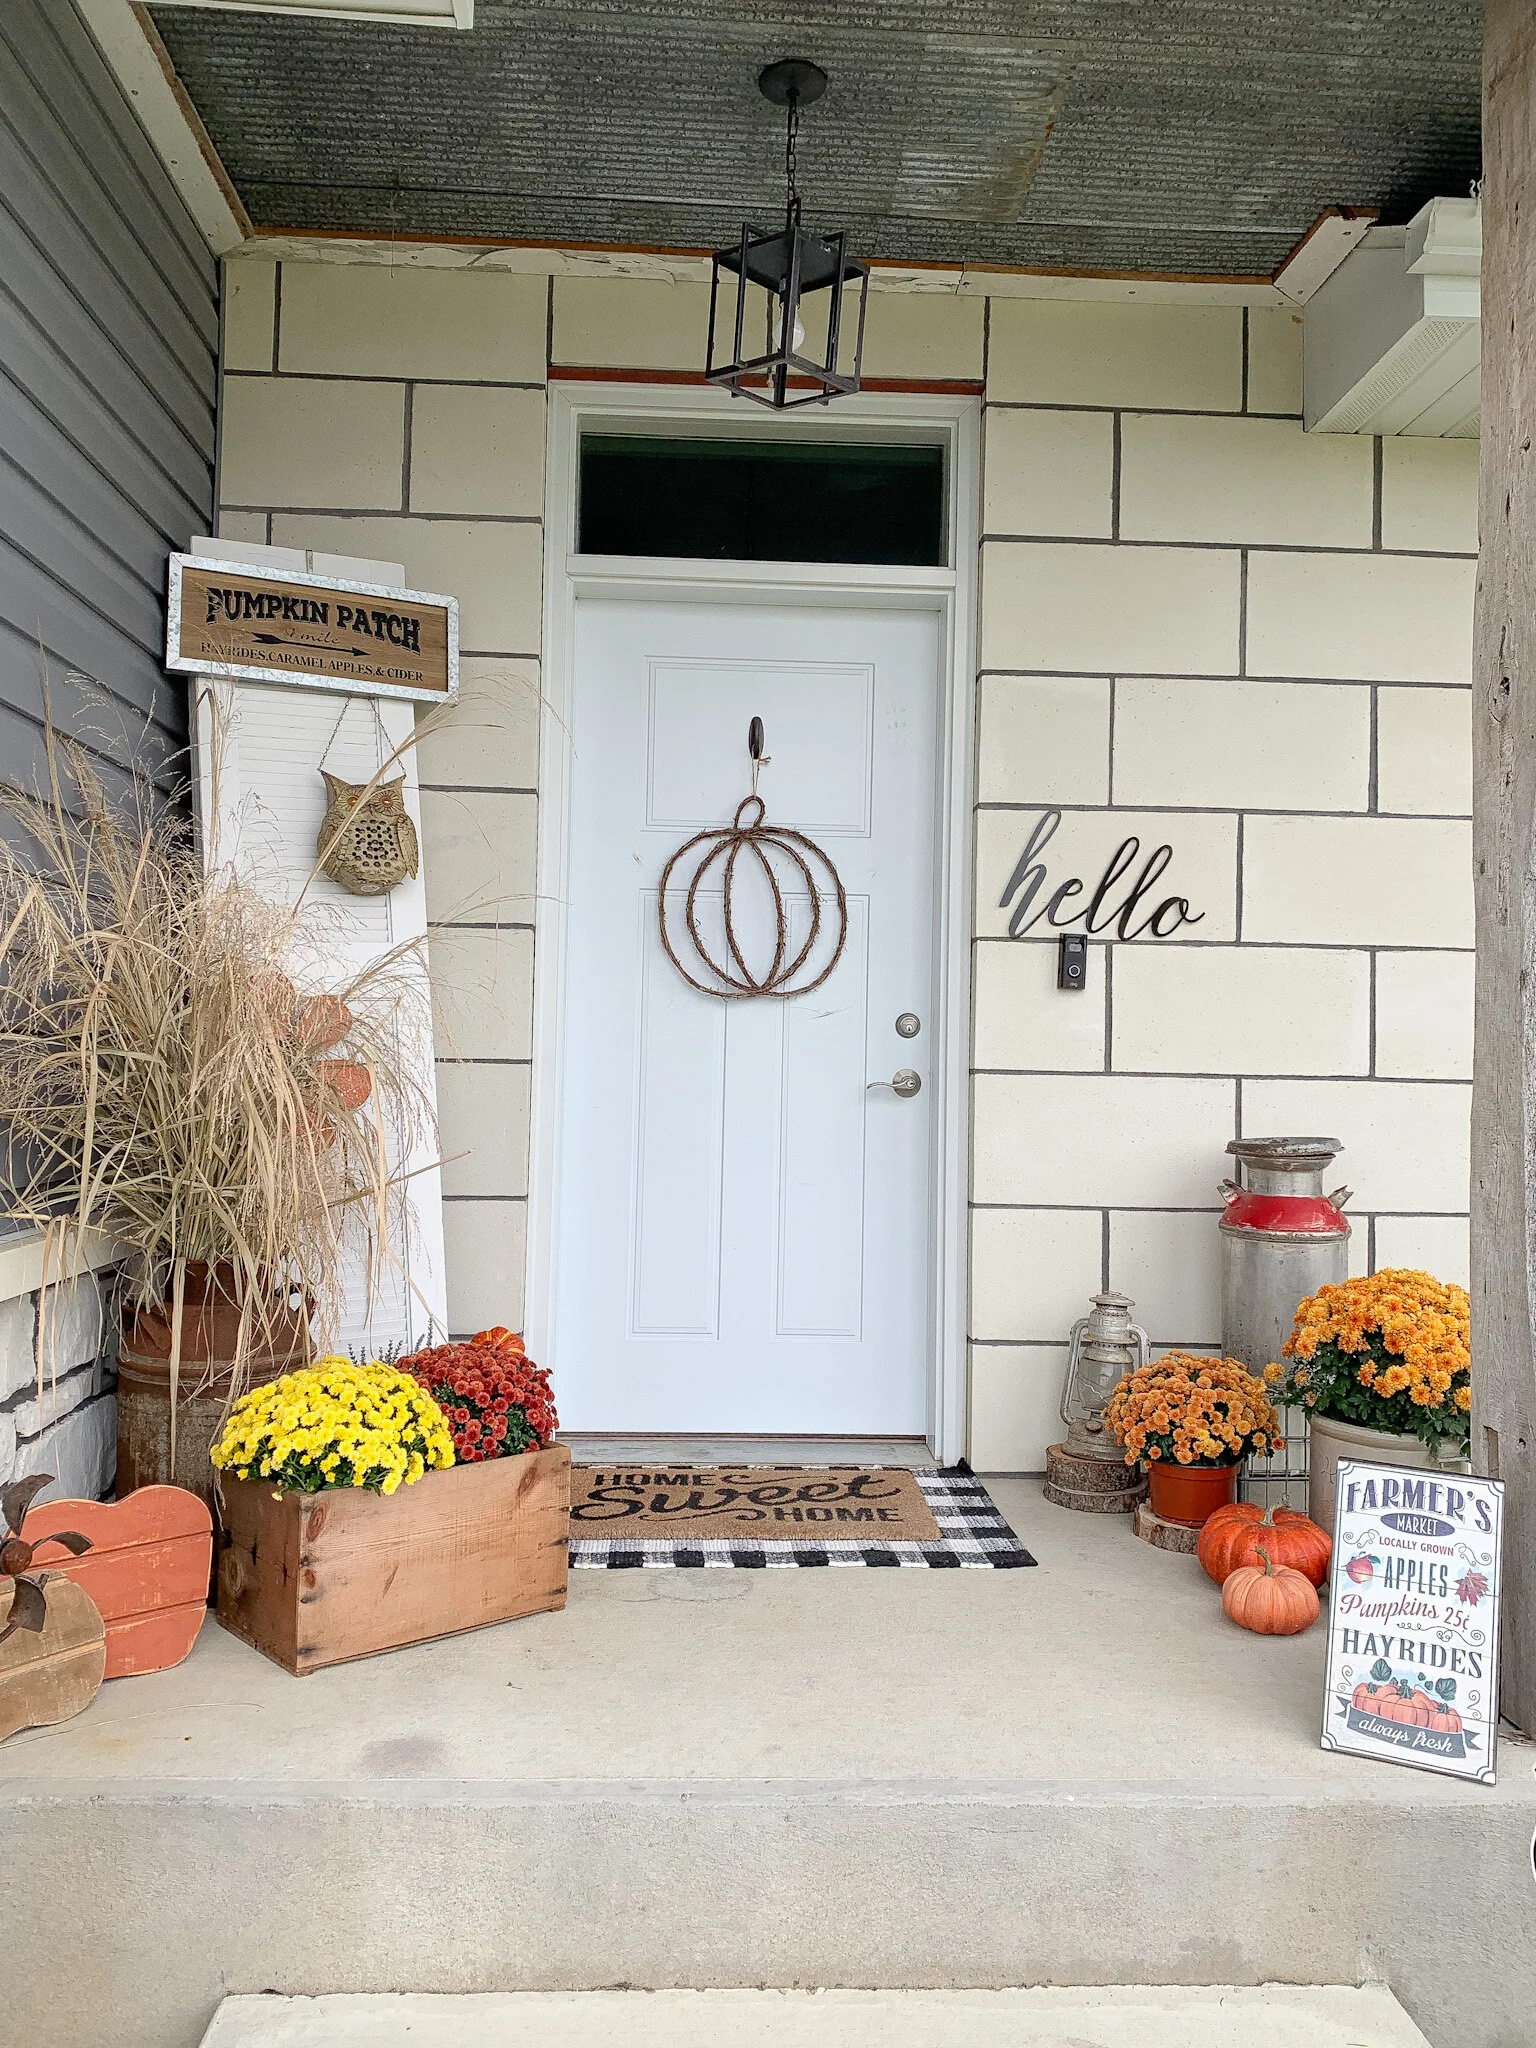
Y’all know I am all about budget friendly decorating, and especially free! I have some decorative grass in the front of my house that we cut down each year about this time, and I saved some of it for my front porch.

IMG_8562.jpg

I have a large milk can that I stuffed full of the cut down grass, and as it dries out it will look really nice and fall-ish (and even better since its free). In fact, the only portion of this porch project that cost any money, are the fresh mums I picked up from the nearby grocery store. They were only $6 each, so I feel pretty confident that I won’t be devastated if they don’t last too long, due to my inability to keep plants alive. Here’s a closeup of these huge (and cheap) mums!

Everything else was from my stash of things I already had, I mean I collect super inexpensive vintage things all year round for these precise moments! Here is how it turned out!

IMG_8924.JPG
IMG_8966.jpg

I hope you enjoyed my budget friendly front porch project! As always, thanks for stopping by the blog, we really appreciate all of the support!

See you soon!

-Rachael

DIY: Budget Friendly Pantry Organizing!

Hi friends! I’m writing to you from frigid Iowa, where it’s a whopping 1 degree today, but hey we are over halfway through January so this won’t last a whole lot longer! I haven’t posted a DIY for a while, so I wanted to share with you what I recently did with my pantry.

I normally take everything out of my pantry once or twice a year just to make sure nothing is expired or forgotten about, and as I was getting ready to do that again recently I did a few searches on Pinterest and Instagram for inspiration on how to make the space a bit more visually appealing.

There were hundreds of gorgeous photos to choose from, but as I started researching the actual bins and containers for everything it became apparent that this was an EXPENSIVE task. I mean, $14 for a clear plastic tray to put on a shelf?! $25 for a set of 4 glass canisters?! There was just no way I was going to spend that kind of money or organize this space.

Starting Point

Our pantry is a walk-in space, that has a knack for collecting random items due to it’s proximity to the kitchen. The problem with this catch-all space, is that it only has a half door, so all of the random items are on display for every visitor to see. Let me show you what I mean…

From this angle, you can’t see the mess inside!

From this angle, you can’t see the mess inside!

The mess!!!

The mess!!!

Ok, now you know what I was up against! I knew there had to be a more budget friendly way to spruce this up, so I put my thinking cap on.

First up, I needed some glass containers. A lot of them. I didn’t really care if they all matched, and I wasn’t going to buy a dozen from Amazon at $5 a piece, so I went down to my local thrift store for some vintage jars and canisters.

IMG_5203.jpg

Next up, I needed some labels for these jars and Amazon seemed to have quite the selection. I ordered a set of labels that was around $14 for 50+ stickers from a shop on Amazon called ‘The Talented Kitchen’.

I started the tedious process of emptying boxes and containers into the jars (after washing them of course!) and tossing all the expired items. I even found out what a very rotten avocado looks like, yikes! Here are a couple close up photos of the jars with labels…

IMG_5267.JPG
IMG_5268.JPG

These turned out really nice, and I was able to toss all the half packages of items! Bonus feature of the clear glass jars is the ability to see the amount readily available, making that grocery list a breeze!

Last up, I needed some clear bins for random things, and Amazon had some outrageous prices on clear storage containers so I went with what my local Target had instead. I included a couple pictures of the bins below, the larger one was $4 and the smaller one was $1.

IMG_5274.jpg
IMG_5270.JPG

All Finished!

Here are a couple photos of the finished project, I am not entirely certain that I have everything in the exact place that I want it, but it works for now.

IMG_5251.JPG
IMG_5250.JPG
IMG_5253.JPG

I am really excited how this turned out, as it is no longer an eyesore to anyone walking by the area. Also, I was pretty impressed that I accomplished this project for significantly less cost than originally thought. Next up, I need to repeat this process for the spice cabinet as I currently cannot find anything in there!

That is all I have for you today, thanks so much for stopping by the blog and I would love to see some of your own pantry transformations, feel free to tag me on your photos on Instagram (@aps_design) or Facebook (apsdesignblog).

Cheers!!

Rachael

Repurposing : The #1 Budget Friendly Decorating Hack

I often get asked about decorating in general, and the cost associated with it. It’s no secret I am an epic bargain hunter, and I think that’s why repurposing old items is my favorite budget friendly decorating hack. The possibilities are only limited by your search terms on Pinterest!

Don’t like an old cabinet or buffet taking up space in your garage? Add some new paint and hardware and turn it into a decor display cabinet or changing table in a nursery. Looking for inexpensive ‘new to you’ furniture? Check out your local thrift store or salvage yard, and then spruce it up a bit.

Today I have a few examples of repurposed items currently on display in my home, and I will share the cost of the items and the updates that I did to them. Feel free to pin any images for later reference!

First up, my medicine cabinet turned decor cabinet! I found this beauty at a local thrift store, and I believe the price was only $10 (it was even on sale!). I completely updated it for only $5, and it now sits as a permanent fixture on my entryway wall, and I simply change out the decor for different seasons. For details on how I updated the cabinet, click here.

Total cost: $15

Medicine Cabinet, original condition

Medicine Cabinet, original condition

c0edd002344cffd1a190c0d93ee6e9d7.jpeg
61b629c2be992f0a4cde38b896f5be6b.jpeg

Next, I have an old shutter style hinge door on my front porch that I simply use hooks to hang different decor on depending on the season. This item was FREE, on a local facebook marketplace group. All I did was clean it up and bit and do a small amount of sanding. Here are a couple examples of how I have used it so far, and the photo on the left is how it looks currently.

Total cost: $0

41818817d8985fa0c01dc2d005b50001.jpeg
c7d39c325a8db0d22febb31f53a45ad9.jpeg

I’m not afraid to get a little dirty and bust out the chalk paint when necessary, and this comes in handy when an item needs a fresh look. A perfect example is a set of 3 spindles I picked up at a salvage store, and I was determined to make them look like candlesticks. I had Adam cut them at different heights, for a total of 5 candlesticks made from the 3 spindles. At $2 a piece, my cost was $6 total. A little chalk paint and sanding later, I have 5 pretty versatile pieces of decor and you will see them in my home during every season. For the full tutorial, click here.

Total cost: $6

IMG_0556.jpg
72180625e2e09fc44735d0b5648560a7.jpeg

Lastly, I have a deep love for decorating with old farm items. These might look like junk to the untrained eye, but the history in each piece is what calls my heart to them. For example, this chicken feeder from a local flea market sits on my dining room table almost year round, filled with various seasonal decor. I sometimes find myself wondering how many chickens ate from this trough over the years and what other stories this item holds, not to mention it makes a great centerpiece because it doesn’t obstruct views of people sitting at the table!

Total Cost $10

7bc5c3be65b2a17a0337531036ca3948.jpeg

I hope today I could show you that having a vast assortment of decor and/or decorating your home for each season doesn’t have to be expensive. In fact, I get such enjoyment searching for that bargain and then bringing new life to old items. How do you decorate with repurposed items in your home? I would love to hear all about it!

I hope October is treating you well, wherever you are!

Signoff.jpg

Summer Front Porch Decor

Hello from Iowa, America’s heartland!

As we get ready to celebrate our country’s birthday in just a few short weeks, I thought I should dig out some patriotic decor and spruce up the front porch. Luckily, Target has metal stars in red, white, and blue in their dollar section currently and since I am there several days a week I was lucky enough to have an early pick and I was able to snag all three colors. These stars were the initial inspiration for my summer porch refresh, and the rest of it came together pretty quickly. I have a few photos pictured below that will hopefully bring you inspiration for your own outdoor decor.

ca6562386e9e573fa1504e6524a8bff9.jpeg

This little lemonade setup was the first part of the porch that I decorated, and I mostly just grabbed things from my house that I thought could withstand the Iowa weather. The lemonade sign is recently from Hobby Lobby, which is having their final closeout prices on their spring items (there are some good deals!!).

Next, it was time to add the pop of patriotic colors…

62ba1f600efeafa74eae89d291cb8081.jpeg

If you remember from my spring porch setup, this old bi-fold door was used to hang pots of succulents and I kept it in place for the metal stars I found at the Target dollar section.

3ca41d82b3c91e57137c51f87e9a9917.jpeg

I kept the ‘hello’ sign, the black star, and the welcome mat from my Spring decor, and moved the water pump and wash tub to the right side of the door and added a few plants. Adam keeps saying that this is the year we will get a ‘real’ front door, and I’m holding him to it, so stay tuned for that!

Here are a few pictures of it all together!

1bbf2e914c630186ccd8f56e6820aca2.jpeg
fdb122a40f83bf60aec179d5a4b3a712.jpeg

I may add a few plants to the steps/walkway to the door, however I don’t want to make it too narrow either, so it will just depend on what I am able to find. Personally, I feel as though outdoor spaces can get a cluttered feeling rather easily, so I try to keep it as simple as possible for that reason.

Well I better get back at it, as always thank you for stopping by the blog today, it really means a lot to us! I hope you were able to find some inspiration for your own home, and feel free to share your own photos and connect with us either here or on Instagram. See you soon!

Signoff.jpg