Farmhouse Renovation: Month 3 Update

It’s time for another update on the farmhouse renovation project!

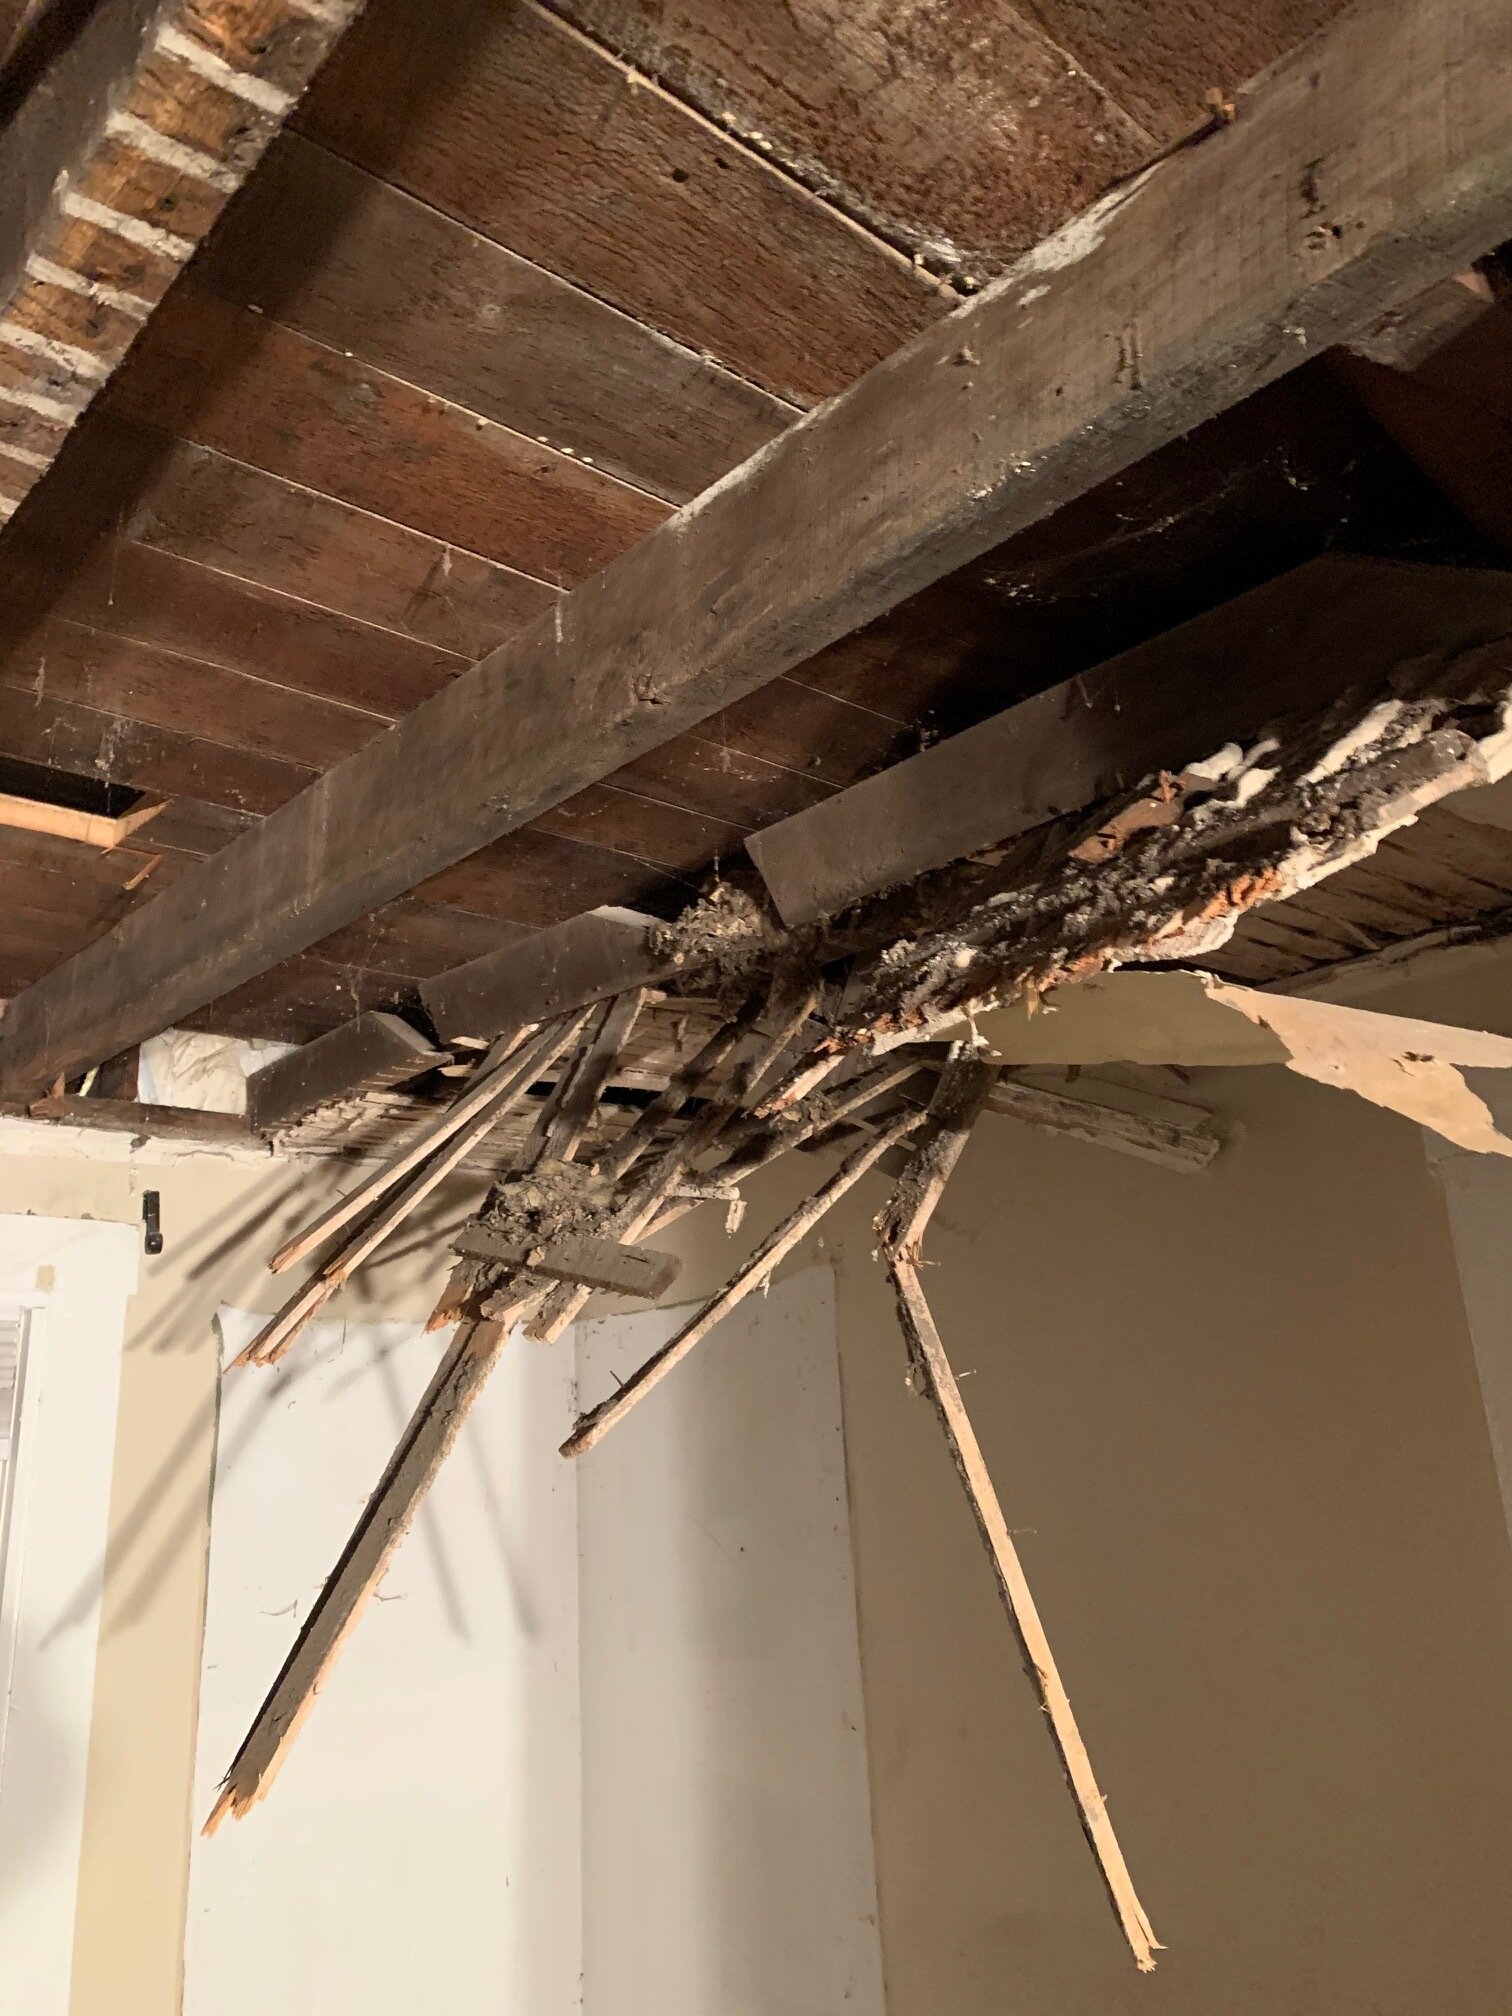
For anyone new here, we purchased a c.1900 Iowa farmhouse 3 months ago and promptly tore down a large (sagging) section and have been putting it back together ever since. This has definitely been an interesting project, mainly due to there not really being any building codes or rules to follow 120 years ago, so we have had to allow for extra time (and money) to accommodate unforeseen things along the way….(hello super scary/non supported second floor…i’m looking at you!)

Enough on the recap, let’s get on to the accomplishments for the month….

New this month:

-All Plumbing

-Furnace and all duct work

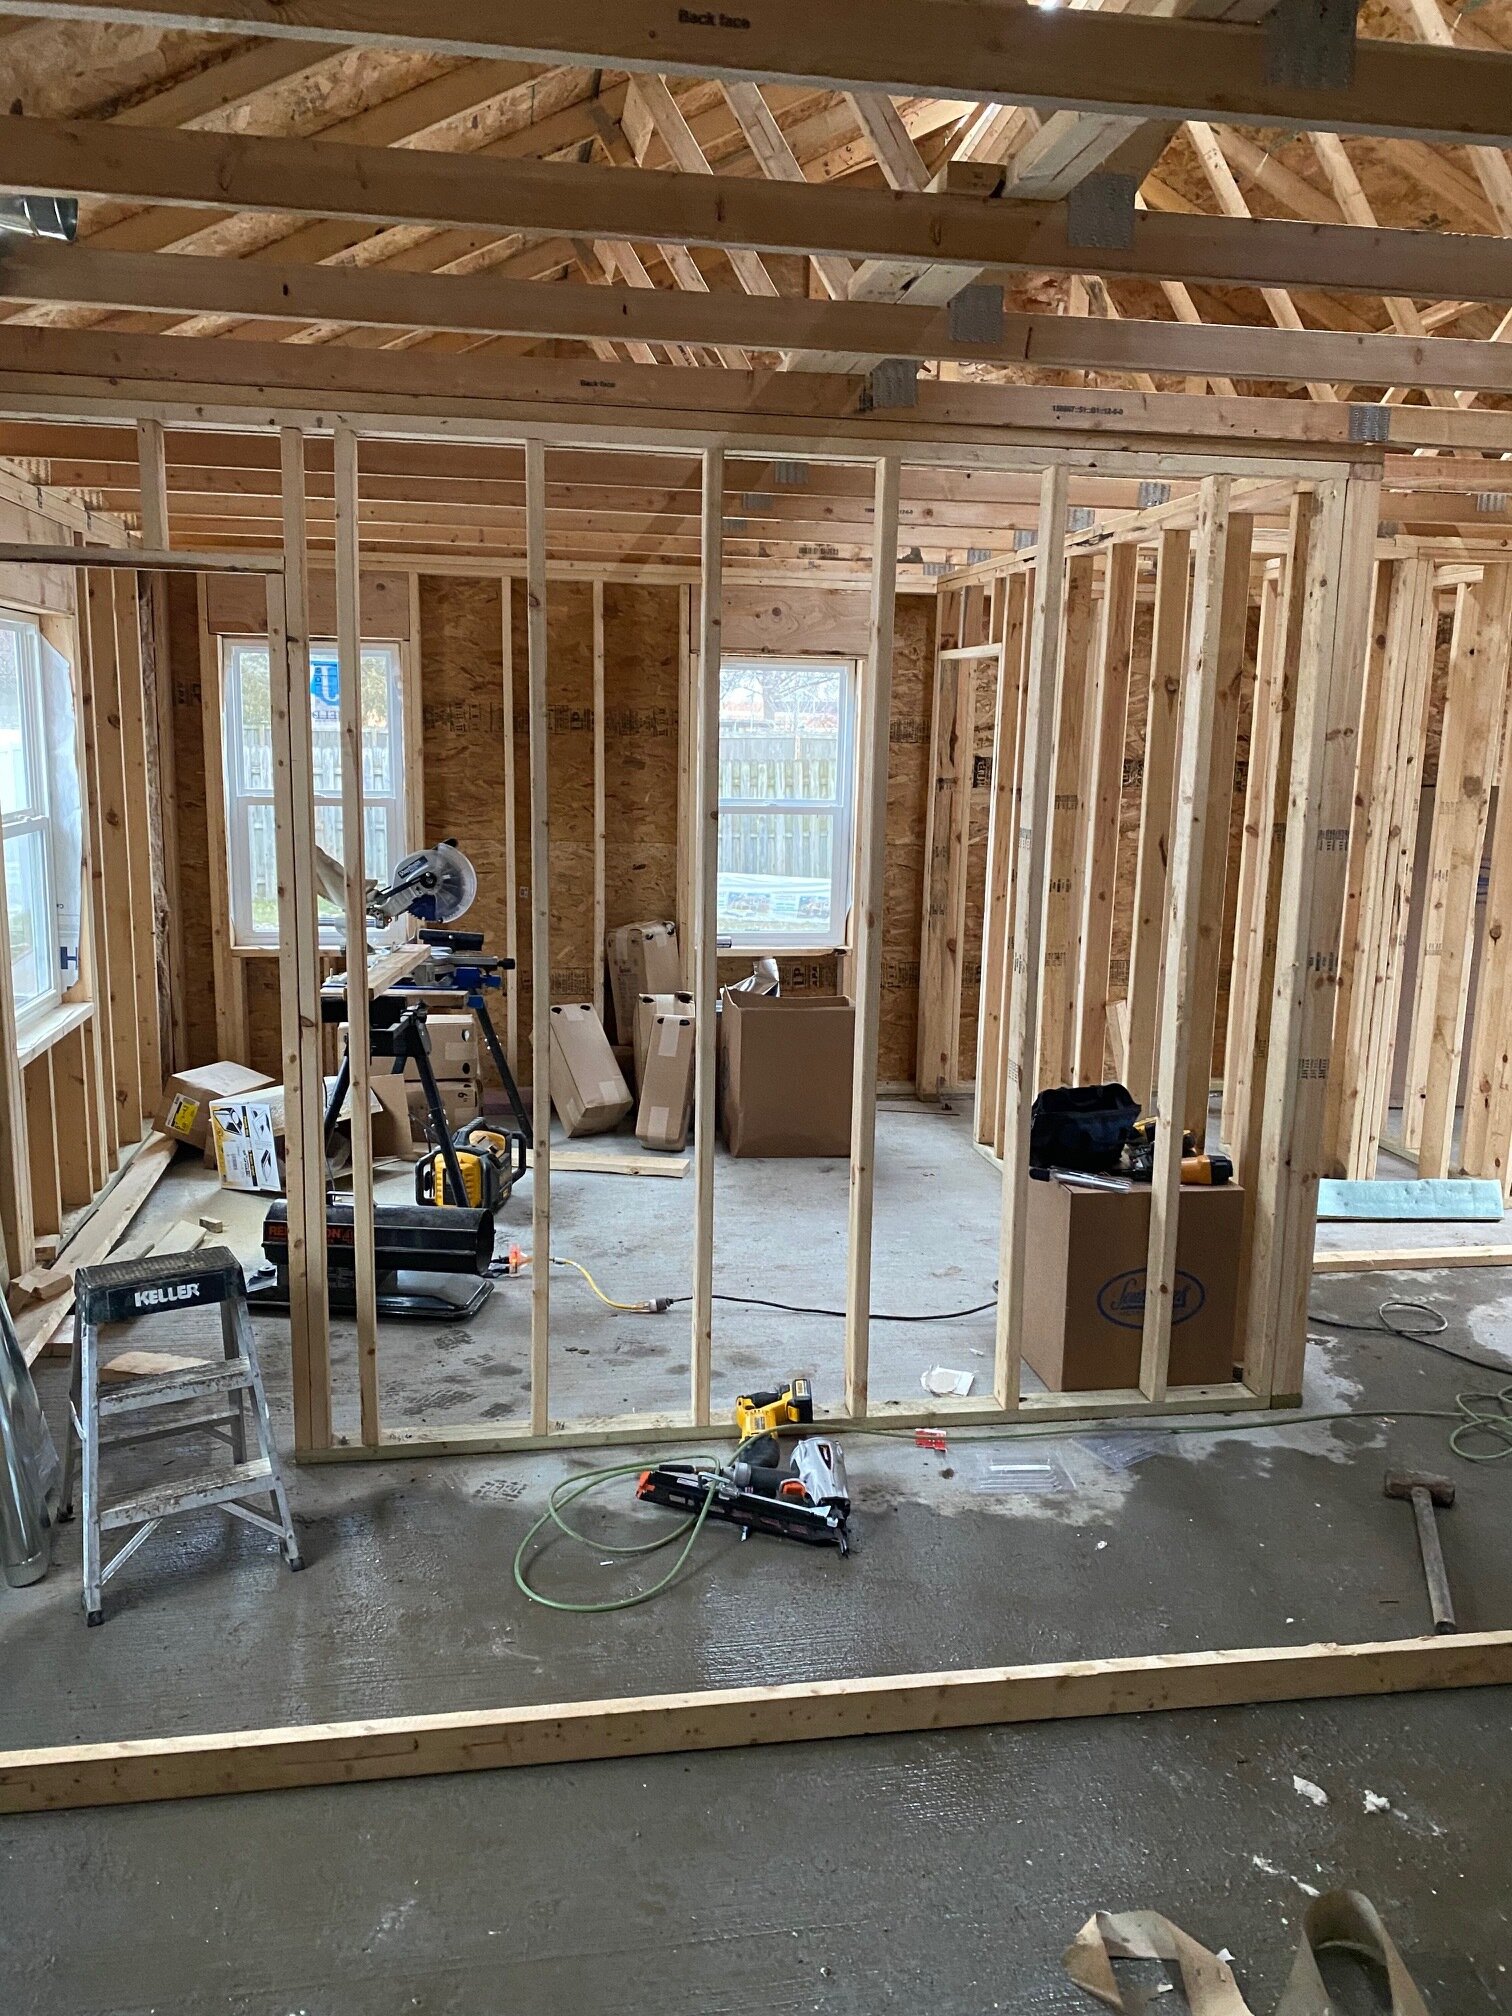
-Interior walls framed up

-All windows replaced

-Almost all the siding torn off original structure, and new OSB and tyvek paper

-All electrical wired up and ready

-A functioning set of stairs

Here are a couple photos showing the updates…

This photo is from the front porch, looking at the front door

This photo is from the front porch, looking at the front door

The porch view after new walls and windows!

The porch view after new walls and windows!

The above photos show just how extensive this renovation has become. Was it in the original plan to tear everything out to the studs? No. However, we needed to replace the improperly installed windows and that meant tearing off all the siding out front. The insulation and sheeting weren’t up to par and not really functioning, so they all had to go too.

Now, this means more work and increased cost, but we would rather spend a few more dollars up front and not have to worry about issues down the road. Plus, this is Iowa so we can’t have poor insulation and improperly installed windows or utility bills will be very high.

IMG_5409.JPG
IMG_5410.JPG

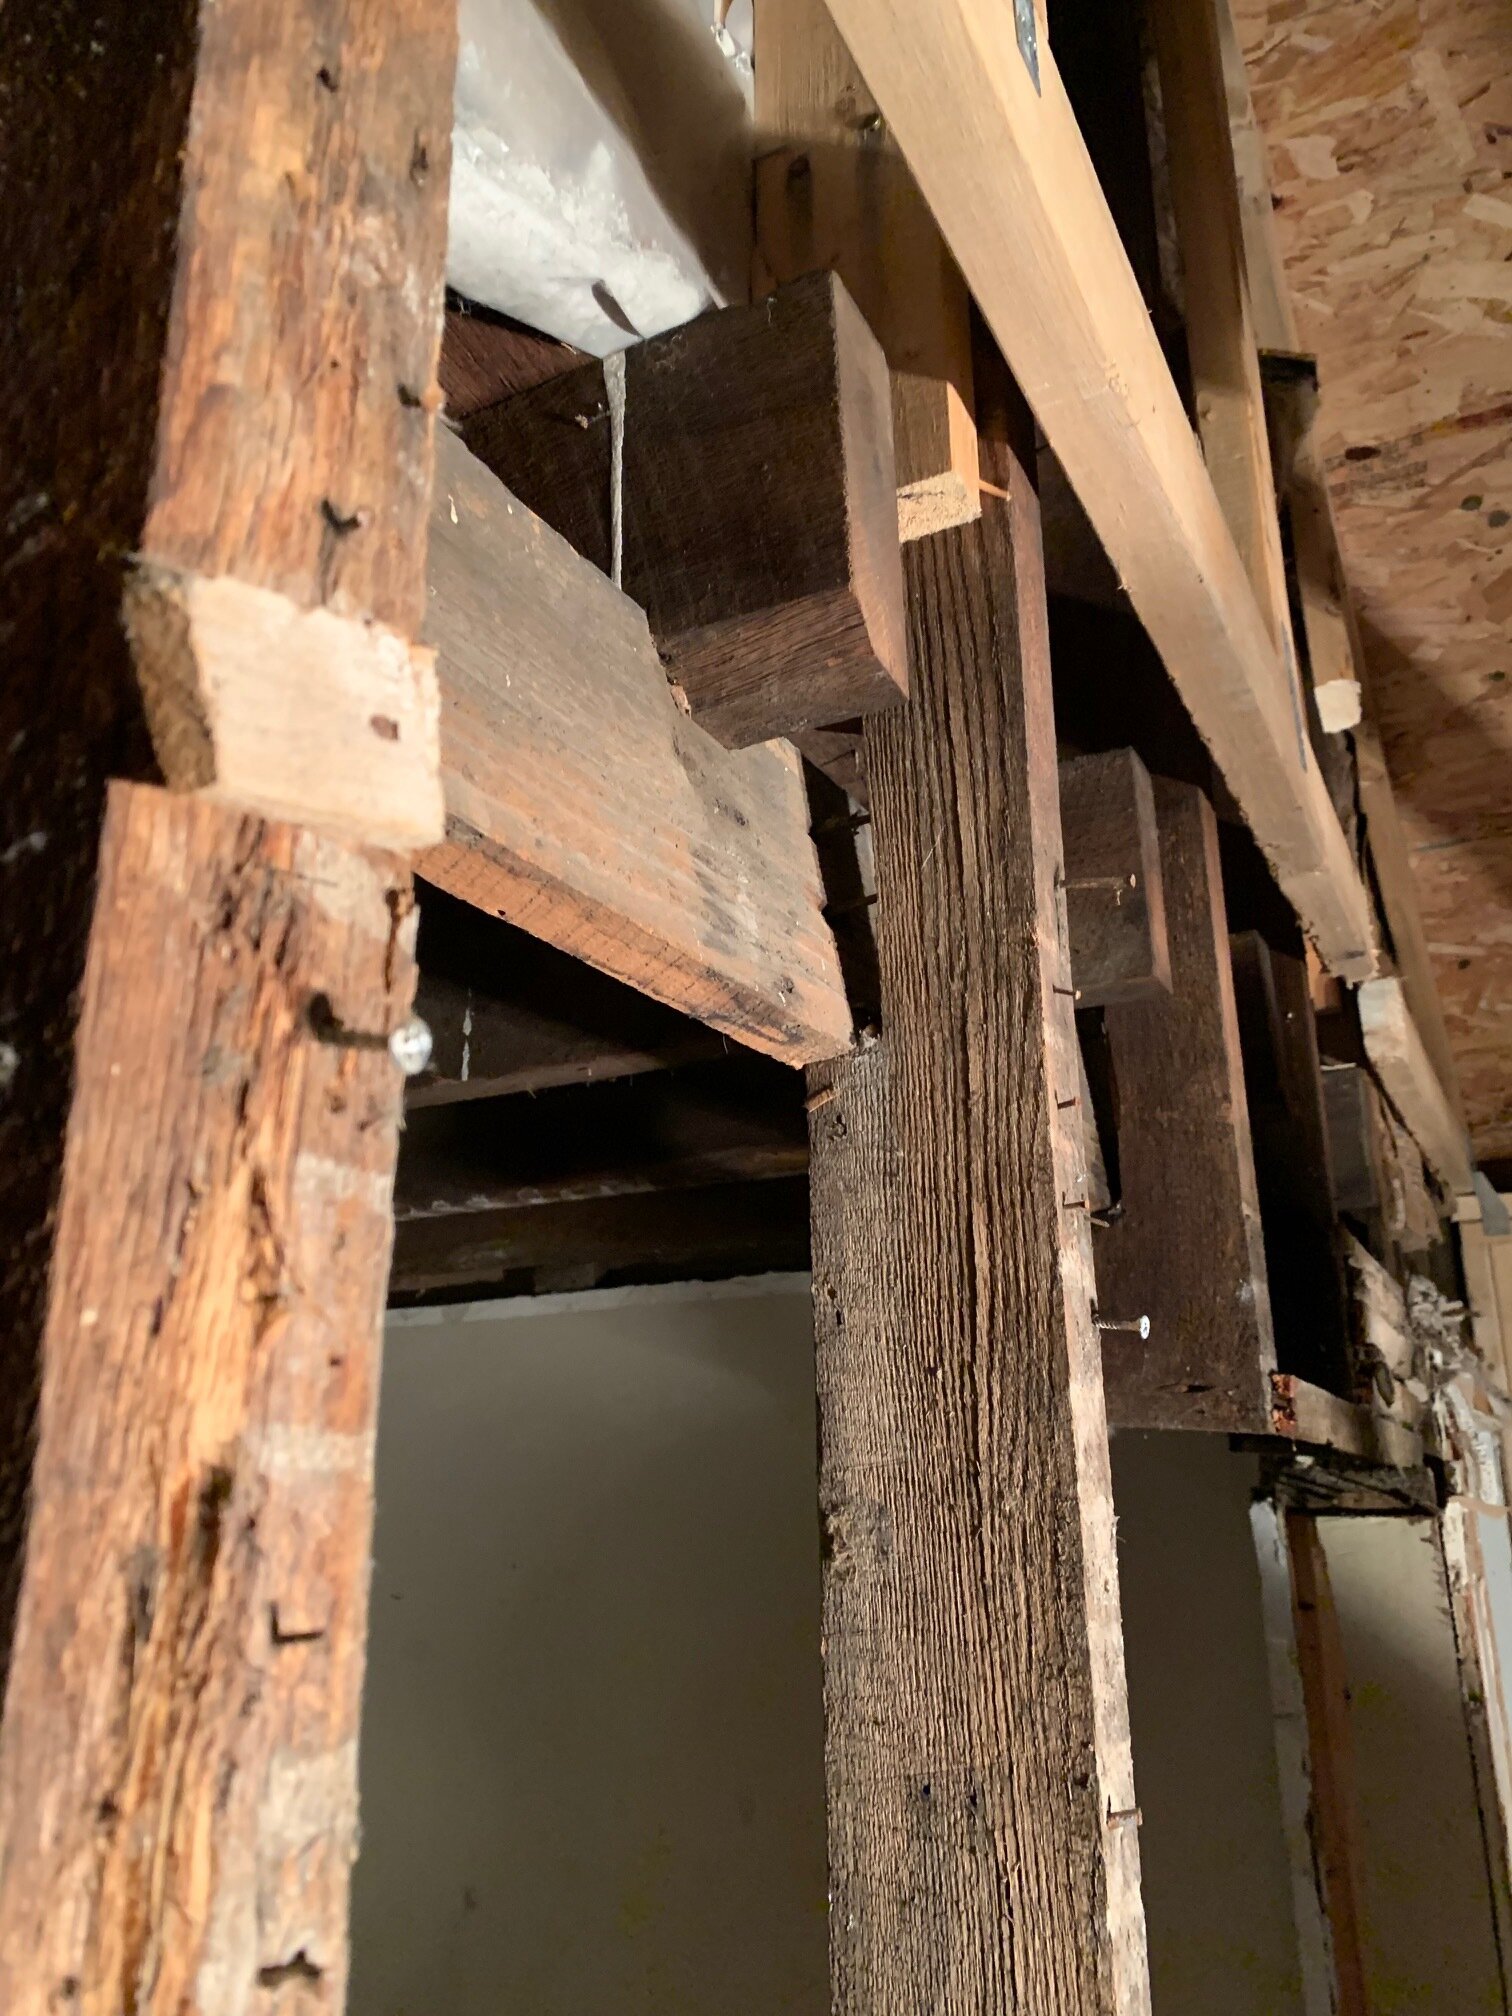
We have repeated this same process, section by section, for the entire house. Only one small part remains, and that will be done shortly. It’s particularly time consuming to do this all in January, but that’s what we have to work with at the moment. I mean, icy scaffolding just makes things more interesting…right?

IMG_0326.jpeg
IMG_0327.jpeg

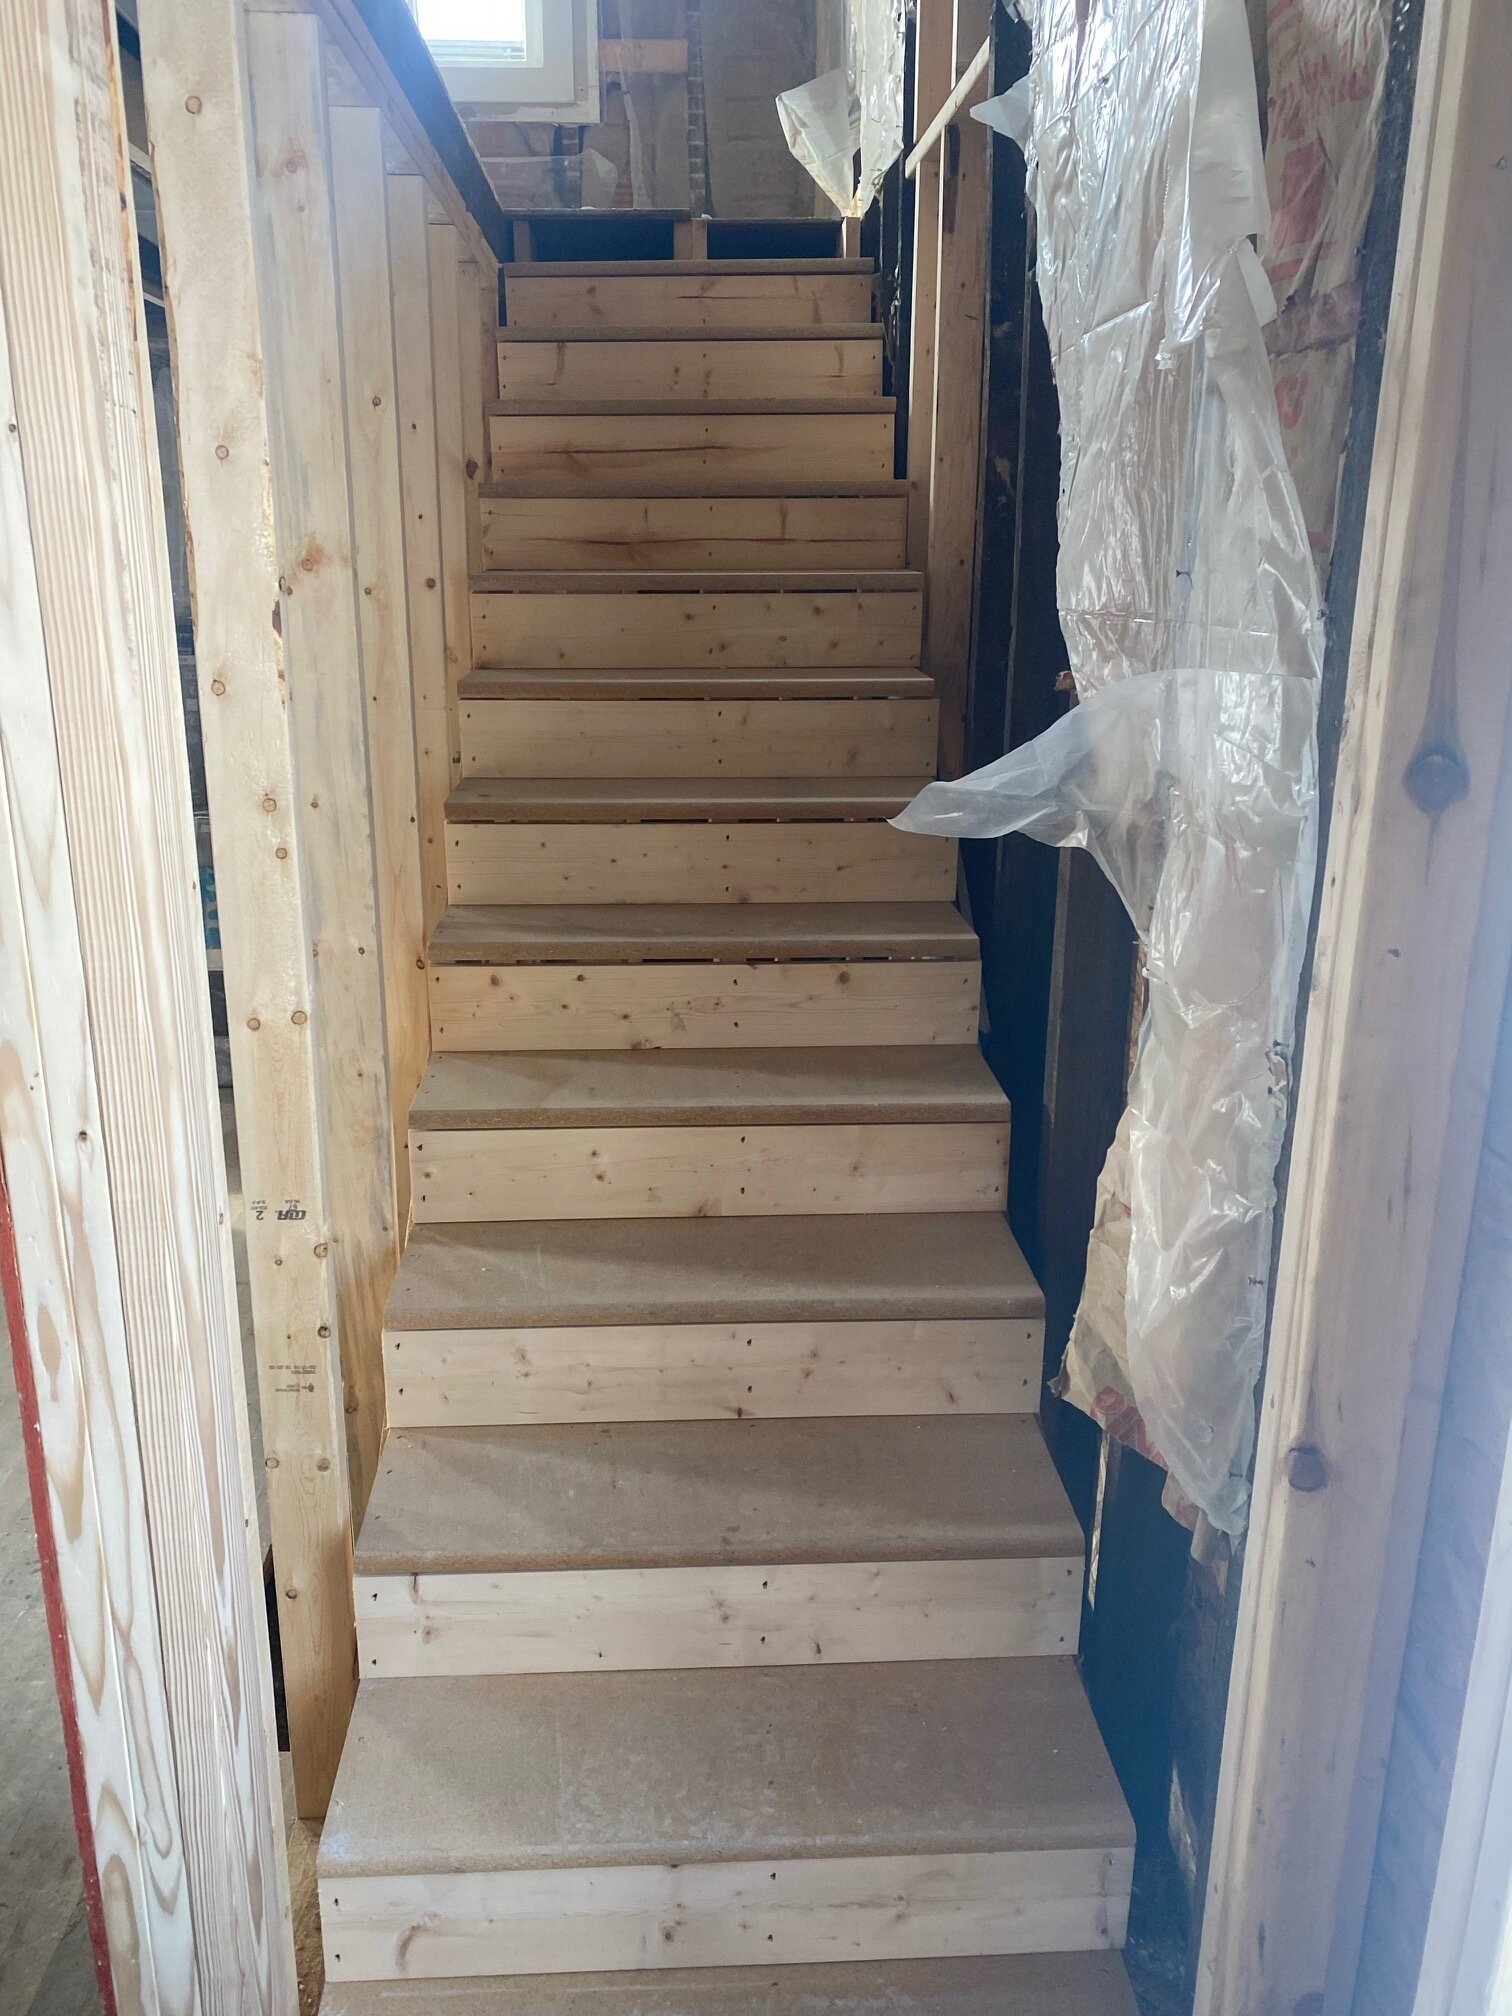
Next up, we have a fully functional and standard size flight of stairs to the second floor. Gone are the days of ducking your head and climbing super small and steep steps with no railing.

Speaking of the second level, we haven’t been up there for several weeks while there were no stairs, and I lost track of how much we have to do up there as well. Obviously the windows will have to be replaced (might as well do them all, right?) but the flooring and fixtures will need work too.

IMG_5367.jpg
IMG_5366.jpg

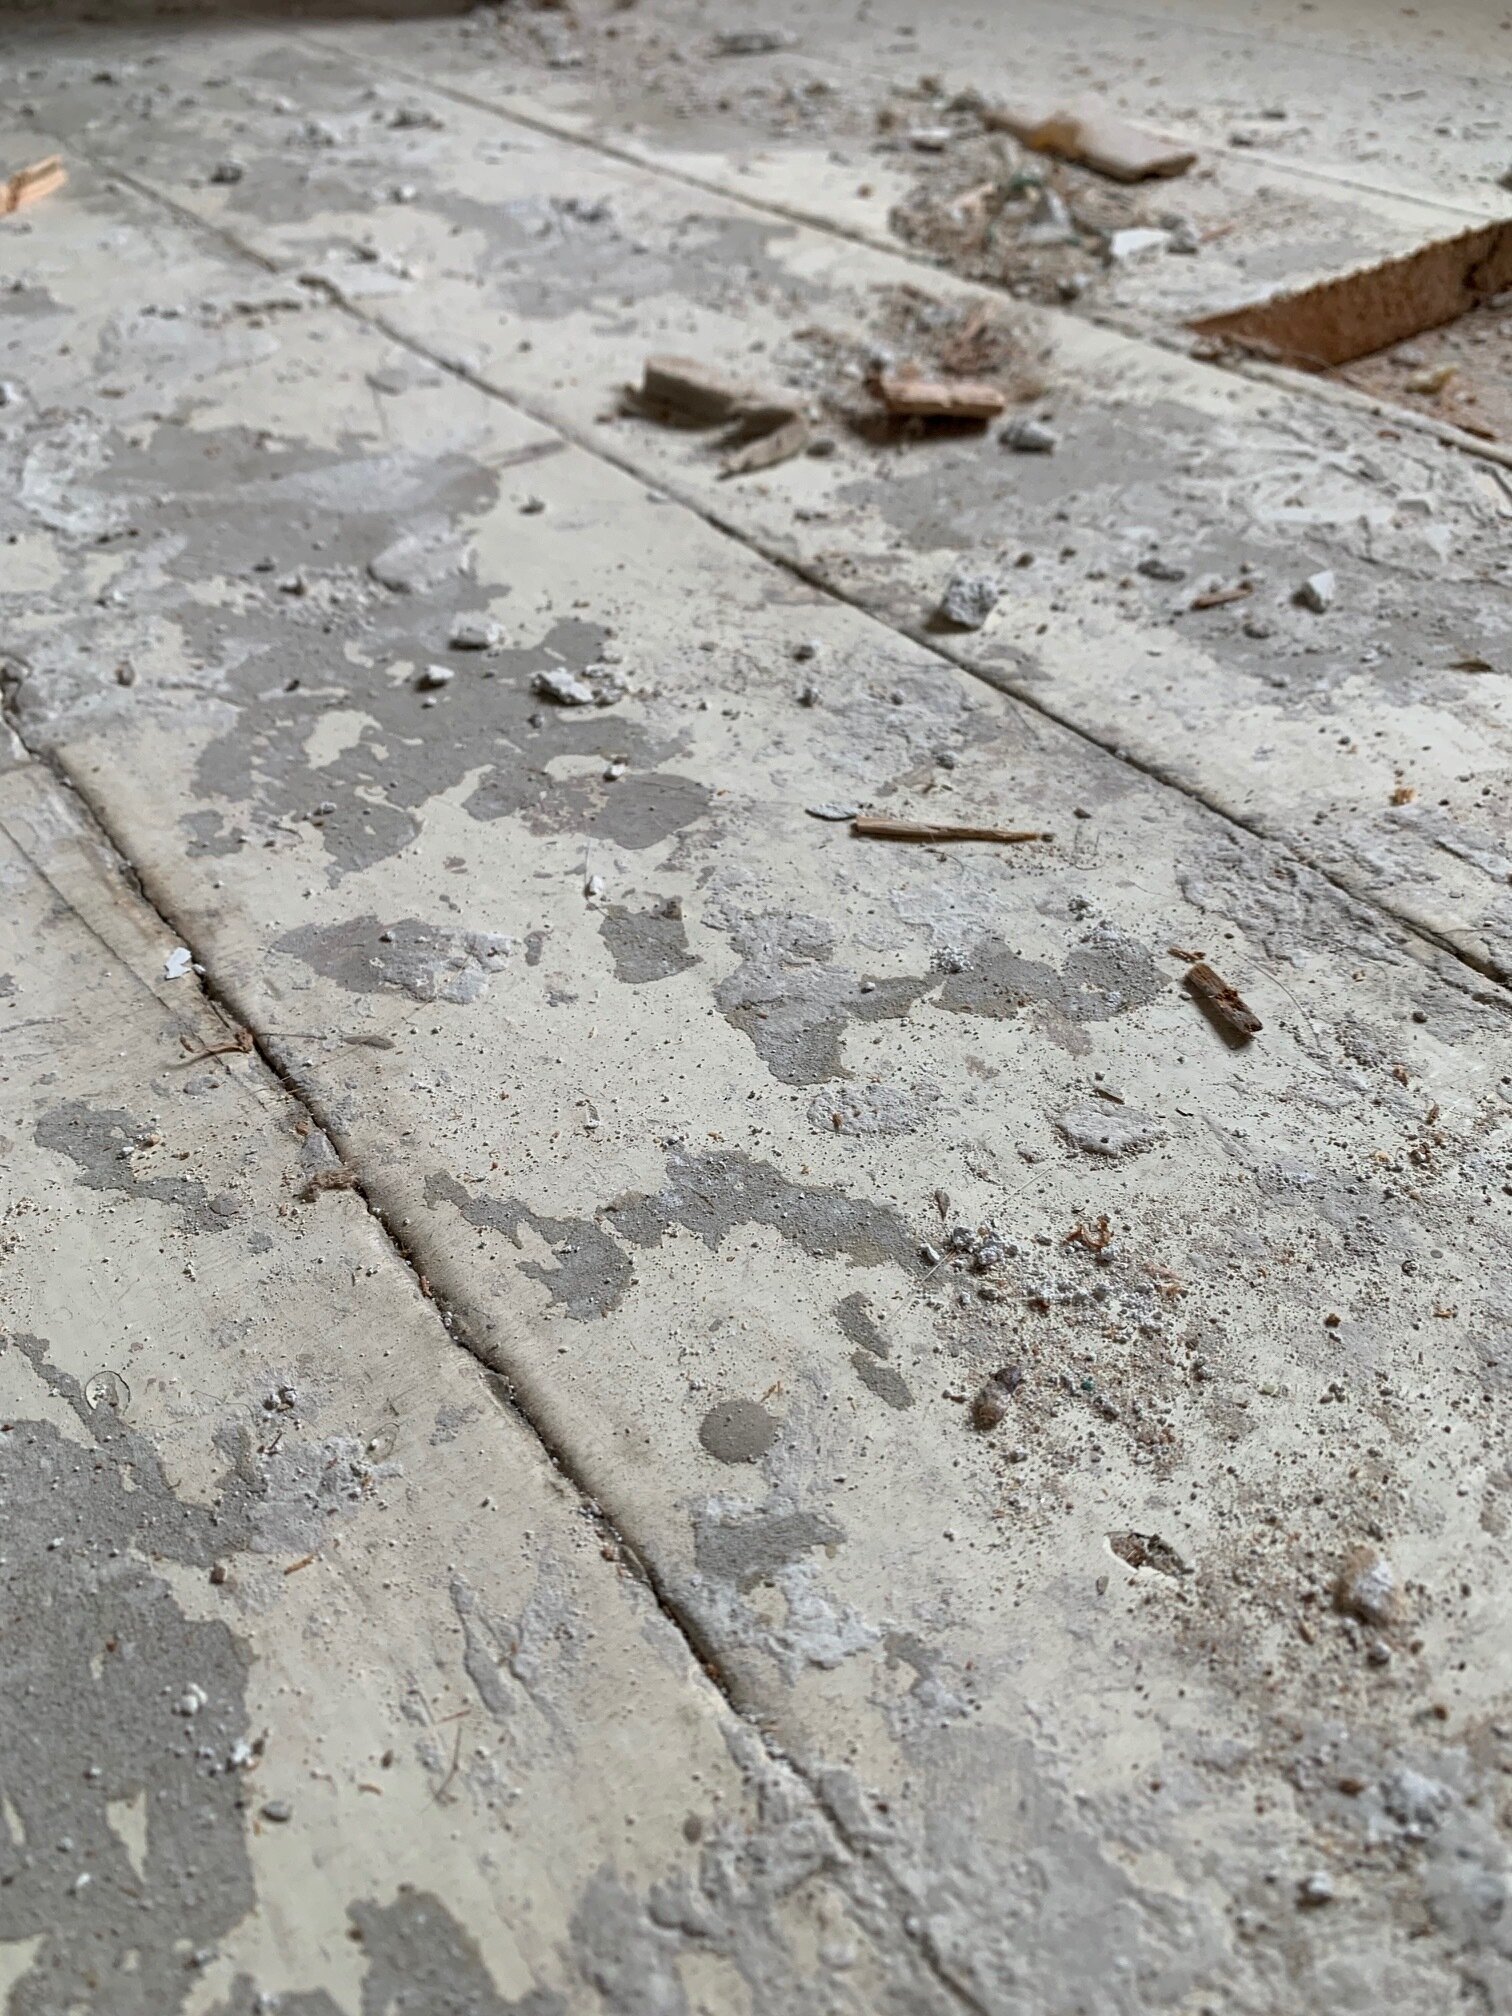
The first photo is of the (likely lead) painted original flooring, and we simply cannot sand that down and use it, for obvious reasons.

The next photo is a view from the stairs, and while things might not look too bad up here there is still a bunch of work to do. For example, the door to the second bedroom no longer closes due to the bracing and raising of the floor that was required in order to ensure it would not come down. We also need proper safety mechanisms such as smoke detectors, railings, and windows that are the required size, in case of emergency evacuation. These things can all be done now, since we can now access this part of the house!

As always, our daughter (who we call ‘the inspector’) is as involved as a two year old can be, and she loves to ‘help’. The weather in January has made this somewhat difficult but we work with it the best we can.

Helping dad with the front door

Helping dad with the front door

Giving her approval of the new stairs

Giving her approval of the new stairs

That’s all I have for this update! I will leave you with a fun little before and after of the outside. As always, thank you for visiting the blog today, we really appreciate all of your support!

Cheers!

-Rachael

IMG_5171.jpg
IMG_5411.JPG

DIY: Budget Friendly Pantry Organizing!

Hi friends! I’m writing to you from frigid Iowa, where it’s a whopping 1 degree today, but hey we are over halfway through January so this won’t last a whole lot longer! I haven’t posted a DIY for a while, so I wanted to share with you what I recently did with my pantry.

I normally take everything out of my pantry once or twice a year just to make sure nothing is expired or forgotten about, and as I was getting ready to do that again recently I did a few searches on Pinterest and Instagram for inspiration on how to make the space a bit more visually appealing.

There were hundreds of gorgeous photos to choose from, but as I started researching the actual bins and containers for everything it became apparent that this was an EXPENSIVE task. I mean, $14 for a clear plastic tray to put on a shelf?! $25 for a set of 4 glass canisters?! There was just no way I was going to spend that kind of money or organize this space.

Starting Point

Our pantry is a walk-in space, that has a knack for collecting random items due to it’s proximity to the kitchen. The problem with this catch-all space, is that it only has a half door, so all of the random items are on display for every visitor to see. Let me show you what I mean…

From this angle, you can’t see the mess inside!

From this angle, you can’t see the mess inside!

The mess!!!

The mess!!!

Ok, now you know what I was up against! I knew there had to be a more budget friendly way to spruce this up, so I put my thinking cap on.

First up, I needed some glass containers. A lot of them. I didn’t really care if they all matched, and I wasn’t going to buy a dozen from Amazon at $5 a piece, so I went down to my local thrift store for some vintage jars and canisters.

IMG_5203.jpg

Next up, I needed some labels for these jars and Amazon seemed to have quite the selection. I ordered a set of labels that was around $14 for 50+ stickers from a shop on Amazon called ‘The Talented Kitchen’.

I started the tedious process of emptying boxes and containers into the jars (after washing them of course!) and tossing all the expired items. I even found out what a very rotten avocado looks like, yikes! Here are a couple close up photos of the jars with labels…

IMG_5267.JPG
IMG_5268.JPG

These turned out really nice, and I was able to toss all the half packages of items! Bonus feature of the clear glass jars is the ability to see the amount readily available, making that grocery list a breeze!

Last up, I needed some clear bins for random things, and Amazon had some outrageous prices on clear storage containers so I went with what my local Target had instead. I included a couple pictures of the bins below, the larger one was $4 and the smaller one was $1.

IMG_5274.jpg
IMG_5270.JPG

All Finished!

Here are a couple photos of the finished project, I am not entirely certain that I have everything in the exact place that I want it, but it works for now.

IMG_5251.JPG
IMG_5250.JPG
IMG_5253.JPG

I am really excited how this turned out, as it is no longer an eyesore to anyone walking by the area. Also, I was pretty impressed that I accomplished this project for significantly less cost than originally thought. Next up, I need to repeat this process for the spice cabinet as I currently cannot find anything in there!

That is all I have for you today, thanks so much for stopping by the blog and I would love to see some of your own pantry transformations, feel free to tag me on your photos on Instagram (@aps_design) or Facebook (apsdesignblog).

Cheers!!

Rachael

Farmhouse Renovation: Month 2 Update

Two months!

It’s been a little over two months since we purchased a 1900’s farmhouse, and then promptly took a bulldozer to a large section of it. We have since added back a large addition (almost 600 sq feet), to replace the torn down section and add some space.

Out with the old…

Out with the old…

In with the new!

In with the new!

Since our last update about two weeks ago, we have the addition completely closed in from the Iowa elements, thanks in part to some amazing December weather. Now if we could just request some daylight after 430 pm…ha!

Now that the new part is enclosed, we were able to open up the wall separating the original section from the new addition, and it was the first time I had seen the old part since we boarded it up! Here are a couple photos…

View inside the new part

View inside the new part

Looking into the original part of the farmhouse

Looking into the original part of the farmhouse

Opening up the walls and ceiling of the original section of the home presented it’s own challenges, including 120 years of dirt and grime. Oh and about 3 layers of ceiling in the old living room! Here are a couple before shots…

IMG_5182.JPG
IMG_0214.JPEG

Tearing into this section was not exactly in the original plan, but in order to update the electrical correctly and put new heating and air duct work in we decided to take it all down. There’s always that one moment in the home improvement shows where something goes wrong, and the owners are left with a decision on how to proceed, and for us it was this ceiling and what was underneath it.

I already mentioned there were a ton of layers to the ceiling, and this left us with quite a mess, but a more alarming issue was how the second floor was being (sort of) supported. The picture below on the right shows ONE board, that is kind of in a notch, and that was what held the floor joists for the second floor. One board, folks!

Lots of layers to the ceiling here!

Lots of layers to the ceiling here!

IMG_5179.jpg

That one board might have made it the last 120 years, but Adam didn’t feel comfortable leaving it one more day, so we had to handle that immediately. Let’s just say that this load bearing wall will soon be almost 12 in thick to provide much needed support to the second floor. Definitely a scary moment, but I am glad we found it when we did!

In other news, you can see in the photo on the above left that there should be some original flooring upstairs underneath the carpet! The second floor will be where our daughter, who we call the ‘inspector’, will have her bedroom and play room. She likes to visit from time to time to sweep and pick up trash, and we will take any help we can get!

Inspector, doing some inspecting

Inspector, doing some inspecting

Well that’s all I have for today! Soon we will be getting into the fun part of a renovation/build, when the rooms really start to take shape. Don’t forget to follow along on Instagram and Facebook, for some fun video updates of Adam working, and the Inspector inspecting!

Until next time…

-Rachael

Farewell 2019!

It’s mind boggling to think back to all that has happened this past year at APS Design/Construction.  We completed some huge projects for clients (hello boathouse!), traveled to Alaska, and even snatched up an original 1900’s Iowa farmhouse for renovation.

The Boathouse!

The Boathouse!

Boathouse side view

Boathouse side view

Since we are on the topic, I will share that I routinely am asked how we do so much.  ‘Do you guys ever sleep?’ is a very common question, and the answer is yes!  Every day!  I will admit we have a lot on our plate, but time management and remaining flexible from one minute to the next is how we get it all done.  We are also blessed with a small army of people that are willing to watch our daughter at a moment’s notice. 

Alaska 2019

Alaska 2019

Glacier Bay National Park

Glacier Bay National Park

Ketchikan, Alaska

Ketchikan, Alaska

Looking ahead, 2020 is shaping up to have some big changes in store for us.  Obviously we have the farmhouse to finish, which should be fully completed in early spring.  Then there is Adam’s life-long dream of owning a big piece of land…which we might try to tackle this year.  There are a couple other things in the mix that I will have to update on later, once plans are finalized. 

At this time last year, I had no idea that we would take part in everything that we did in 2019, and you all were a big part in making that happen.  Thank you for continuing to visit our website and engaging on our social media posts, as well as sharing/recommending us for projects. 

Thank you for your continued support while we navigate this journey and strive to attain our goals. We have always been big dreamers, and 2020 will be no different!

Happy New Year Friends!

-Adam and Rachael