Summer Front Porch Decor

Hello from Iowa, America’s heartland!

As we get ready to celebrate our country’s birthday in just a few short weeks, I thought I should dig out some patriotic decor and spruce up the front porch. Luckily, Target has metal stars in red, white, and blue in their dollar section currently and since I am there several days a week I was lucky enough to have an early pick and I was able to snag all three colors. These stars were the initial inspiration for my summer porch refresh, and the rest of it came together pretty quickly. I have a few photos pictured below that will hopefully bring you inspiration for your own outdoor decor.

ca6562386e9e573fa1504e6524a8bff9.jpeg

This little lemonade setup was the first part of the porch that I decorated, and I mostly just grabbed things from my house that I thought could withstand the Iowa weather. The lemonade sign is recently from Hobby Lobby, which is having their final closeout prices on their spring items (there are some good deals!!).

Next, it was time to add the pop of patriotic colors…

62ba1f600efeafa74eae89d291cb8081.jpeg

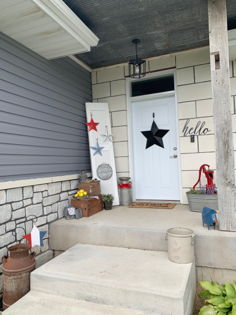
If you remember from my spring porch setup, this old bi-fold door was used to hang pots of succulents and I kept it in place for the metal stars I found at the Target dollar section.

3ca41d82b3c91e57137c51f87e9a9917.jpeg

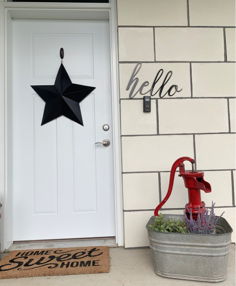
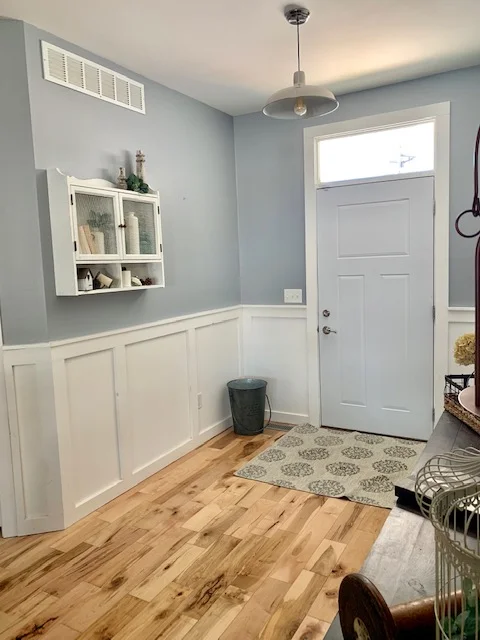
I kept the ‘hello’ sign, the black star, and the welcome mat from my Spring decor, and moved the water pump and wash tub to the right side of the door and added a few plants. Adam keeps saying that this is the year we will get a ‘real’ front door, and I’m holding him to it, so stay tuned for that!

Here are a few pictures of it all together!

1bbf2e914c630186ccd8f56e6820aca2.jpeg
fdb122a40f83bf60aec179d5a4b3a712.jpeg

I may add a few plants to the steps/walkway to the door, however I don’t want to make it too narrow either, so it will just depend on what I am able to find. Personally, I feel as though outdoor spaces can get a cluttered feeling rather easily, so I try to keep it as simple as possible for that reason.

Well I better get back at it, as always thank you for stopping by the blog today, it really means a lot to us! I hope you were able to find some inspiration for your own home, and feel free to share your own photos and connect with us either here or on Instagram. See you soon!

Signoff.jpg

Entryway Table Refresh

Hi there! I’m writing to you from a cold and rainy day here in Iowa, but it’s just for one day so I can handle it. If you follow me on Instagram, you know I have been stalking my plants to see when they will come out of the ground and they have made some progress the last couple of days! There is finally hard evidence we are at the end of this epic long winter, and all this anticipation just makes it that much more enjoyable. It’s seriously like Christmas for me, I cannot wait until the weather permits me to be outside full time.

In celebration of all things spring, its time to refresh the entryway saw horse table. I’m not sure why I dread styling this table, maybe because it is such a focal point to the interior of my home and I always want it to be perfect. Or it could be that I just need more things in the epic huge entryway so it doesn’t seem like it’s the only thing to look at. EITHER WAY, I tackled it yesterday and wanted to share it with you all.

As you know, I usually divide this long table into sections, which I highly recommend if you are trying to style a large piece. My husband Adam always pokes fun at me moving things around 100x until I get them right, but if I start small and build on it then this usually eliminates at least 50% of the rearranging. Anyway, here’s the first section I completed, which is the left side of the table.

e57dcace6f79d4aa78a583e82517889f.jpeg

I went back and forth on using books in front of the large spool, a lot, but here’s the version without them. These are all things I gathered up around my house and took out of my decor stash. I am a firm believer that you don’t need to buy new things and spend a ton of money to decorate your home, just collect over time and reuse the same items.

f2589f9f710876410a3f449de64f0e0d.jpeg

Here we have the right side of the table. I am a huge fan of this vintage birdcage and try to incorporate it into every season’s decor. Check out my post on the DIY clothespins here, if you want to make some of your own.

05b7f9b6f0394d47e060e2533e78e564.jpeg

And here is a photo of the entire table! I moved the copper lanterns down below for this photo, but they are glass and not conducive to being played with by a 1 year old, so they had to be moved out of reach. I am happy with how this table turned out and now I need the weather to cooperate so I can give some spring vibes to the front porch.

Soon. Very soon.

Until then, I want to thank you for stopping by the blog today and I hope you were able to gleam some inspiration for your own homes. I’m off to finish my list before nap time is over!

Signoff.jpg

Homemade Dog Food

Disclaimer: I suggest you consult your pet’s veterinarian (as I am not one) to determine the best food for your dog’s breed, activity, etc.


I’m changing it up a bit for today’s post….let’s talk food. Dog food to be specific!

Recently, I have been paying close attention to the chemicals and preservatives found in food and how they can have adverse health affects. While reflecting on my family’s grocery list and meal habits, I couldn’t help but notice that we feed our dogs dry processed kibble, which seemed to represent everything I was trying to avoid consuming myself. Why couldn’t I extend these healthy eating habits to the canine members of our family as well? How would I go about doing that?

There seem’s to be a meal delivery plan for every lifestyle and diet these days, and dog food is no exception. While having fresh dog food delivered each week in perfectly portioned bags would be nice, I found out it comes along with a significant cost, and a bit more inconvenience on my end. With extreme heat and cold here in the Midwest, I would need to make sure someone would be home to receive the shipments each week and that would be nearly impossible.

Boat ride!

Boat ride!

Sometimes you just need carried around!

Sometimes you just need carried around!

Also, our dogs are used to eating ‘free choice’ (they have a bowl filled each night and choose when they want to eat during the day), which would have to change to them being fed twice a day, and while doable it would be an added task. We already fed them a very high quality dry food, they appear to have no allergies and also no issues with digestion. I knew there had to be a budget friendly way to incorporate fresh food into their diet, and that idea started a path down a Pinterest rabbit hole.

After reading several articles, recipes, and suggestions, I came up with my own dog food recipe and I have used it for the past three weeks. I didn’t want to cut out their dry food completely, as I am sure there are some added vitamins/minerals/proteins that they need from it. Instead, I simply give them one bag of homemade food once per day, on top of their free choice dog food (each bag is about 1.5ish cups). Here is what I have found so far:

1) Our dogs love the taste, and it fills them up! They are eating significantly less dry food, which means less cost!

2) They drink less water, which is normal, since they are eating less dry food.

3) They remain VERY active, and continue to have no issues with allergies or digestion.

IMG_3520.JPG
IMG_1804.JPG

The Recipe!

This is a very easy recipe, substitute with whatever you have on hand, just google to see if it is healthy for your pet first (again, I am not a pet health expert).

You will need:

  • 1 pound ground beef (I sometimes substitute a beef/deer mix)

  • 1 can kidney beans

  • 1 1/2 cups frozen peas

  • 2 cups uncooked brown rice

  • 4 large carrots, sliced

  • 2 sweet potatoes, cut into 1in chunks

  • 4.5 cups water

Add everything to a crock pot and mix well. Cook on high for 5 to 6 hours, stirring occasionally. Let cool completely and portion into baggies, I use one heaping cup per bag which is probably closer to 1.5 cups. Toss in the fridge until you are ready to serve, or make a large batch and store in the freezer. This recipe makes around 12 servings, which lasts just under a week between my two dogs.

Start

Start

Finish

Finish

Bagged up!

Bagged up!

And there you have it, my simple and budget friendly homemade dog food recipe! Feel free to pin this post for later use, and as always, thanks for stopping by the blog today!

Signoff.jpg

How To Clean Up Your Vintage Glass Bottles

Today I am writing from SUNNY and WARM (ish) Iowa! I can’t tell you how excited I am to not have to brace my face for the cold every time I open a door. Today’s post goes along with all things ‘spring cleaning’ which is the theme at my house these days! We have been doing all those yearly tasks, cleaning out dryer vents and bathroom fan motors…safety first!

If you have been following along you know I love everything budget friendly, and therefore I find a lot of my decor pieces at thrift shops. I love the hunt for a good deal, and I recently came across a collection of medicine bottles and many were marked $1 . I have a plan to display them in my bathroom (after I re-paint it) and while I love the look of vintage bottles, I noticed some of these had a residue or film on the inside that was taking away from the look.

After a little research, and some trial and error, I came up with a fairly simple method to cleaning some of the residue out of the bottles that didn’t use any harsh chemicals and also didn’t damage them. The end result was not a sparkling clean look, but it’s better than where we started!

Here are a couple before photos to show you what I was working with…

IMG_1416.jpg
IMG_1417.jpg

As you can see there was quite a bit of buildup on the inside of these bottles, and it was taking away from their appearance. Here is how I cleaned them up:

  1. Fill them half way with warm water and other half white vinegar

  2. Let them sit on the counter for 24 hours

  3. Rinse well

  4. Fill them completely with white vinegar

  5. Let them sit for another 24 hours

  6. Rinse well and dry

You could repeat this process as many times as you wish to achieve your desired result.

Here are the after photos…again they are not perfect but definitely an improvement!

IMG_1494.jpg
IMG_1495.jpg

These bottles are now ready to be added to my collection that I’m working on for the spare bathroom, and of course I will share that cabinet and collection when I get it completed. Now that the weather is nicer, we have been working outside most days but I will find time for the indoor projects again soon!

As always, thanks for stopping by the blog today, and feel free to pin this post for later use!

Signoff.jpg

The Easiest Decor DIY Ever!

Hi there! I’m writing to you from sunny Iowa, and while 40 degrees might not be warm where you are from, it’s certainly a welcomed sight in this region! Today I have a super easy and quick DIY ready for you, perfect for filling in those small spaces in your home.

You will need:

  1. Twine

  2. Clothespins

  3. Scissors

That’s it!

Let’s get to it!

I picked up these clothespins and twine from Lowes

I picked up these clothespins and twine from Lowes

Now that you have everything gathered up, take the scissors and cut a 2 to 3 foot section of twine and begin to wrap it around a clothespin, with no particular pattern. I like to choose varying lengths of twine and make some clothespins ‘fatter’ than others, so they all appear different when piled up together. Repeat this process as many times as you desire, and you can either hot glue the ends or simply tuck them in.

These little twine clothespins are great fillers for any decor, since they are neutral and not specific to a season. Here are a couple photos of how I used them just today.

a71d47622b411b621d3957acb9cb4488.jpeg
f8b947043b83bacaeee2691de36f575d.jpeg

This project was also very budget friendly, I think the grand total was around $7. For those looking for clothespins, I found them in the cabinet organization section at Lowes (don’t ask me why they keep them there, I never understand how that place is organized).

Well, I am headed back outside now that all of my winter decorations are officially unfrozen from the front porch….it’s time to clean that area up!

As always, thanks for stopping by the blog today!

Signoff.jpg

Spring Dining Room Decor

It’s March, and I am determined it’s time to decorate for spring, regardless of the fact it remains very cold here in Iowa. Today I want to share with you my quick and easy dining room decor that I refreshed for the new season.

This is quite possibly the last time I decorate this table, as it is on the project list to be sold and replaced with a barn wood farm table, much like this one pictured below (photo from a client’s home).

IMG_4069 (1).jpg

Hopefully by mid summer we will have the table built and replaced, but as always it is hard to find time to do things for yourself. At least we won’t have snow removal getting in the way of our projects by then!

Well I could talk for hours about plans for my dining room, but let’s get back to the current task at hand….decorating for spring! Traditionally, I have never done a whole lot for spring, and as a result I only have one tote designated to spring decor (I have like 8 for Christmas!). Regardless, I dug that tote out a few days ago and got to it.

IMG_1155.JPG

I picked up these pastel eggs from Target, either last year or the year before, and I have really enjoyed them. They add just a hint of color and are so versatile to use. And since I don’t plan on changing anything up before Easter, they are going to serve dual purpose as the Easter decor!

IMG_1166.JPG

Here is a closeup of the table, which I kept very simple, and all of these items I had on hand except for the small glass plant mister which was at the Target dollar spot, score! If we zoom out a bit you can see the rest of my dining room below.

IMG_1168 (1).JPG

My buffet and large rusty metal pig are permanent fixtures of the dining room, and I change up the buffet decor for the different seasons. As you can see I used some faux greens and DIY candlesticks (if you missed that tutorial click here). Also, I have had some eucalyptus and faux flowers in the window boxes for a couple months now, but I will most likely leave those as is until we are closer to summer.

And there you have it, my simple refresh of my dining room for spring. I would love to refresh my front porch as well, but my winter decor is currently frozen to the concrete so that will have to wait for another day and another post…hopefully sometime soon!

Well I am off to tackle some spring cleaning, I must harness this motivation while it lasts! Thanks for stopping by the blog today, see you soon!

Signoff.jpg

Hanging Cast Iron Cookware

Hi friends!

Today I have a quick post for all the cast iron cookware lovers out there. We love using this cookware at our home but find it impossible to have enough room to store all of the heavy/bulky pieces. My husband has wanted to hang up a pot rack over the island for years, but I didn’t want all the heavy cookware to block the view of the rest of the living area. Finally, during one of the 800 snow days this month, we came to an agreement on how to hang and store our cast iron pots and pans.

Our pantry was the obvious location, due to it’s proximity to the stove and vast amount of unused space. We also needed the pans out of reach of our 1 year old, so hanging them on the wall seemed to be the best choice. Adam found a barn wood 2x4 in the garage and fastened it to the wall in the pantry, and then added the gas pipe and fittings. For those of you that don’t happen to have a ton of gas pipe sitting around in your garage, you can buy them from any hardware store. We used 1/2in size, but you could use larger if desired. The only downside to working with gas pipe (besides the grease) is all the adhesive and stickers that have to be removed. If you follow us on Instagram, you saw my struggles with this the other night on stories.

IMG_1122.JPG

Here is a close up photo of the gas pipe hardware. I had some old shower curtain hooks from a previous residence that I used to hang up the pots and pans, but I’m sure you could find something more aesthetically pleasing on Amazon. In the future I plan to hang up another identical rack below this one, and use it for hang baskets for potatoes and veggies from the garden (to get them off of the kitchen counters).

IMG_1125.JPG

Here is the view from outside our pantry.

While this was a quick and easy project, it really has been a game changer for kitchen storage. For those of you who use cast iron cookware, you know its bulky and some sizes can be hard to fit in drawers and cabinets. This storage solution took five skillets and one large stock pot out of our cupboards, freeing up space for further organization.

I hope this post brought some inspiration to your own kitchen organization! Thanks for stopping by the blog today!

Signoff.jpg

Thrift Store Cabinet $5 Makeover

Hello! Here in Iowa we are finding ourselves stuck in an endless cycle of snow storms and closings, which isn’t all bad since it allows for time to finish up projects around the house. Today I want to share with you a simple and inexpensive $5 makeover of an old medicine cabinet that I found at a thrift store a few months back.

Now, if you are thinking like my husband Adam, you might wonder what on earth I was doing buying an old medicine cabinet, but I saw some hidden potential in it becoming a cabinet/shelving piece for my enormous (and mostly bare) entryway. Here are a couple pictures of the cabinet in it’s original condition.

IMG_0558.jpg
IMG_0559.jpg

The first task at hand was to take the doors off and get rid of the mirrors, all while saving the hardware for reassembly. After everything was taken apart and cleaned, I began painting with some Valspar chalk paint that I had on hand.

IMG_0671.jpg
IMG_0672.jpg

After the whole cabinet received a couple coats of paint it was time to reassemble the doors, and I used chicken wire in place of the original mirrors. I chose this material for a couple of reasons; I wanted the decor inside to be visible and I generally hate cleaning mirrors. I found a roll of chicken wire at my local farm store for $5, and that purchase ended up being the only expense for this entire project!

IMG_1034.jpg

All that was left was reassembly, with the original hardware, and I hired my husband to hang it on the wall in our entryway. I think it turned out really cute, and in the pictures below you can see how our enormous entryway is slowly starting to come together!

(our permanent front door has yet to be installed)

(our permanent front door has yet to be installed)

This entryway has been a challenge for me to decorate (I mean, we have only lived here three years and it’s still mostly empty). However, this medicine cabinet turned decor shelf has given me the jump start I needed to finish this space once and for all. Do you have a room/area in your home that is a challenge to decorate? If so, I would love to hear how you tackled it.

For now, its back to shoveling snow for me, but I hope this project brought you some inspiration for an inexpensive furniture makeover in your future!

Signoff.jpg

Toy Chest Makeover - DIY

Hi friends! It seems we have found ourselves in an endless cycle of snow days here in Iowa, but I’m using this time to complete all those small projects I never seem to have time for. Today I’m going to share with you my most recent project, a quick and easy makeover of a children’s toy chest.

My husband found this toy chest on Facebook marketplace a few months back, and it had been sitting in our garage as a kind of ‘rainy day’ project. Well recently I found myself with some free time due to terrible weather, and decided to give it a quick makeover.

Here are a couple before photos of the top and sides of the piece.

IMG_0735.JPG
IMG_0726.JPG

I removed the hardware that attached the top to the rest of the box and ran a sander over the entire piece to smooth out any rough edges, since a one year old would soon be climbing all over it.

Next, I painted the entire toy chest with some furniture paint and allowed it to dry. The original hardware was a dull brass color, but some black spray paint fixed that!

I decided to add a little DIY stencil to the top piece of the toy chest, and if interested you can see my complete stencil tutorial here.

My ‘stencil’, which is just large font printed on regular paper.

My ‘stencil’, which is just large font printed on regular paper.

Below is an up-close photo of how the stencil turned out, ignore the mess!

57014445217__80F87A59-26DD-4AB3-BBF6-94C881AB3812.JPG

After everything was dry my husband was nice enough to put it all back together, and he added a couple rubber stoppers to the inside of the lid to prevent little fingers from being pinched. Overall, it was a quick no-cost makeover and now matches the decor in my daughters room.

IMG_0925.JPG
Rubber stopper to prevent pinched fingers

Rubber stopper to prevent pinched fingers

IMG_0924.JPG

That’s it! This project was a little time consuming due to the stencil, but with several days in a row of negative windchill, it seemed I finally had the time to take this on so I went for it!

As always, feel free to follow us on Instagram (@aps_design) for all of our up to the minute projects and behind the scenes antics! :)

Signoff.jpg

DIY Laundry Detergent

Hi friends! Today I want to share a quick post on my DIY laundry detergent. If you have been following along you know that I love all things budget friendly, and when it comes to cleaners and detergents I prefer as few chemicals as possible for my family. Now I also believe there is a time and a place for bleach, and I am not opposed to busting out the heavy duty cleaners if needed, I just prefer not to use those for laundry.

Let’s get to it! This recipe is SO simple, and makes a large amount!

Here are the ingredients:

IMG_5237.JPG

8 cups Baking Soda

6 cups Super Washing Soda

2 bars castile soap (grated)

I like to use one bar of peppermint and one of lavender, but this time I only had lavender on hand.

Mix the baking and washing soda together in a large bucket, grate the bars of soap and mix again.

That’ts it! I use 1/8 cup per load. Not only does this clean your clothes and smell amazing, but it also cleans your washing machine! I store my detergent in a large glass jar, pictured below.

I also have been using wool dryer balls for YEARS (in place of fabric sheets) and never had to replace them! I use them with or without a drop of essential oil (for scent) and I have found that the more dryer balls I put in with my clothes, the faster they dry. This saves energy as the machine runs for a shorter amount of time.

IMG_0775.JPG

This little DIY laundry routine has really cut down the cost of washing/drying laundry in our family, and I hope it can bring some inspiration to yours! Have you tried this homemade detergent? Let me know how you like it!

Looking for the products I used for this post?

These are affiliate links, to see my full disclosure click here.

Signoff.jpg