Farm Share Friday - Week 5
Hello friends!
It’s Friday and that means we have not only made it to the end of the week, but it’s also time for #farmsharefriday! Today’s post is going to be super quick since I don’t have any new recipes to share with you from last week’s box and I am on a time crunch this afternoon while writing this (can we say last minute?). Again, these posts are not sponsored and just my personal experiences and opinions with a local farm share program.
Alright, let’s get to it!
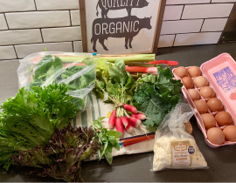
This week’s box contents:

1 doz eggs
2 heads of lettuce
1 bag of spinach
1 very large bunch of basil
Radishes
Beets
Now I consider myself a very non-picky eater and will try almost anything several times before determining I do or do not like it, however I can confidently say I am not a fan of beets. We did receive a few of them this week and luckily I have some coworkers that can take them off my hands.
Well speaking of work, I have to get ready and head there this evening. If you follow us on Instagram you occasionally see some story posts from my real job as a 911 dispatcher. I always thought that job title was mysterious so I try and share as much as I can about it to those curious.
See you soon friends!

Farm Share Friday - Week 3
It’s already that time of the week again, my favorite day (for many reasons)! We finally have the hot and humid Iowa weather that we are used to, and that means all sorts of goodies are popping up out of the ground, especially the herbs! We had a lot of leafy greens in our delivery last week, and I want to share a juicing recipe for anyone looking to add a little greenery to their diet. And don’t worry, my 1.5 yr old enjoyed it with me, so it can’t be that bad!

Green Juice
-2 green apples
-handful of each: kale, spinach, lettuce
-4 stalks celery
-1 Lemon (peel removed)
If you have never juiced anything before, read the directions for the machine you are using as they are all a bit different. I really like to juice vegetables because it’s easier than eating them and still provides all the health benefits! This recipe was perfect for all of the leafy greens we had in our share box last week.
Ok, on to this week’s box contents!

-Fresh flowers for planting
-Blueberries
-Green Tomatoes
-Eggs
-Radishes
-Sage
-Two heads of lettuce
-Greens
I have never tried fried green tomatoes, and it looks like this week I might have to! I better run and finish my outdoor work before it storms again, you can definitely tell it’s spring time in the Midwest lately! As always, thank you for stopping by the blog today!

Farm Share Friday - Week 2
It’s time for #farmsharefriday!
(these posts are not sponsored, just me sharing my personal experience with my local CSA)