Fixer Upper Homes - Risk vs Reward
A while back, I was asked about my favorite type of project, and homes that need renovations really speak to my heart. Whether it’s a cosmetic update or a structural overhaul, these homes have so much potential as they wait for their next chapter.
Every home tells a story, and every owner adds to that story. Quite often I will find myself in one of these older properties thinking about all of the people who came through that tired front door before me. Or the number of children that sat on the front porch over the last 100 years. The celebrations that took place in the family rooms at the holidays, or the heartache experienced when loved ones were no longer present for those gatherings.

Fixer upper projects aren’t for everyone, but in my experience they present some one-of-a-kind experiences that are second to none. I have put together some pros and cons for these types of homes, in case you are thinking of taking one on yourself.
Let’s start off with the positives…
Blank Canvas: This is your chance to be the designer your Pinterest account knows you can be! From paint colors to bathtubs, you get to put your own stamp on all of it!
New Chapter: With a few of your updates, these homes can be ready for their next 100 years. Your expertise and design choices could be enjoyed by future generations.
Smaller Price Tag: Homes that require renovations are often offered at steep discounts, even if they are in a desirable neighborhood. The cost of updating is not something the current owner wants to take on, so if you are not afraid of a little elbow grease you could catch a bargain.
Sizeable Profit Potential: Right in line with #3, a fixer upper home (properly updated) can present a sizable profit, and can be the perfect opportunity for budding developers.
Uncovering Hidden Gems: From original features to period architecture, the possibilities are endless. Who knows what’s waiting in those walls to be restored (did you know there are entire social media groups dedicated to ‘things found in walls’ ?)


And a few challenges…
Research, Research, and more Research: Finding the right property, that doesn’t require ‘too much’ work, can be time consuming for a buyer. Getting in touch with a real estate expert that knows how to evaluate this type of home is going to make the process much easier. If you need assistance in eastern Iowa, or need help finding someone in your area, you can contact me here.
Thorough Planning: Organization is key, especially if you will be tackling renovations yourself. Watching sales and rebates, tracking receipts and shipments, as well as applying for permits and interviewing contractors can all seem overwhelming. But with a solid plan in place up front, much of this headache can be avoided altogether.
Creative Solutions Needed: Sometimes unique problems arise that can require some creative thinking and/or solutions. Remember, not all older homes are constructed the same, as building codes and inspections likely weren’t in place at time of original construction. A contractor with experience with these types of homes can be your best asset for troubleshooting solutions.
So, are you ready to tackle a rundown property and make it your dream estate?
Maybe you are a planner, like me, and want to see it all mapped out before taking the plunge? I’ve been there.
Or, maybe you already own a property that needs renovations, but don’t know where to start? I’ve been there too.
Over at APS Homes, I have a free download that identifies the most common red flags that your fixer upper could require costly repairs, called…
10 Warning Signs You Might Be Looking At a Money Pit’
No tools or special skills needed
Print and take with you to the inspection!
At the end of each year, it always seems like we are in a race to finish projects before winter officially sets in, and this year is no different. With a nationwide shortage on materials, we are having to shuffle projects to tackles the ones that have in stock items and etc. It’s full on chaos over on google calendar, but we just have to power through!
Plus, I am distracting myself with Christmas decorating, anything goes in 2020!
I hope this post finds you all safe and healthy!
-Rachael
The Kitchen Reveal You Don't Want To Miss!
Sometimes there are home improvement projects that linger, for years. This would be one of those projects. Our kitchen was 95% finished for the last two years, all but for some 6 or 8 back splash tiles and decor. Well, since this winter is approximately 15 months long, we had time to finally get a few things done around here and this project was one of them!
A little background info:
the home we currently live in was designed on a piece of notebook paper by my husband. We eventually had to have an architect develop the house plans off of our drawing (because let’s face it, we know nothing about truss systems for roof structures) but the floor plan stayed the same. Now we had previously built additions to homes, and remodeled existing structures, but building the entire home from scratch was a new endeavor. Oh, and did I mention we had never designed a kitchen… (yikes!).
So off we went with our notebook paper drawing to meet a local cabinet maker and have him help us come up with something. He told us what worked logistically for wiring and plumbing, and showed us some basic layouts he had in production. I knew I wanted something different and unique and by the time we left our first meeting I am pretty certain he thought I was nuts.
Fast forward to that next summer, and we were laying tile and painting the walls in preparation for the cabinet maker to bring and assemble the cabinets. I don’t have many pictures from this point in time (maybe because we were literally building our home during the night and working during the day), but this photo below shows you the basic outline of our cabinet system (excuse the contractor lighting and pizza box).

The next step was to add counter tops and appliances, which then made this kitchen functional. We were on a time crunch, so finishing touches and decorating took the back burner. We just needed our kitchen to pass the final building inspection and we could worry about the rest later.
Originally, I was interested in concrete counter tops but my husband talked me out of it. We cook A LOT at our house, and he was afraid that we needed a stronger material that could take a beating without showing any signs of wear. I am happy to report that after three years of constant use, these quartz counter tops have held up perfectly and have zero imperfections.
We did add a stainless steel back splash behind the stove area pretty early on, and then gradually finished the rest of that wall with subway tile, as you can see pictured below.
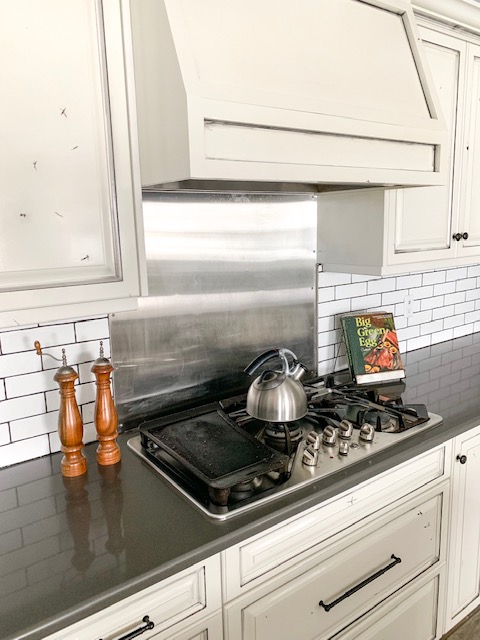
One of the first comments people usually make when they see our kitchen for the first time is that our cabinets look ‘beat up’. Well, I think this is where our custom cabinet maker thought I was nuts, but I wasn’t going to budge on the distressed look. The material is knotty alder, and we chose all of the wood that had the greatest amount of natural knots and ‘imperfections’. Then, combined with black glaze and iron knobs and pulls, this kitchen has the appearance that the cabinets are older or re-purposed, when in fact they are brand new. I know this is a unique look, and it’s not for everyone, but it really came together in the end and I couldn’t be happier with how it turned out.
Ok, fast forward a couple of years to present time, and the last of the subway tile was installed over the kitchen sink. During the notebook paper design phase, I had pictured a window for this space but it was not feasible since the garage was on the other side of the wall. I still decided to put a window in this space, but just had to be a bit more creative.
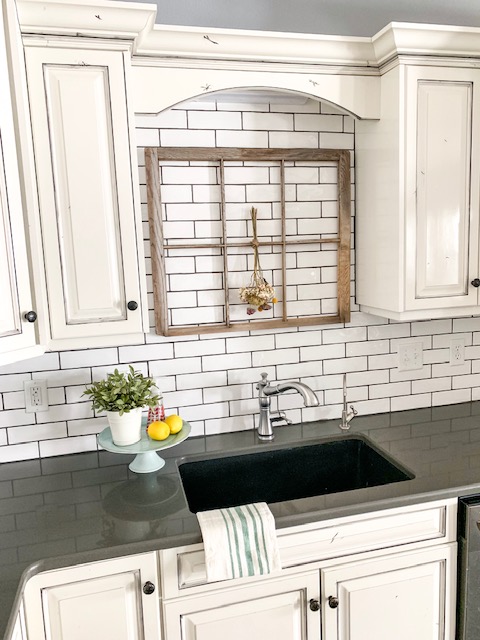
I found an old farmhouse window at a salvage barn for $5, and I immediately knew it would work for this space. All of the glass was removed, which was perfect since it would make cleaning a breeze. This window frame is very light, and thus I was able to install it easily with command strips. Plus, I didn’t really want to drill into the fresh tile! (yikes!) And while I love our sink, I would have preferred a copper farm sink but that just wasn’t in the budget for this house (maybe next time!).
Here are a couple more photos/angles of our kitchen:


Well I could go on and on about this kitchen, it really is the focal part of our home and I am so excited that it is finished. This was a huge lingering project that I can finally cross off of our list, all thanks to our epic long winter this year. If you have any other questions about the materials or process, feel free to leave a comment here or catch me on Instagram. As always, thanks for stopping by the blog today! We really appreciate your support!

The Epic Barn Beam Bed Frame!
Hi all! We are in the home stretch leading up to Christmas and many of you are probably already on break for the holidays (this season seemed like it flew by faster than previous years). I have one final post for you before we transition into full Christmas mode at my house, which will consist of a few days computer-free to enjoy this time with family. So if you are sitting in an airport waiting to travel to your holiday gathering, or maybe need a 5 minute ‘break’ from all things Christmas, I have just the post for you!
Recently, we finished up a client project that turned out to be the biggest piece of furniture we have ever created, thus the title of this post. This bed frame required long hours of prep, assembly, take down, haul to its final location, and reassembly, but as you will see it was well worth it and turned out stunning!
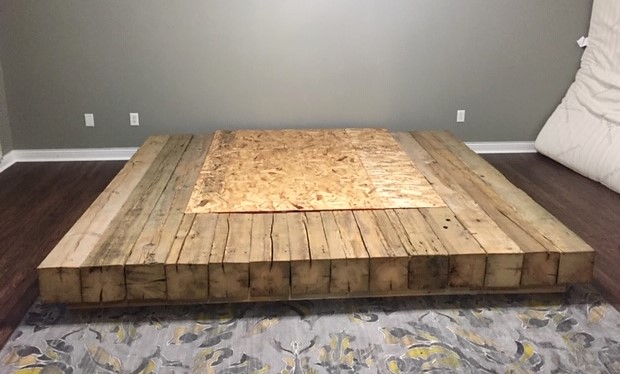
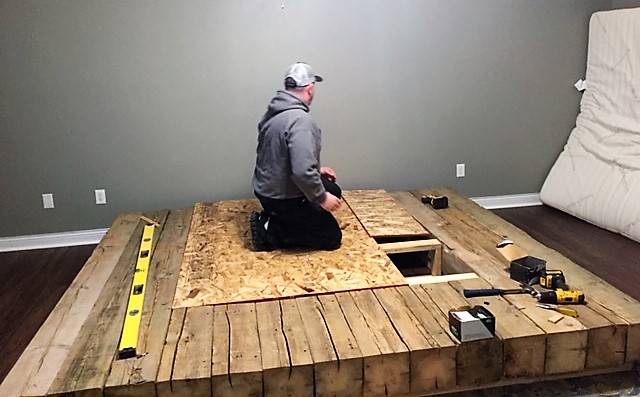
The materials for this project included authentic reclaimed barn beams and these were SOLID 8x8 beams, which made them very heavy.
Prior to use, the beams had to be cut, sanded and assembled at our shop to ensure they all fit together properly and weren’t warped by the last 100 years of extreme temperatures of Midwest weather. a simple frame was assembled to keep the beams up off the floor in the client’s room.
Next, each beam was secured in place. To eliminate some of the weight of this piece, an alternate framing technique was used to comply with floor joist specifications and it was completely covered by the mattress and otherwise not visible once assembled.


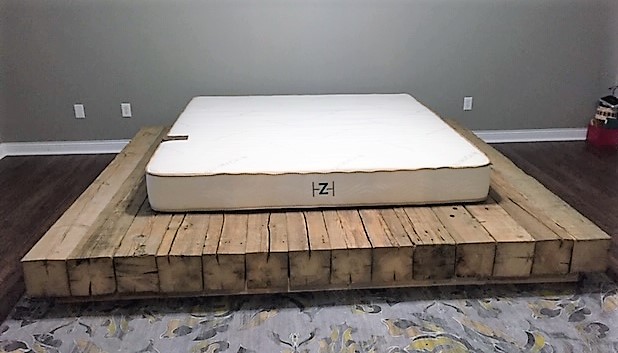
Here the frame is being finished up and mattress added.
To show you just how big this bed frame is, the mattress pictured is king size!
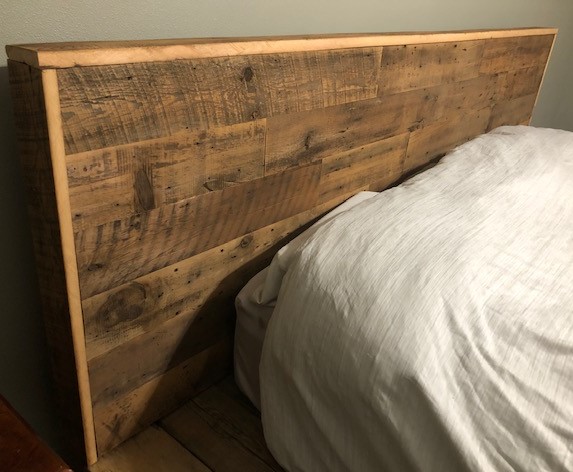
Pictured below are some up close photos of the wood details on the headboard and beams, each of which are unique. There is just something about the look of authentic barn wood that cannot be recreated with other materials.

The finished project photos!

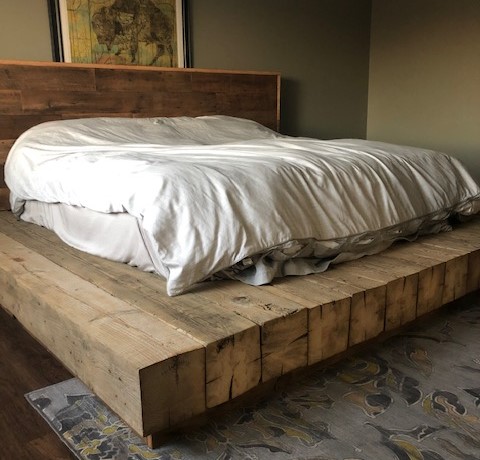
This bed frame turned out truly stunning!
I absolutely love how it all came together. A sincere thank you to the client who chose us to make this item for her!

The Friendship Fireplace Project!
Hey all, one week until Christmas Eve! Are you ready? (It’s OK, I’m not either!) I’m not too stressed about it either, there’s plenty of time left for that! All of that aside, I am excited to share with you a client project we recently finished up called ‘The Friendship Fireplace’. The street address for this home contains the word ‘Friendship’, thus that is how the project name was developed. We do a number of fireplace/mantel projects and have to keep them straight with unique titles!
The fireplace is often the focal point of the living room as well as the backdrop for family photos, and this homeowner wanted a total remodel of this space to bring it out of the 1970’s. To do that, we first had to start with a clean slate!

Aside from the fireplace itself, there was not any part of the original design that was worth keeping…it all had to go.
And as you can see we made a huge mess, but it was worth it!
Progress photos after some new framing, insulation, and cement wall board.


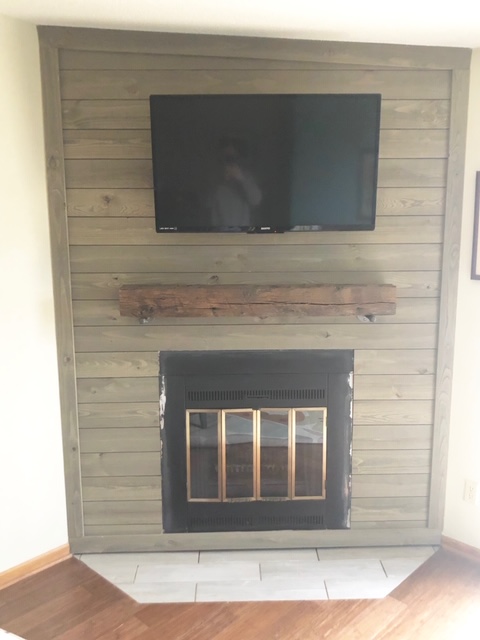
We needed to redefine this space, and the easiest way to accomplish that was to add a new texture or wall surface. The homeowner chose rough sawn weathered shiplap, which is pictured below. It’s a gorgeous light grey, and really makes this space ‘pop’!

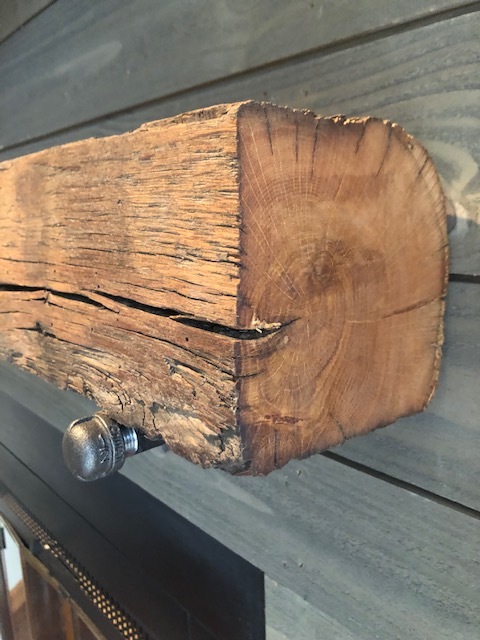
These barn beam mantels are always my personal favorite. Every single one is unique, bringing a different century-old story into each home. This one was mounted with simple gas pipe wall plates and fittings.


And here’s a full length view, complete with fresh tile at the base of the new wall. This family will have a fresh new space to take all of their family photos and the mantel will surely be a talking point with guests for years to come!
We really appreciate the homeowner choosing our business to complete her fireplace remodel!
The fireplace insert remains in original condition, as the homeowner has plans to resurface that herself
And some bonus mantel pictures, because I can’t help myself!


My (No-Cost) Holiday Front Porch!
Last week I wrapped up my decorating for the year by completing my front porch, and it was a challenge! If you follow me on Instagram (@aps_design) you already know that I posted the whole process on stories that day, attempting to do the entire porch with items I already had at home, no purchases!
This was a personal challenge I came up with because I know I have a ton of items at home that I should be creative with and use for decorating, but I usually forget to do that and just purchase what I need instead. But, in the spirit of budget friendly, I went with a no-cost front porch this year! Now I will admit, I have a large collection of random items that helped make this task possible, but I did have to get creative in using them and some of these methods could inspire you as well!
Lets get to it!
I worked on the right side of the porch first, collecting items and putting them in a wagon that I found in my garage. I had made some ‘presents’ out of blocks of wood earlier this season and decided they would go well together in the wagon. The crock that is also in the wagon could probably use some greenery but in the spirit of not buying anything for this porch decor, it remains empty.
The large rusted milk jug is a staple piece for my front steps, so it always stays out there in some capacity. This season I gave it some height by positioning it on top of an overturned wooden apple box.
I piled the wood slices up in front of the wagon to add more of a woodsy/rustic/tree farm feel to the picture.

The left side of my porch was a bit more challenging, as I did not have any Christmas lights on green wire, but in the evening hours when the tree is lit it’s not as noticeable. I simply put the tree in an old wash bin and stacked some wood slices in front of it.
During my scavenger hunt in the garage, I found this beautiful vintage sled and half barn door that I had previously forgotten about. I grabbed a little greenery and tied it to the sled. Ideally, I would find some old ice skates to pair with the sled, if I wasn’t doing a no-cost challenge!


Here’s the final look!
Again, I would have done things a little bit differently if I wasn’t doing this little personal challenge of not purchasing anything for the front porch, but this did force me to look through things I already had and be creative in using them. I hope this can provide some inspiration with your own budget friendly decorating! Merry Christmas!

Coffee, Tree Trimming, and Christmas Decorating
Hi! Can you believe next week is already Thanksgiving? I still cannot wrap my brain around it. Either way, Christmas decorating is in full swing at my house and while I’m not quite ready to share what I have done so far, I did help a dear friend decorate her home yesterday over some much needed Starbucks, and wanted to quickly share what we did in case some of you are planning on whipping out your holiday items on Thursday night.
You all know I love everything budget friendly, and holiday decorating is no exception. While I do often buy a small item here or there, I reserve most of my décor shopping for after the holiday (or season) to take advantage of those steep discounts. As a result, I often forget what I have from the year before when it’s time to dig it all out of storage again, and this is why I prefer to get all decorations spread out in one place before beginning to place them throughout my home. I often reuse items in a new way than the year prior, or simply put them in a different room to give the illusion of ‘new’, without going over budget.
Ok, lets get to it!
Having an infant on the move, my friend wanted to utilize some higher spaces in her home to place décor that her baby could not get into. She had two shelves on either side of her fireplace/tv area that she wanted to fill, and we also needed to figure out something for her tree to make it somewhat baby friendly.
We tackled the shelving first, and to do so we needed to paint a few mason jars white to go along with her Christmas theme this year. If you need a DIY tutorial on how we did it, click here.


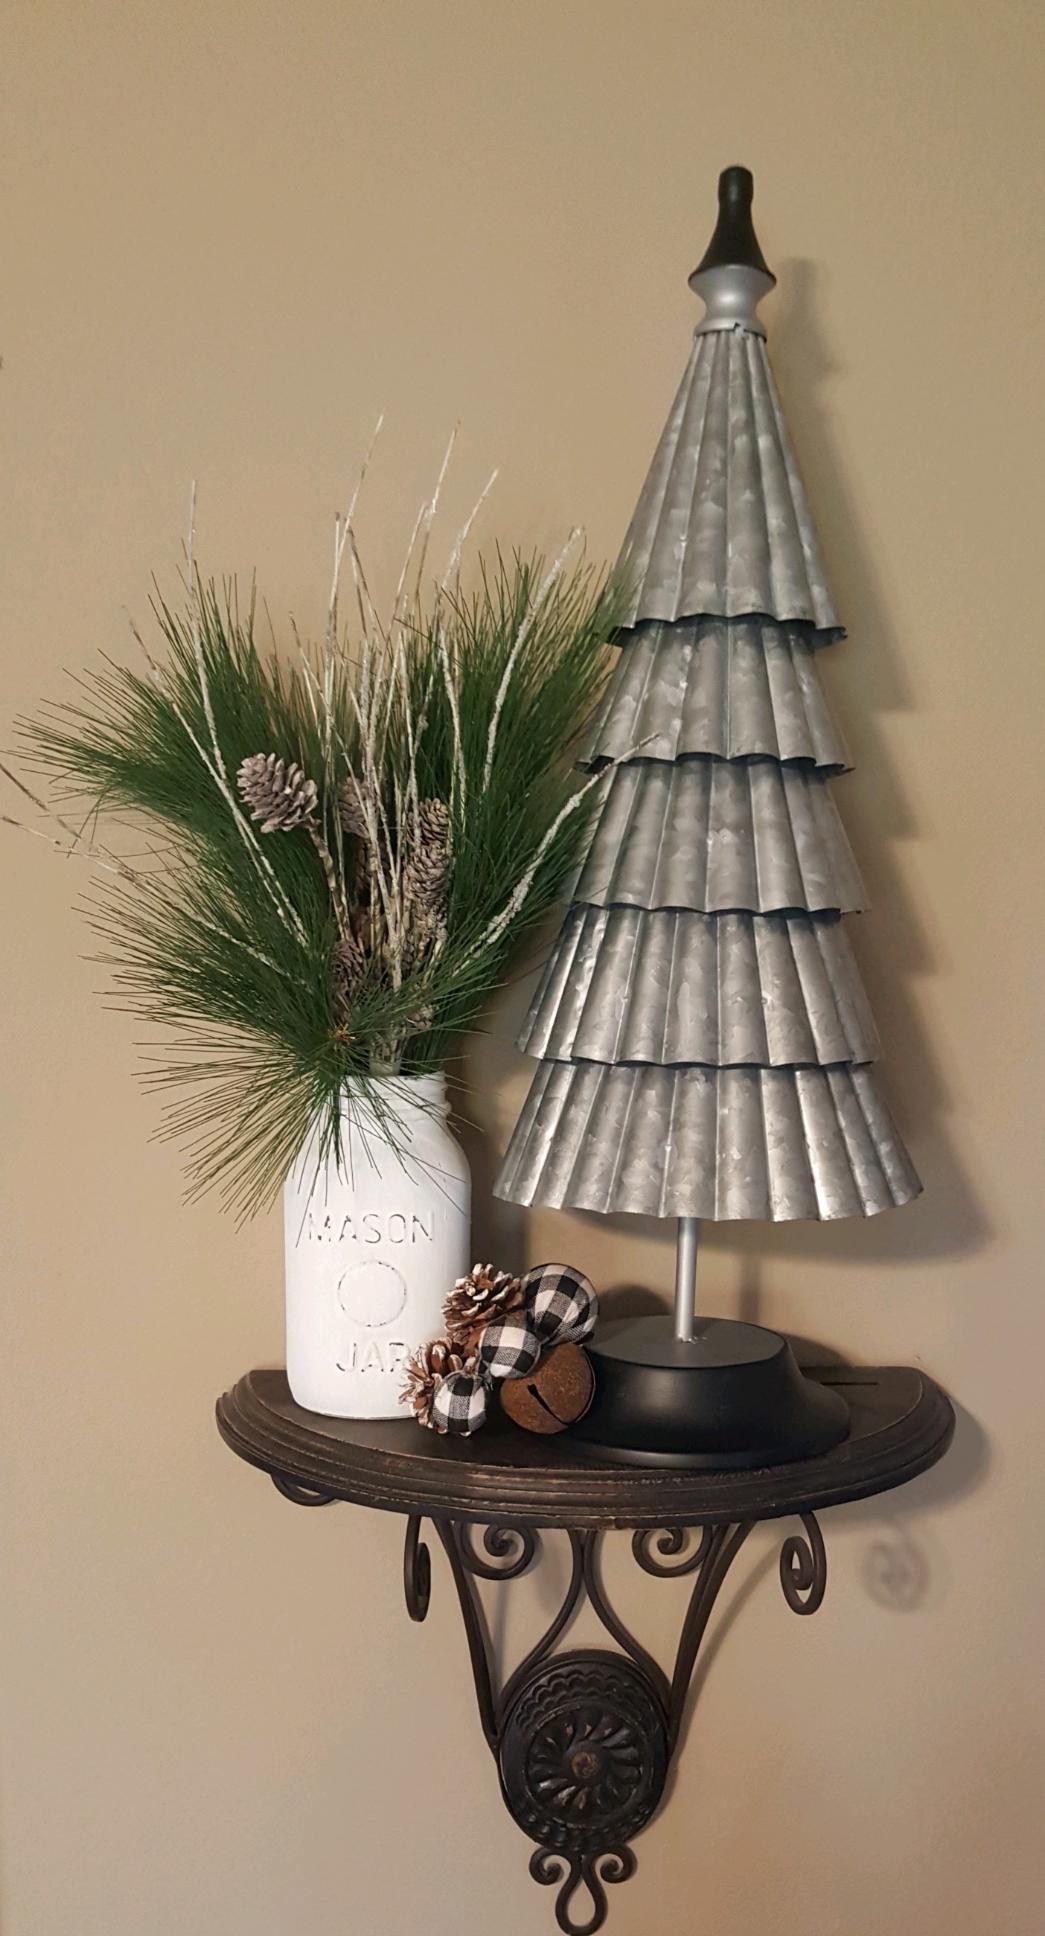
Next, we needed to figure out how to keep the little one out of the Christmas tree. To do this, we used a smaller, 'planter’ style tree that would normally be used on a front porch or as an accent tree. I trimmed most of the red ‘berries’ off of it, since red wasn't really in the color scheme this year. We snagged a $3 tree skirt from the Target dollar spot, an old metal tub that I had laying around, and got to work!

The tree base looked a bit ‘empty’ in the large wash bin by itself, so we gathered up other items (ornaments, stocking holders, random things) and filled the wash bin until the base of the tree was no longer visible.
We placed the whole thing on top of an end table, out of reach of little hands.
We finished the look with a metal Christmas tree sign, which was another Target dollar spot deal.
The dollar spot is on point this season!
We had a great time decorating while catching up and spending some time with each other, after all, that's what this season is all about!
Here are some pictures of our finished products! Happy decorating!