


The Final Porch Photo
It’s been about a week since we visited our home for the last time, picked up the final items, and took one last photo on the front porch.

The last porch pic!
It’s been a bittersweet experience, leaving the first home we built together from the ground up, our child’s first home, our beloved dog Mia’s last home.
We are excited to move on to our acreage and spread out…to watch the summer sunset’s with sweet tea and fireflies…to chase chickens, play in the creek, and enjoy the wildlife. I mean, first we have to build a house out there, but we will get started on that soon.

Whatever it is, the way you tell your story online can make all the difference.
We have plenty of exciting projects this summer, and I can’t wait to start sharing them with you. Now that we have a bit more time (and aren’t in the middle of moving) I will be catching up.
We’ll chat soon!
-Rachael
Laundry Room Makeover
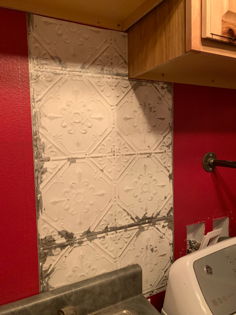
I am always looking for inexpensive ways to update and/or decorate our home, and my laundry room was recently at the top of my list of spaces that needed serious help. I had seen several designers recently posting about using wallpaper to update a space, and my first reaction was not a positive one. I mean, wallpaper?!? Who has time for that??
Well as it turns out, I had time for it, and so do you! Wallpaper has come SUCH a long way from the days where I remembered my grandparents mixing paste and matching patterns, only to have it dry and shrink just enough that it no longer lined up perfectly. I was curious how this “new” version worked, so I ordered a roll from Target’s website, which has dozens of options.
Today’s version of wallpaper has no mess, simply peel and stick. Make a mistake and need to remove it? Just peel it off the wall, no damage to the paint/wall, and you can re-use the piece! This feature in particular makes a wallpaper project budget friendly, I did this entire laundry room makeover with only one roll, which was $30. Don’t worry about matching patterns either, the print I chose has a tiny pattern line on it so you can easily tell where the next piece should line up.
So I went for it and ordered the wallpaper….
Before I show you how it turned out, let’s take a look at some ‘before’ photos!


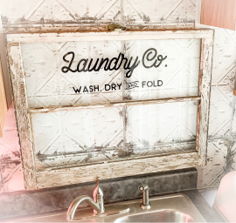
This laundry room functioned just fine how it originally was, but I wanted a space that was more inviting and had a ‘fresh’ look. I first shopped the garage for some shelving materials, then picked up a vintage window for the space above the sink, and finally picked out the wallpaper that would tie it all together Somehow, I roped Adam into helping me.
Neither one of us had ever worked with wallpaper, and thus we had no idea how to install it. I envisioned unrolling it and sticking it to the wall (why make it more difficult than it needs to be, am i right?), however Adam had other ideas.
He approached the situation as thought it were flooring, and found the center of the wall and the center of the wallpaper pattern and started there. As a result, the first piece took about 45 min to place, but the rest of it went much faster.
After the wallpaper was applied, we placed a small white trim around the top edges to give it more of a polished look. Then all that was left was to mount the shelf and hang the window, and suddenly the laundry room had been transformed! Here are a couple photos…
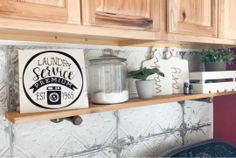

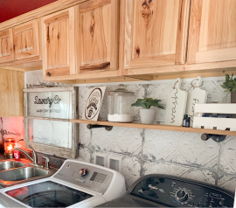

This budget friendly update has made quite a difference, and I am really happy how it turned out. This was a learning experience, but it really was quite easy, so if you are looking to freshen up a space consider using wallpaper!
That’s all I have for today, I am headed back outside to enjoy this second Summer that Iowa has given us this week! I will be back soon with our latest outdoor client project, as soon as I load and edit the photos :)
As always, thank you for stopping by the blog today! We really appreciate it!
-Rachael
The Kitchen Reveal You Don't Want To Miss!
Sometimes there are home improvement projects that linger, for years. This would be one of those projects. Our kitchen was 95% finished for the last two years, all but for some 6 or 8 back splash tiles and decor. Well, since this winter is approximately 15 months long, we had time to finally get a few things done around here and this project was one of them!
A little background info:
the home we currently live in was designed on a piece of notebook paper by my husband. We eventually had to have an architect develop the house plans off of our drawing (because let’s face it, we know nothing about truss systems for roof structures) but the floor plan stayed the same. Now we had previously built additions to homes, and remodeled existing structures, but building the entire home from scratch was a new endeavor. Oh, and did I mention we had never designed a kitchen… (yikes!).
So off we went with our notebook paper drawing to meet a local cabinet maker and have him help us come up with something. He told us what worked logistically for wiring and plumbing, and showed us some basic layouts he had in production. I knew I wanted something different and unique and by the time we left our first meeting I am pretty certain he thought I was nuts.
Fast forward to that next summer, and we were laying tile and painting the walls in preparation for the cabinet maker to bring and assemble the cabinets. I don’t have many pictures from this point in time (maybe because we were literally building our home during the night and working during the day), but this photo below shows you the basic outline of our cabinet system (excuse the contractor lighting and pizza box).

The next step was to add counter tops and appliances, which then made this kitchen functional. We were on a time crunch, so finishing touches and decorating took the back burner. We just needed our kitchen to pass the final building inspection and we could worry about the rest later.
Originally, I was interested in concrete counter tops but my husband talked me out of it. We cook A LOT at our house, and he was afraid that we needed a stronger material that could take a beating without showing any signs of wear. I am happy to report that after three years of constant use, these quartz counter tops have held up perfectly and have zero imperfections.
We did add a stainless steel back splash behind the stove area pretty early on, and then gradually finished the rest of that wall with subway tile, as you can see pictured below.
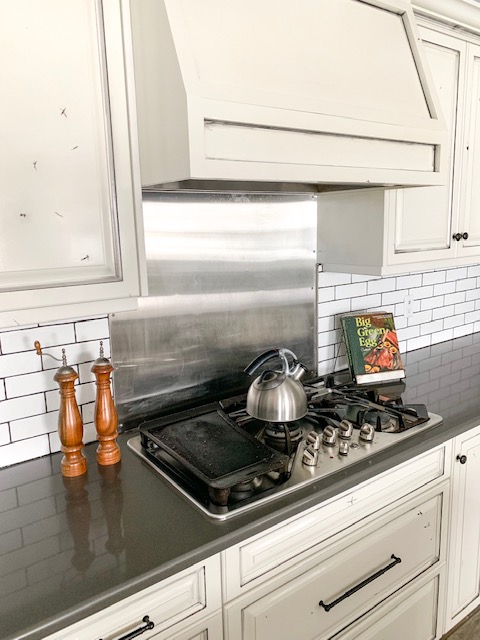
One of the first comments people usually make when they see our kitchen for the first time is that our cabinets look ‘beat up’. Well, I think this is where our custom cabinet maker thought I was nuts, but I wasn’t going to budge on the distressed look. The material is knotty alder, and we chose all of the wood that had the greatest amount of natural knots and ‘imperfections’. Then, combined with black glaze and iron knobs and pulls, this kitchen has the appearance that the cabinets are older or re-purposed, when in fact they are brand new. I know this is a unique look, and it’s not for everyone, but it really came together in the end and I couldn’t be happier with how it turned out.
Ok, fast forward a couple of years to present time, and the last of the subway tile was installed over the kitchen sink. During the notebook paper design phase, I had pictured a window for this space but it was not feasible since the garage was on the other side of the wall. I still decided to put a window in this space, but just had to be a bit more creative.
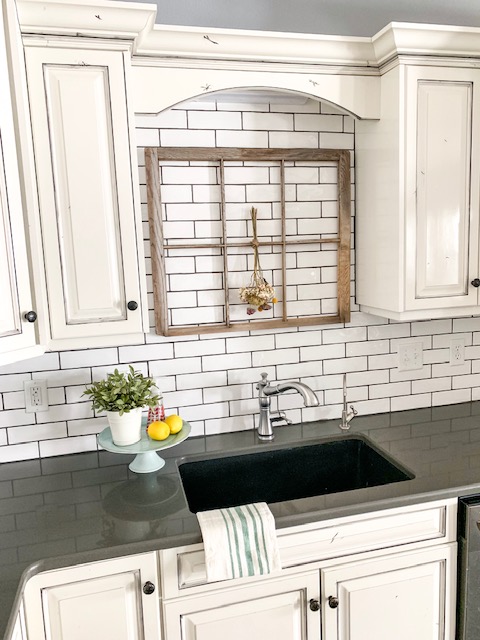
I found an old farmhouse window at a salvage barn for $5, and I immediately knew it would work for this space. All of the glass was removed, which was perfect since it would make cleaning a breeze. This window frame is very light, and thus I was able to install it easily with command strips. Plus, I didn’t really want to drill into the fresh tile! (yikes!) And while I love our sink, I would have preferred a copper farm sink but that just wasn’t in the budget for this house (maybe next time!).
Here are a couple more photos/angles of our kitchen:


Well I could go on and on about this kitchen, it really is the focal part of our home and I am so excited that it is finished. This was a huge lingering project that I can finally cross off of our list, all thanks to our epic long winter this year. If you have any other questions about the materials or process, feel free to leave a comment here or catch me on Instagram. As always, thanks for stopping by the blog today! We really appreciate your support!

Bring it, 2019!
I have never been a person who makes resolutions for the new year, but recently I have caught on to the idea of having a ‘word’ for a focal point behind fresh ideas and goals.
This year, i’m going with the word ‘visibility’.
For those of you who may be new to our community, 2018 was a big year for APS as we branched out into the tech world and constructed this fancy website that you are currently viewing. While APS Construction and APS Design are not new businesses, the idea of documenting and publishing content to a website was (and still is) very new to us.
The suggestion to create a website came up about a year ago, and to be honest I tried to ignore it for as long as I could, as the thought of taking the time to learn the behind-the-scenes technical details seemed daunting. But the need for a way to organize and showcase our work to better serve our clients was not going to go away, so in August I tackled this project head on. And while this website is still a work in progress and receives almost daily updates and tweaks, it certainly is nice to be able to send a client here to view past projects instead of trying to scroll through thousands of photos on a phone.
We have some big plans in store for the coming year, and increasing our visibility will be in the background of all of them. Soon you will be able to find APS Design’s ‘blog’ portion on Apple News, I will share the official link for anyone interested when everything is done being approved by Apple.
I can also share that I am in the final stages of developing a ‘commerce’ portion of this site, where customers can easily purchase the personalized book sets that you might have seen on our Instagram or Pinterest accounts. This should hopefully streamline the process and make things easier on both ends, but first I have to get through the legal side of things and draft ‘terms of service’ and register to collect state sales tax and all of that fun stuff.
As other activities become more finalized I will be sharing them, and as always I will be posting our current client and DIY projects to give you some inspiration for your own farmhouse. We don’t know all that 2019 has in store for us, but we are ready to work hard and see where this journey takes us.

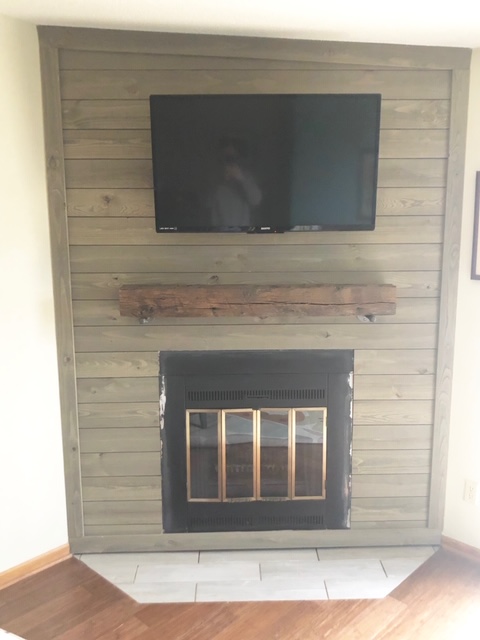
The Friendship Fireplace Project!
Hey all, one week until Christmas Eve! Are you ready? (It’s OK, I’m not either!) I’m not too stressed about it either, there’s plenty of time left for that! All of that aside, I am excited to share with you a client project we recently finished up called ‘The Friendship Fireplace’. The street address for this home contains the word ‘Friendship’, thus that is how the project name was developed. We do a number of fireplace/mantel projects and have to keep them straight with unique titles!
The fireplace is often the focal point of the living room as well as the backdrop for family photos, and this homeowner wanted a total remodel of this space to bring it out of the 1970’s. To do that, we first had to start with a clean slate!

Aside from the fireplace itself, there was not any part of the original design that was worth keeping…it all had to go.
And as you can see we made a huge mess, but it was worth it!
Progress photos after some new framing, insulation, and cement wall board.


We needed to redefine this space, and the easiest way to accomplish that was to add a new texture or wall surface. The homeowner chose rough sawn weathered shiplap, which is pictured below. It’s a gorgeous light grey, and really makes this space ‘pop’!

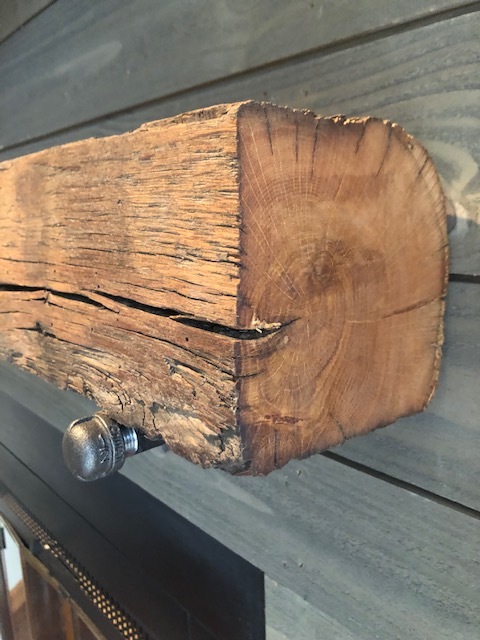
These barn beam mantels are always my personal favorite. Every single one is unique, bringing a different century-old story into each home. This one was mounted with simple gas pipe wall plates and fittings.


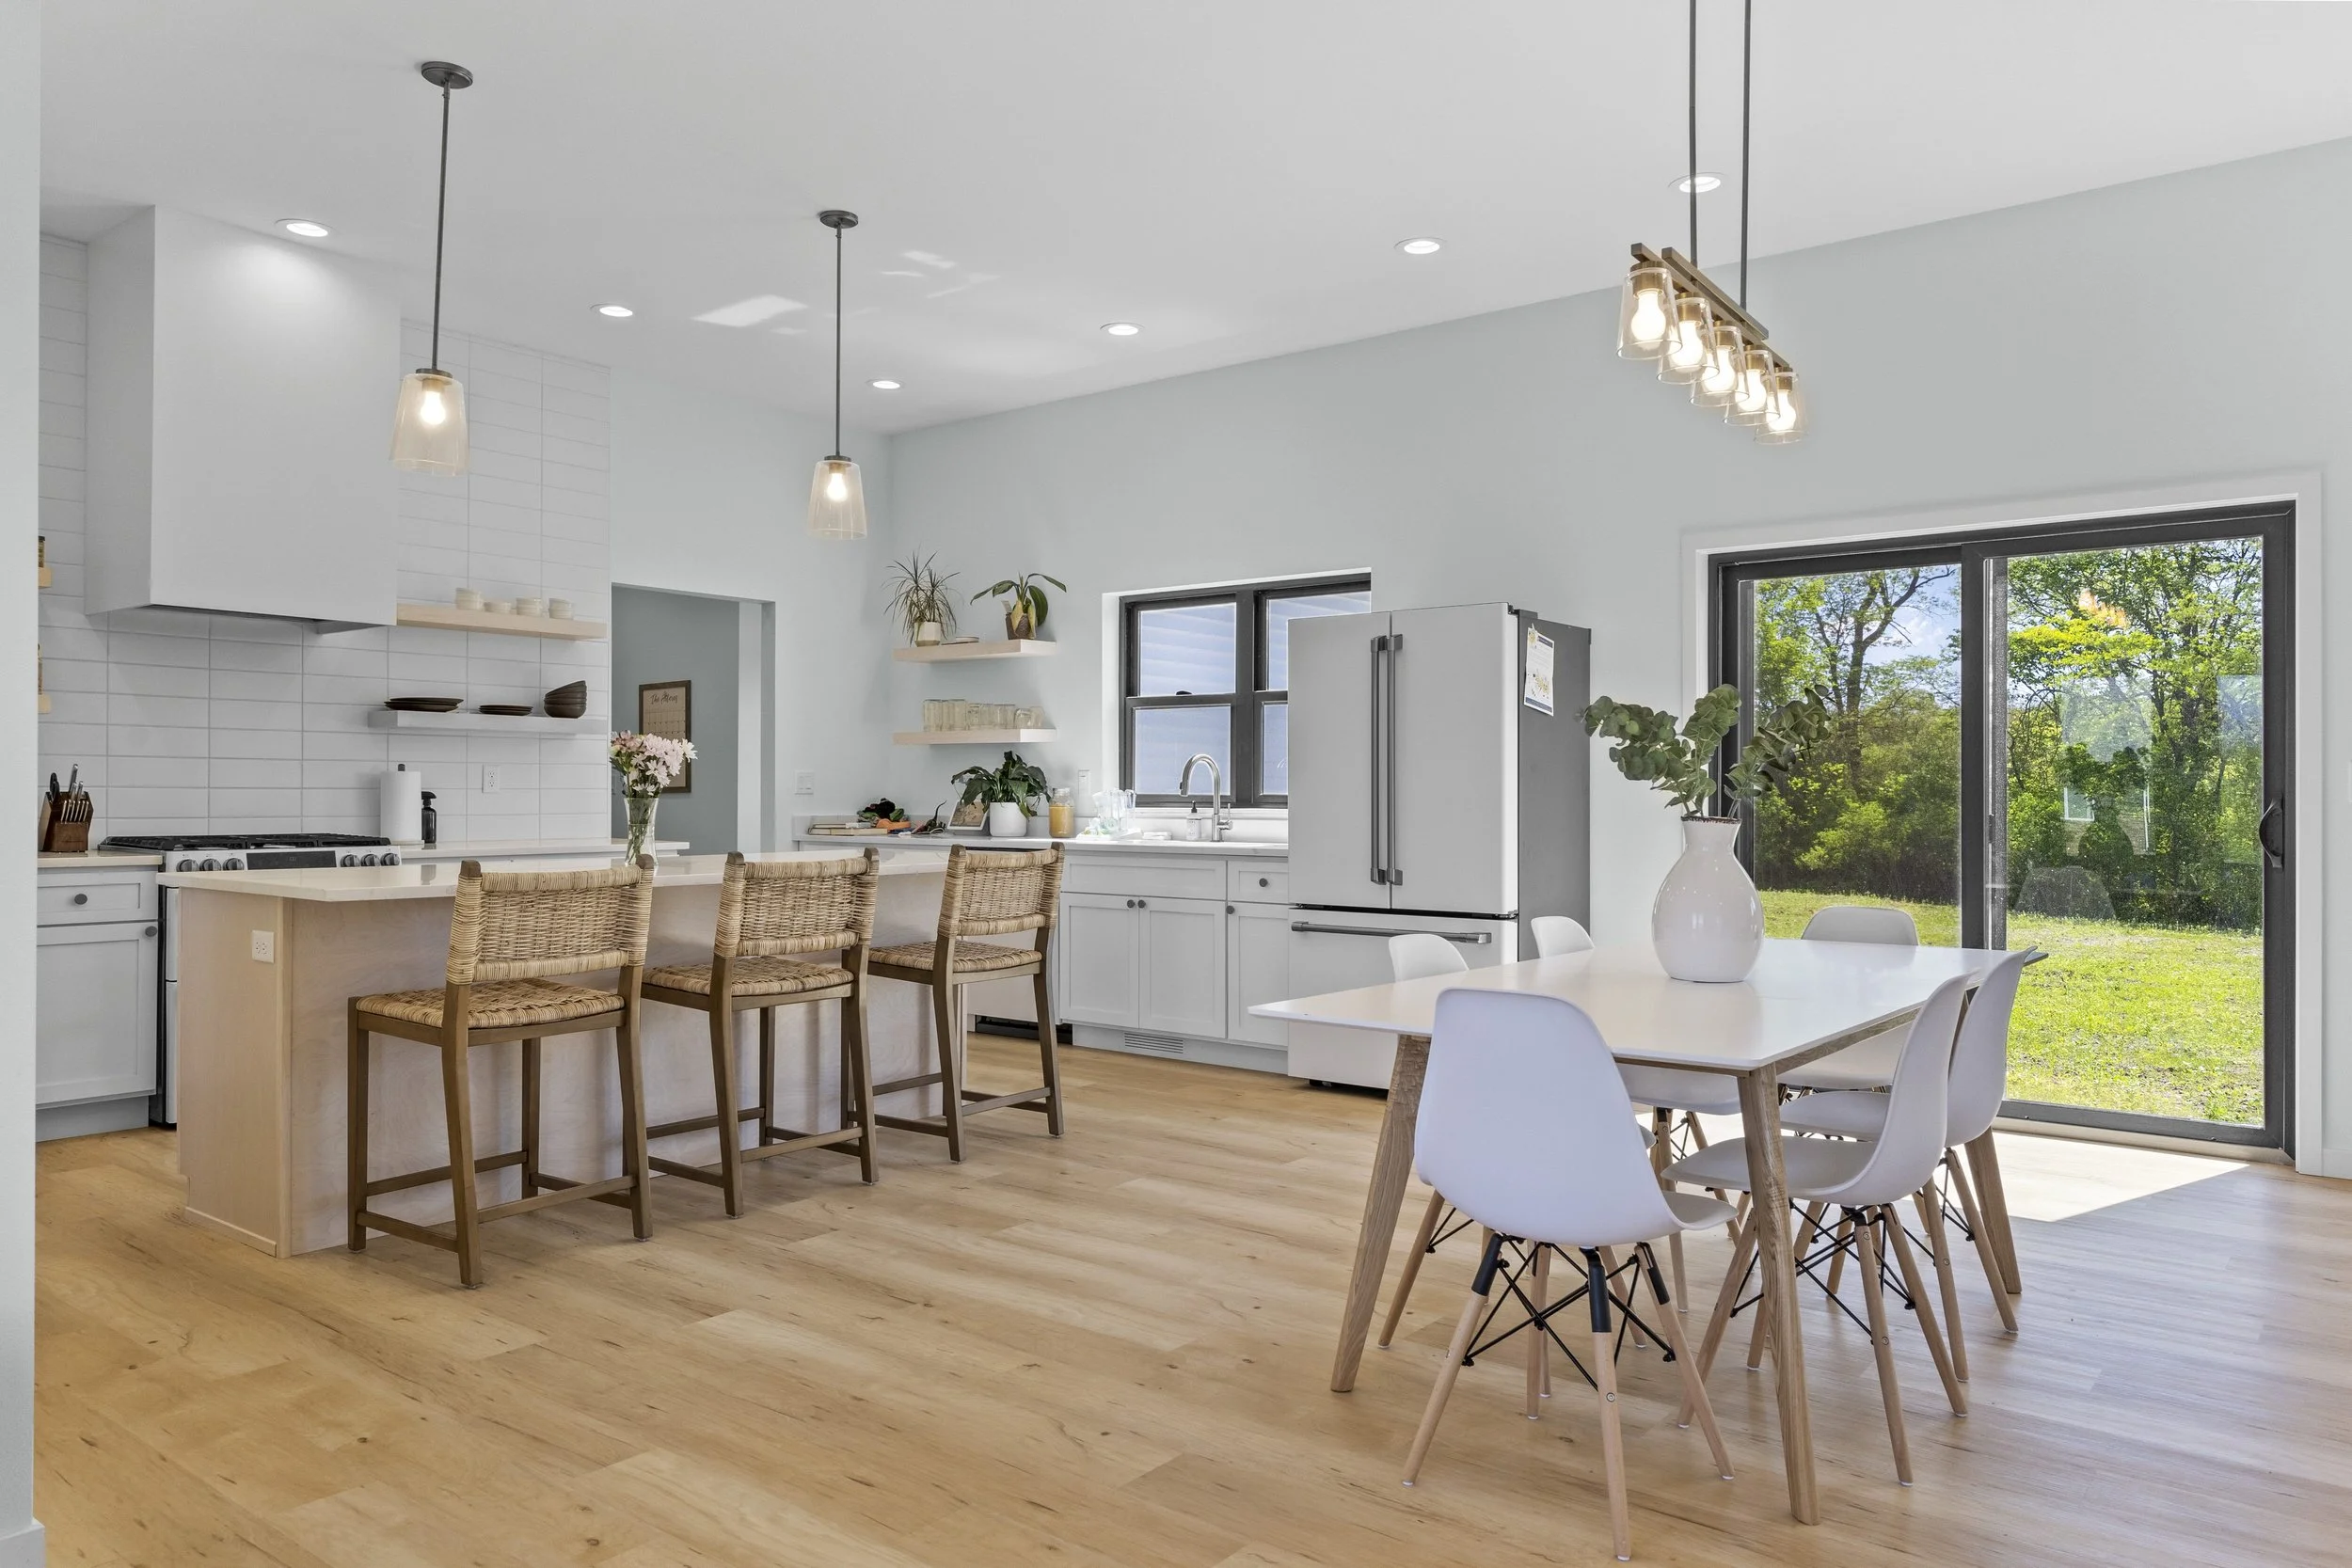
And here’s a full length view, complete with fresh tile at the base of the new wall. This family will have a fresh new space to take all of their family photos and the mantel will surely be a talking point with guests for years to come!
We really appreciate the homeowner choosing our business to complete her fireplace remodel!
The fireplace insert remains in original condition, as the homeowner has plans to resurface that herself