Spring Front Porch
Happy Spring to all of you!
It’s been a little while since I have had time to get on here and share what we are up to, which consists of a long list of projects that seems to grow by the hour! I feel like the winter was so long, that when spring finally arrived we ran out and attempted to do all of the things. We may have taken on a bit too much all at once, but that just means we have more fun projects to post in the upcoming weeks.
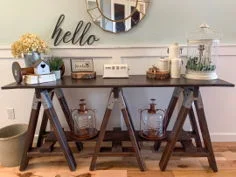
For today, I’m sharing my front porch setup for spring. We still have tricky weather here in Iowa, so unfortunately no live plants are included in my decorating this go around, but hopefully I can add some soon. I’m all about budget friendly decorating, and today’s post includes just one purchase, a $10 rug. So let’s get to it!
We will start with the left side of the door…

Recently, I picked up these ultra heavy duty closet doors (that look like shutters) for free on Facebook Marketplace. I knew I wanted to used them on the front porch, since their weight would help withstand the wind/storms of the Spring weather here in the Midwest. I went through my garden supplies and found these steel buckets from a few years back (they are originally from Lowe’s), and filled them with dirt and faux succulents. Real plants would be ideal, but since we had a freeze warning (and snow!) as little as a week ago, I had to hold off for now.

Next, we have this vintage water pump and wash tub I picked up at a flea market a couple years back. Simple!

A neighbor was cleaning out their home and had an old red metal star they gifted to me, which I simply spray painted black and hung on the door. This white door is not our permanent front door, just one we used to secure the house during construction. Somehow we have lived here three years without replacing it, but Adam assures me this is the year the official front door will be installed! Until then, we have this plain one to deal with. And in this photo you can see my ‘home sweet home’ rug from Target.

On to the right side of the door, which includes more faux plants, and a very old milk jug that is epic heavy. I also included my ‘hello’ metal sign from JDH Iron Designs, I used a few command strips and stuck it right to the stone.

Alright, here is the full photo of the entire front porch! I am enjoying the little pop of red from the water pump, and the simplicity of the rest of it. I hope this post has brought you some inspiration for your own front porch and as always, thank you for stopping by today!
Happy decorating!

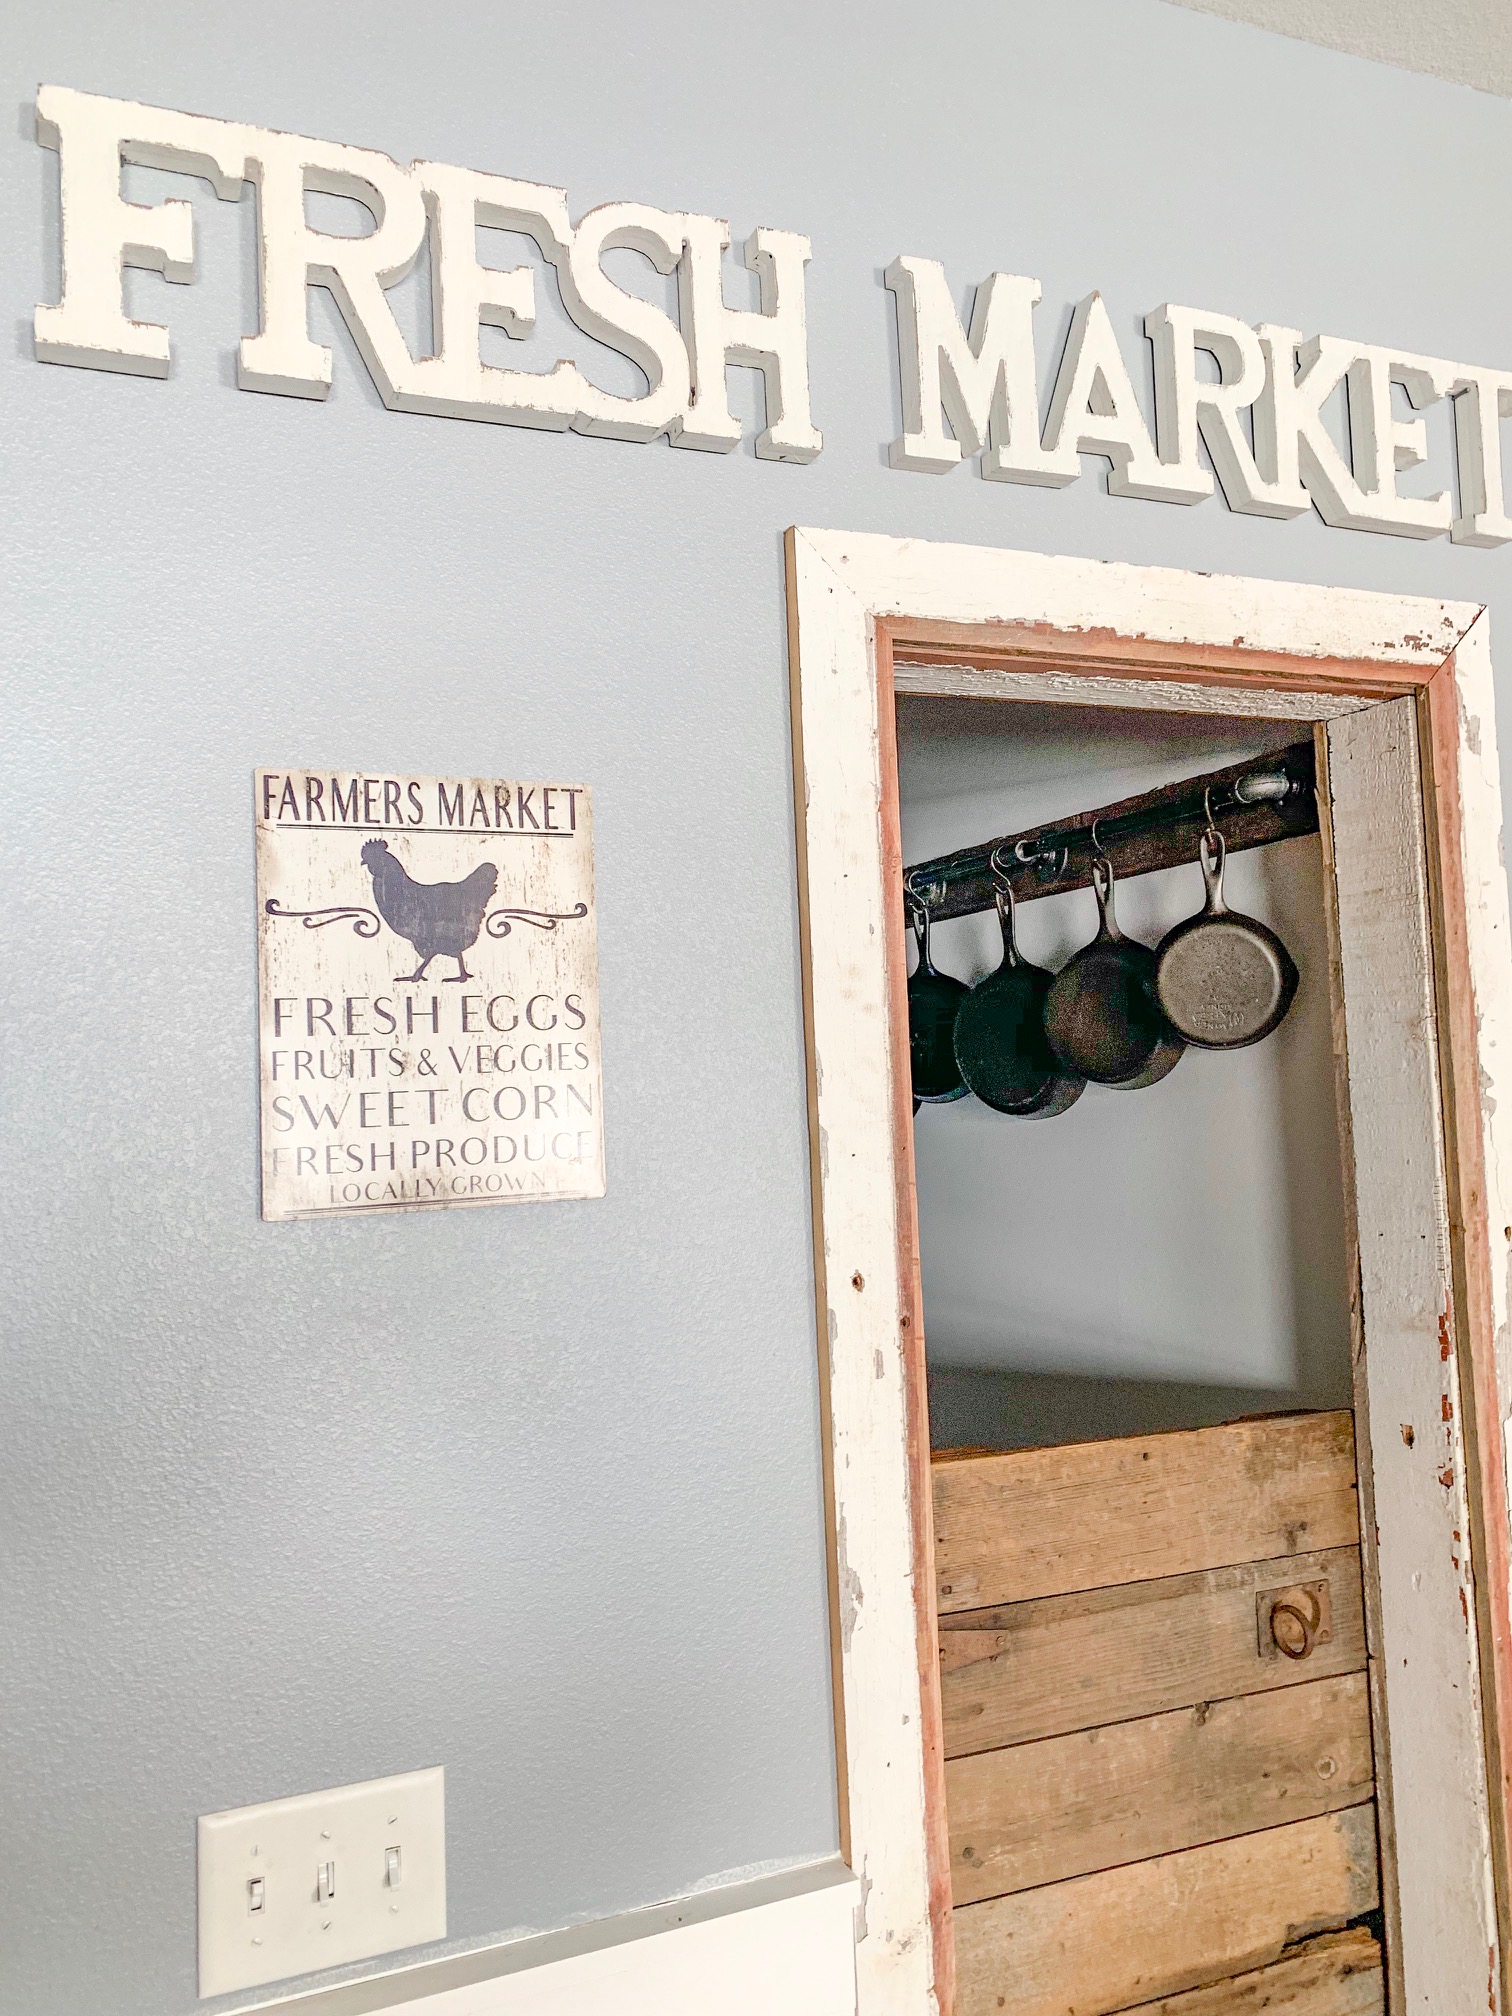
Our Re-Purposed Pantry Door
Hi there! I hope today finds you enjoying sunny Spring weather! Today I am sharing a little behind the scenes info on our pantry door that received so many questions on Instagram the other evening. Here is the photo I posted in case you missed it.

This pantry door is from an old carriage house that we had to tear down due to irreparable wind damage. The structure was two stories tall, with an attic/loft above the area that held the horses and equipment. Here is a photo I found of the carriage house that I took right before we took it down.
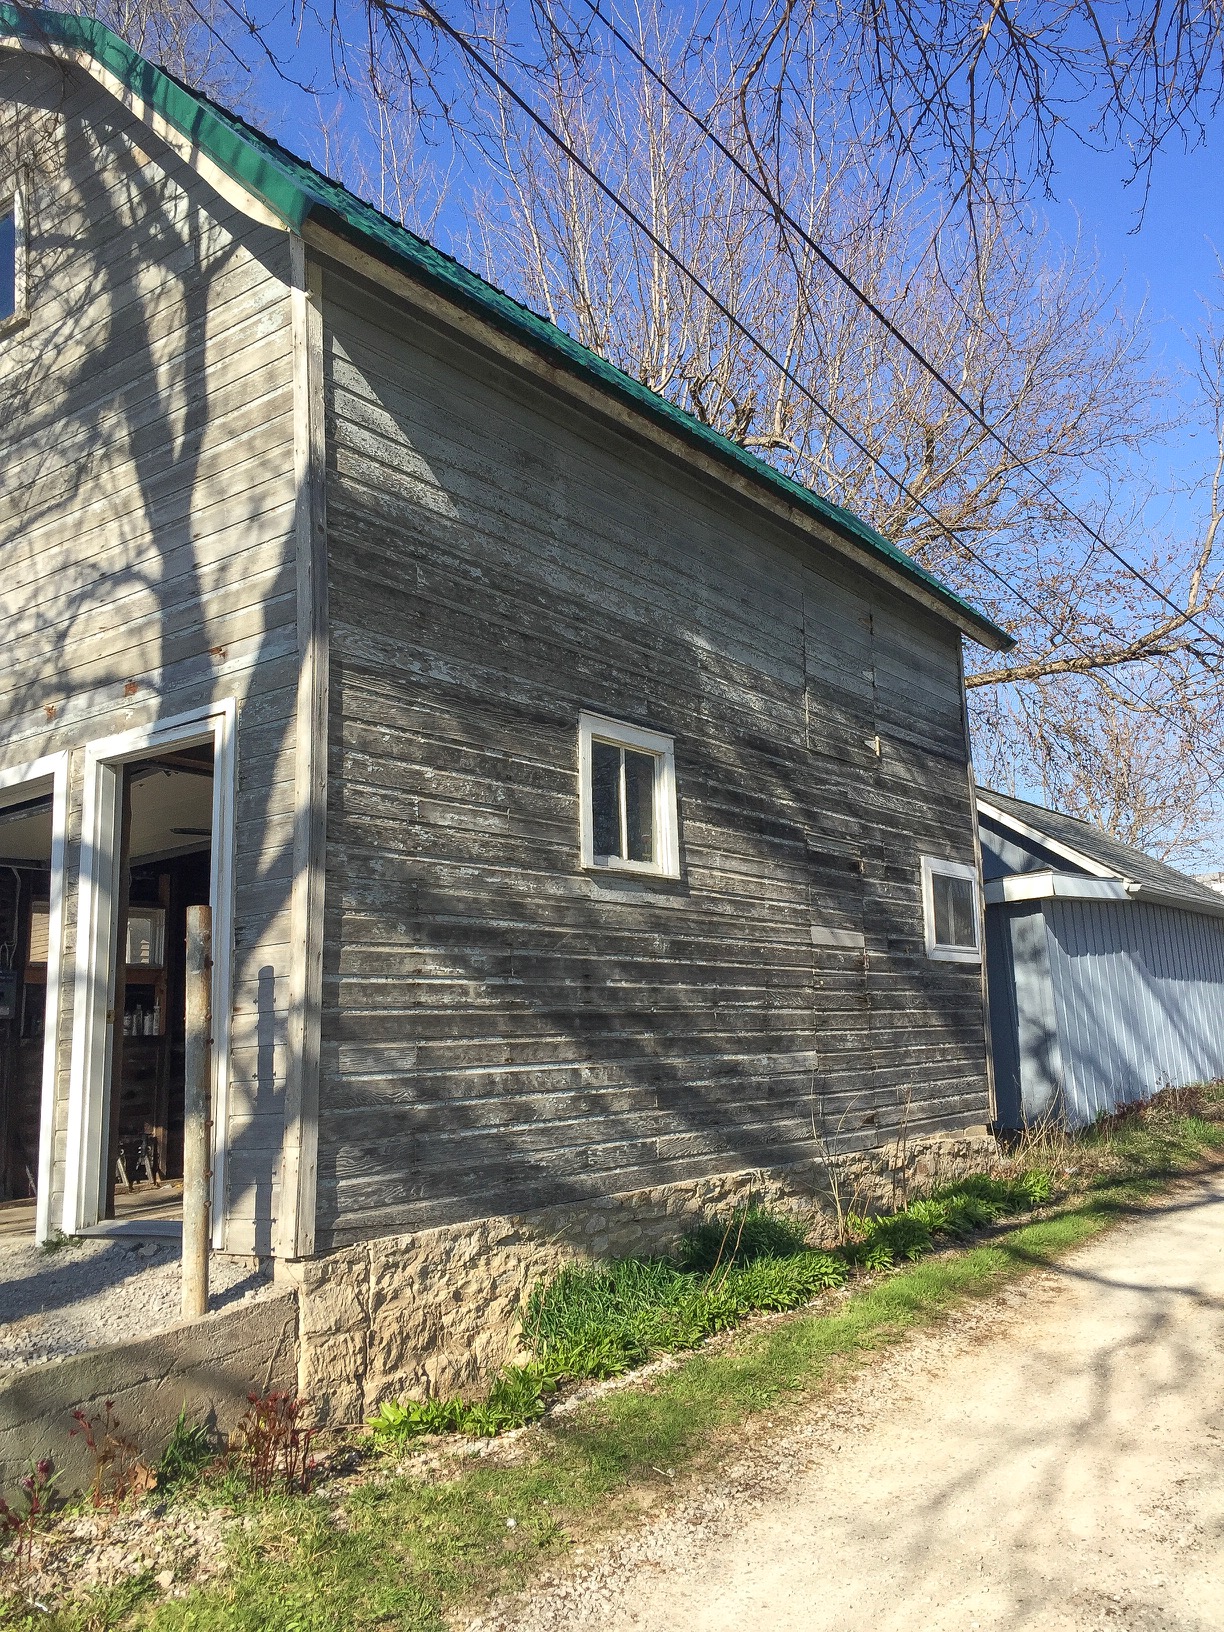
The wind damage is not visible from this angle, but this building had such a lean to it that it was no longer safe. I did venture inside for a quick photo of the ceiling, which served as the flooring for the loft area and appeared to have already been re-purposed.
Here is the photo :

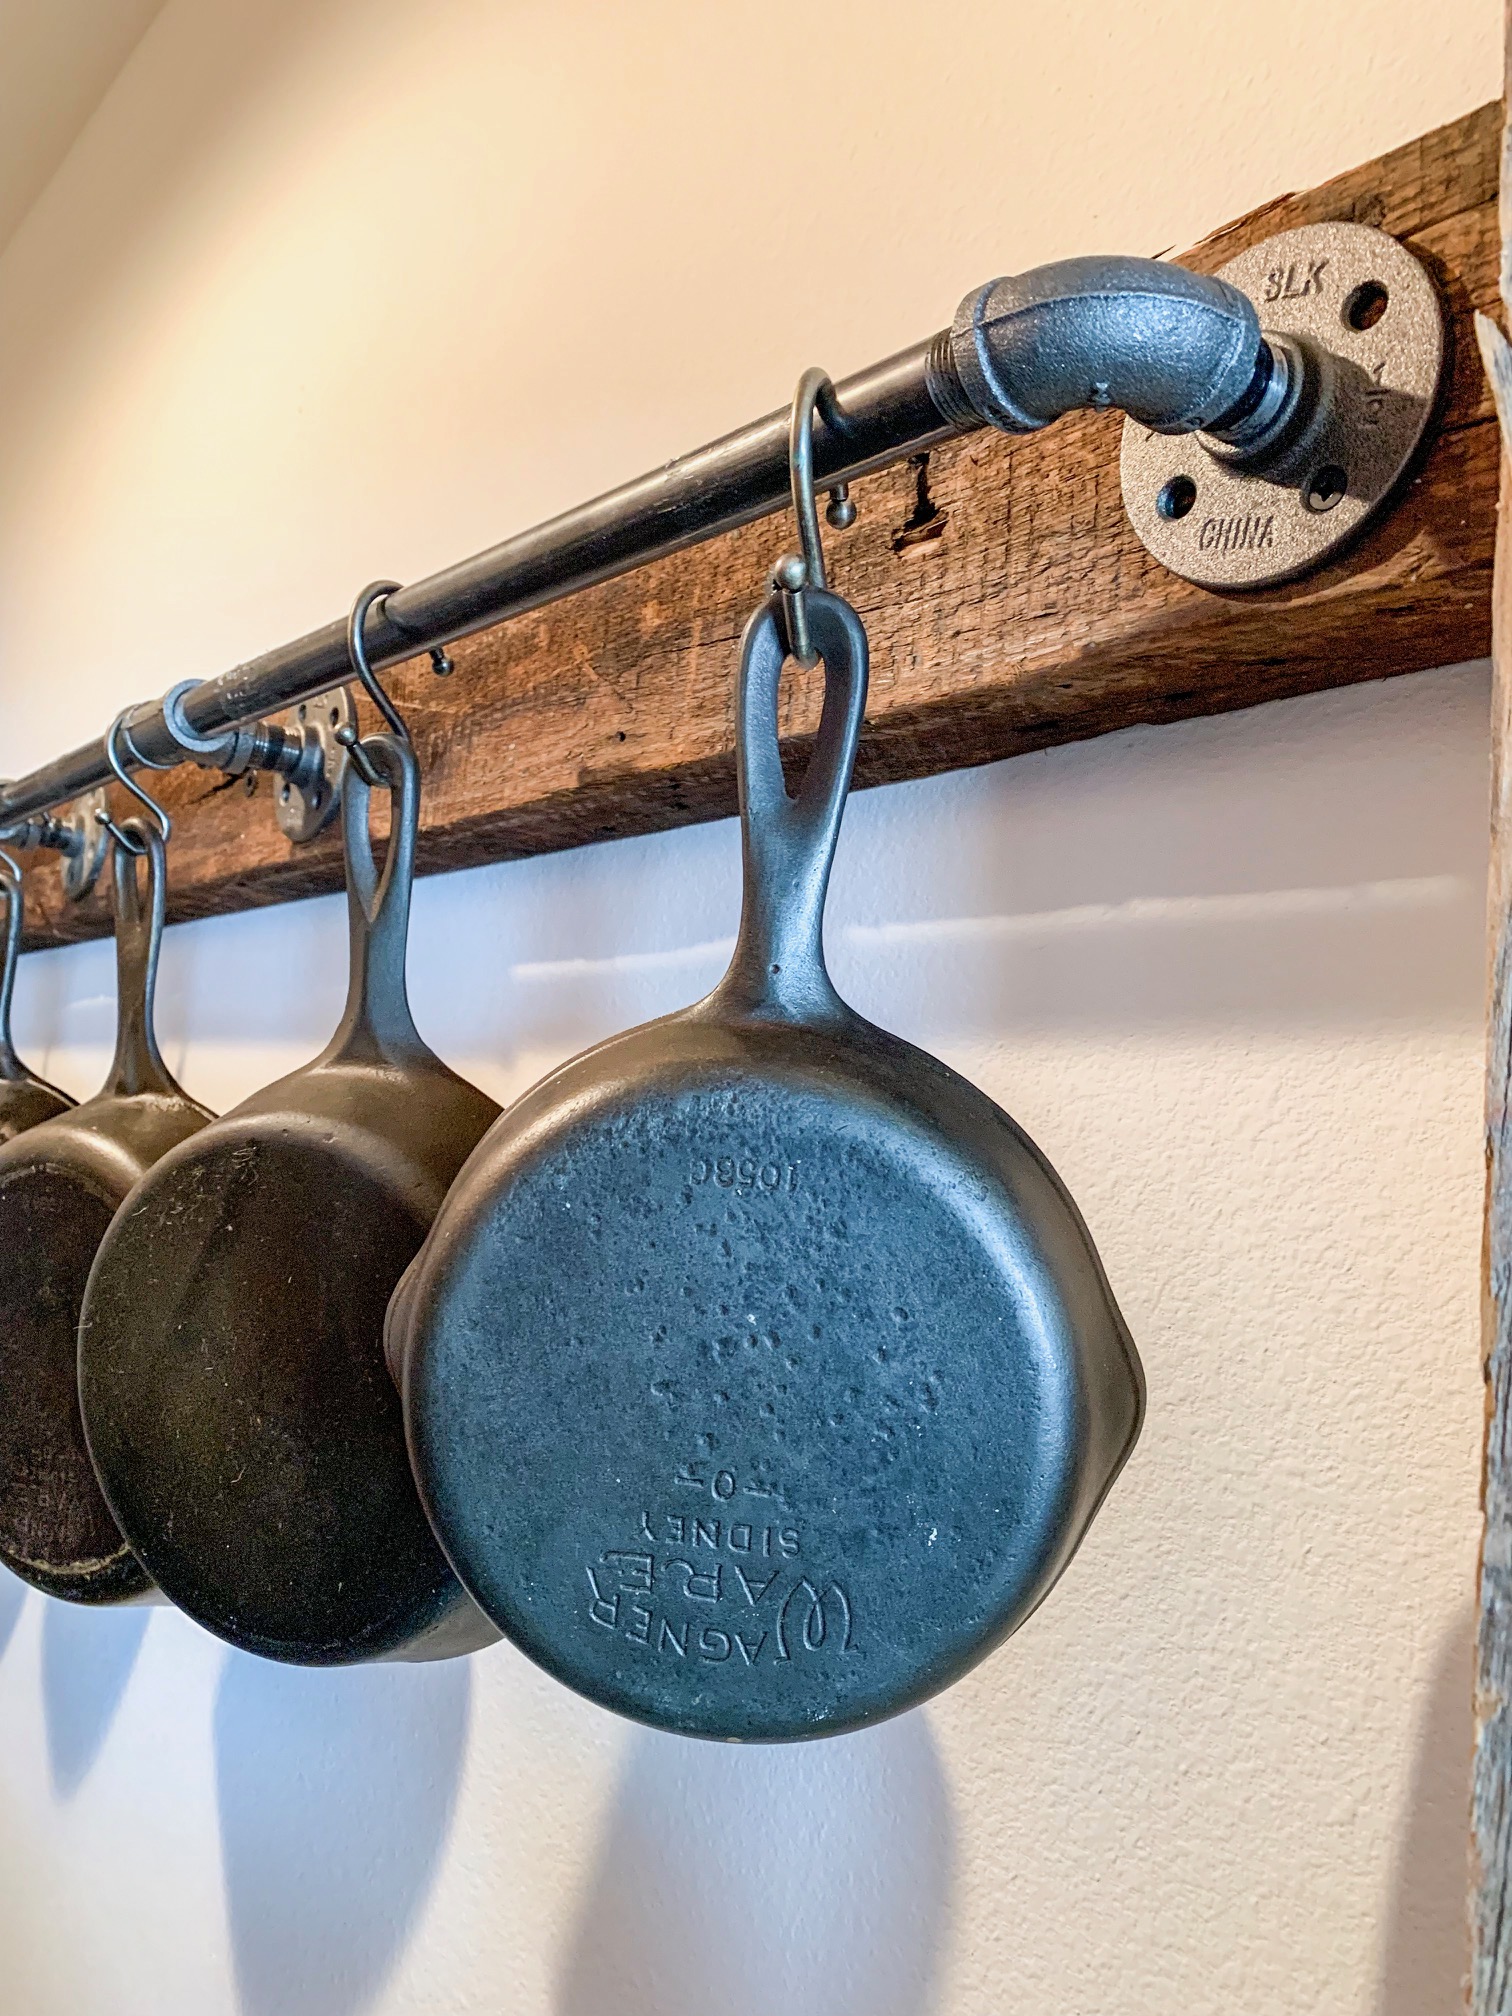
We tore down the entire structure and have reused the materials to make all sorts of things. For example, these 2x4 beams (shown horizontal in photo) are what we use to make our custom farm tables and gas pipe shelving units. Now there’s some history to talk about at the dinner table!

This next photo isn’t the best quality, but it’s an action shot of Adam cleaning out the second story of the structure before demolition could begin. Side note: this door that you see is often featured on my front porch!
Unfortunately, I do not have a photo of our pantry door before it was removed, but it served as the door between the first and second floor, as a ‘hatch’ of sorts at the top of the stairs. The metal ring on the front of the door was used to pull it open from the second story. I lifted the ring on the next photo so you could see what I am talking about. The hinges are also original hardware.

We attached the door, using the original hinges, to the custom frame we had built with unaltered barn wood we had previously obtained from a different structure. I really enjoy the barn wood door frame in it’s original state, showing nail holes and chipped paint of both red and white.

Well, there you have it! I hope this post answered your questions and provided a bit of history along the way. As always, thanks for stopping by the blog today and I look forward to interacting with you again soon!

Entryway Table Refresh
Hi there! I’m writing to you from a cold and rainy day here in Iowa, but it’s just for one day so I can handle it. If you follow me on Instagram, you know I have been stalking my plants to see when they will come out of the ground and they have made some progress the last couple of days! There is finally hard evidence we are at the end of this epic long winter, and all this anticipation just makes it that much more enjoyable. It’s seriously like Christmas for me, I cannot wait until the weather permits me to be outside full time.
In celebration of all things spring, its time to refresh the entryway saw horse table. I’m not sure why I dread styling this table, maybe because it is such a focal point to the interior of my home and I always want it to be perfect. Or it could be that I just need more things in the epic huge entryway so it doesn’t seem like it’s the only thing to look at. EITHER WAY, I tackled it yesterday and wanted to share it with you all.
As you know, I usually divide this long table into sections, which I highly recommend if you are trying to style a large piece. My husband Adam always pokes fun at me moving things around 100x until I get them right, but if I start small and build on it then this usually eliminates at least 50% of the rearranging. Anyway, here’s the first section I completed, which is the left side of the table.
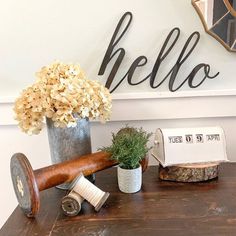
I went back and forth on using books in front of the large spool, a lot, but here’s the version without them. These are all things I gathered up around my house and took out of my decor stash. I am a firm believer that you don’t need to buy new things and spend a ton of money to decorate your home, just collect over time and reuse the same items.
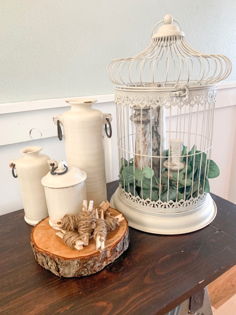
Here we have the right side of the table. I am a huge fan of this vintage birdcage and try to incorporate it into every season’s decor. Check out my post on the DIY clothespins here, if you want to make some of your own.
And here is a photo of the entire table! I moved the copper lanterns down below for this photo, but they are glass and not conducive to being played with by a 1 year old, so they had to be moved out of reach. I am happy with how this table turned out and now I need the weather to cooperate so I can give some spring vibes to the front porch.
Soon. Very soon.
Until then, I want to thank you for stopping by the blog today and I hope you were able to gleam some inspiration for your own homes. I’m off to finish my list before nap time is over!

Homemade Dog Food
Disclaimer: I suggest you consult your pet’s veterinarian (as I am not one) to determine the best food for your dog’s breed, activity, etc.
I’m changing it up a bit for today’s post….let’s talk food. Dog food to be specific!
Recently, I have been paying close attention to the chemicals and preservatives found in food and how they can have adverse health affects. While reflecting on my family’s grocery list and meal habits, I couldn’t help but notice that we feed our dogs dry processed kibble, which seemed to represent everything I was trying to avoid consuming myself. Why couldn’t I extend these healthy eating habits to the canine members of our family as well? How would I go about doing that?
There seem’s to be a meal delivery plan for every lifestyle and diet these days, and dog food is no exception. While having fresh dog food delivered each week in perfectly portioned bags would be nice, I found out it comes along with a significant cost, and a bit more inconvenience on my end. With extreme heat and cold here in the Midwest, I would need to make sure someone would be home to receive the shipments each week and that would be nearly impossible.

Boat ride!

Sometimes you just need carried around!
Also, our dogs are used to eating ‘free choice’ (they have a bowl filled each night and choose when they want to eat during the day), which would have to change to them being fed twice a day, and while doable it would be an added task. We already fed them a very high quality dry food, they appear to have no allergies and also no issues with digestion. I knew there had to be a budget friendly way to incorporate fresh food into their diet, and that idea started a path down a Pinterest rabbit hole.
After reading several articles, recipes, and suggestions, I came up with my own dog food recipe and I have used it for the past three weeks. I didn’t want to cut out their dry food completely, as I am sure there are some added vitamins/minerals/proteins that they need from it. Instead, I simply give them one bag of homemade food once per day, on top of their free choice dog food (each bag is about 1.5ish cups). Here is what I have found so far:
1) Our dogs love the taste, and it fills them up! They are eating significantly less dry food, which means less cost!
2) They drink less water, which is normal, since they are eating less dry food.
3) They remain VERY active, and continue to have no issues with allergies or digestion.


The Recipe!
This is a very easy recipe, substitute with whatever you have on hand, just google to see if it is healthy for your pet first (again, I am not a pet health expert).
You will need:
1 pound ground beef (I sometimes substitute a beef/deer mix)
1 can kidney beans
1 1/2 cups frozen peas
2 cups uncooked brown rice
4 large carrots, sliced
2 sweet potatoes, cut into 1in chunks
4.5 cups water
Add everything to a crock pot and mix well. Cook on high for 5 to 6 hours, stirring occasionally. Let cool completely and portion into baggies, I use one heaping cup per bag which is probably closer to 1.5 cups. Toss in the fridge until you are ready to serve, or make a large batch and store in the freezer. This recipe makes around 12 servings, which lasts just under a week between my two dogs.

Start

Finish

Bagged up!
And there you have it, my simple and budget friendly homemade dog food recipe! Feel free to pin this post for later use, and as always, thanks for stopping by the blog today!

How To Clean Up Your Vintage Glass Bottles
Today I am writing from SUNNY and WARM (ish) Iowa! I can’t tell you how excited I am to not have to brace my face for the cold every time I open a door. Today’s post goes along with all things ‘spring cleaning’ which is the theme at my house these days! We have been doing all those yearly tasks, cleaning out dryer vents and bathroom fan motors…safety first!
If you have been following along you know I love everything budget friendly, and therefore I find a lot of my decor pieces at thrift shops. I love the hunt for a good deal, and I recently came across a collection of medicine bottles and many were marked $1 . I have a plan to display them in my bathroom (after I re-paint it) and while I love the look of vintage bottles, I noticed some of these had a residue or film on the inside that was taking away from the look.
After a little research, and some trial and error, I came up with a fairly simple method to cleaning some of the residue out of the bottles that didn’t use any harsh chemicals and also didn’t damage them. The end result was not a sparkling clean look, but it’s better than where we started!
Here are a couple before photos to show you what I was working with…

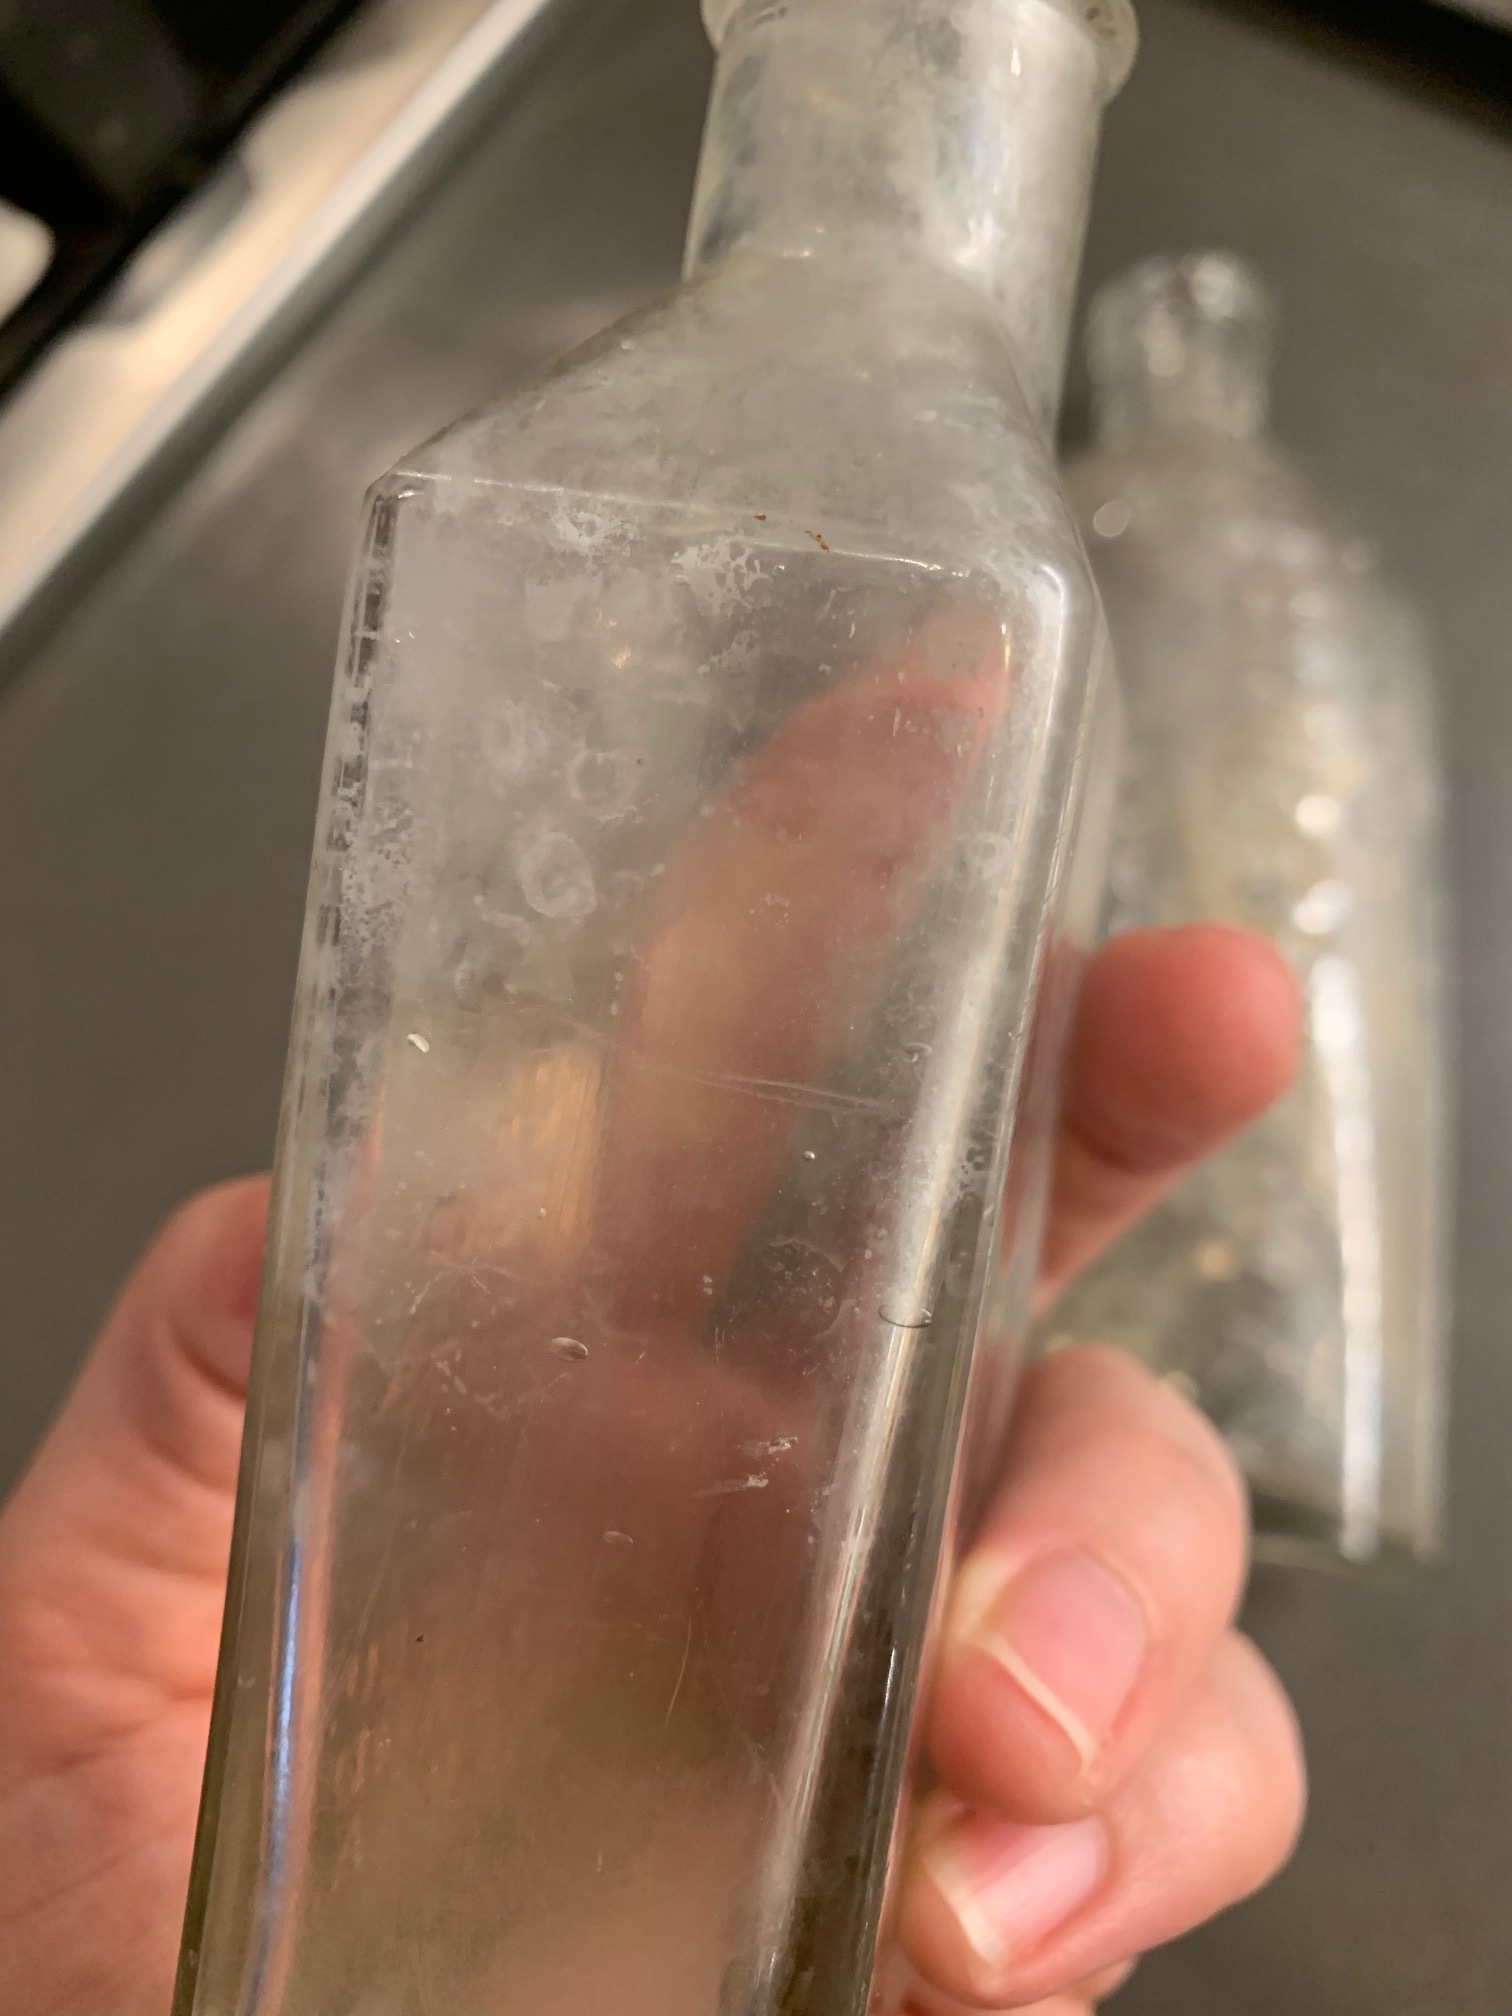
As you can see there was quite a bit of buildup on the inside of these bottles, and it was taking away from their appearance. Here is how I cleaned them up:
Fill them half way with warm water and other half white vinegar
Let them sit on the counter for 24 hours
Rinse well
Fill them completely with white vinegar
Let them sit for another 24 hours
Rinse well and dry
You could repeat this process as many times as you wish to achieve your desired result.
Here are the after photos…again they are not perfect but definitely an improvement!


These bottles are now ready to be added to my collection that I’m working on for the spare bathroom, and of course I will share that cabinet and collection when I get it completed. Now that the weather is nicer, we have been working outside most days but I will find time for the indoor projects again soon!
As always, thanks for stopping by the blog today, and feel free to pin this post for later use!

The Easiest Decor DIY Ever!
Hi there! I’m writing to you from sunny Iowa, and while 40 degrees might not be warm where you are from, it’s certainly a welcomed sight in this region! Today I have a super easy and quick DIY ready for you, perfect for filling in those small spaces in your home.
You will need:
Twine
Clothespins
Scissors
That’s it!
Let’s get to it!

I picked up these clothespins and twine from Lowes